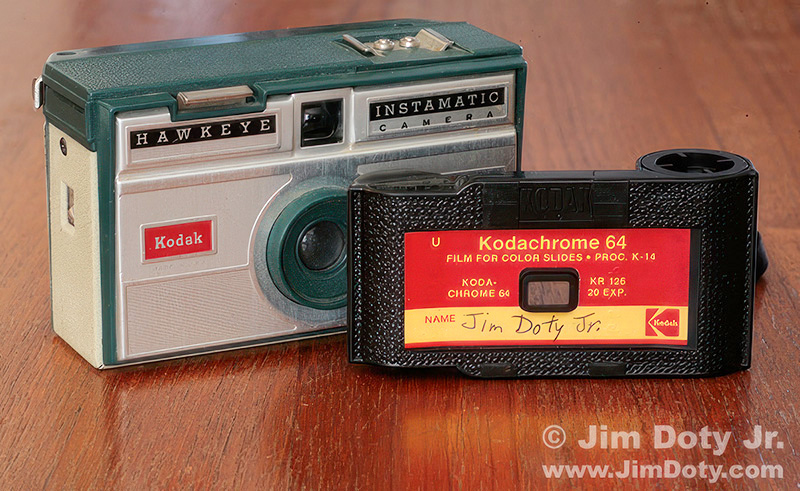
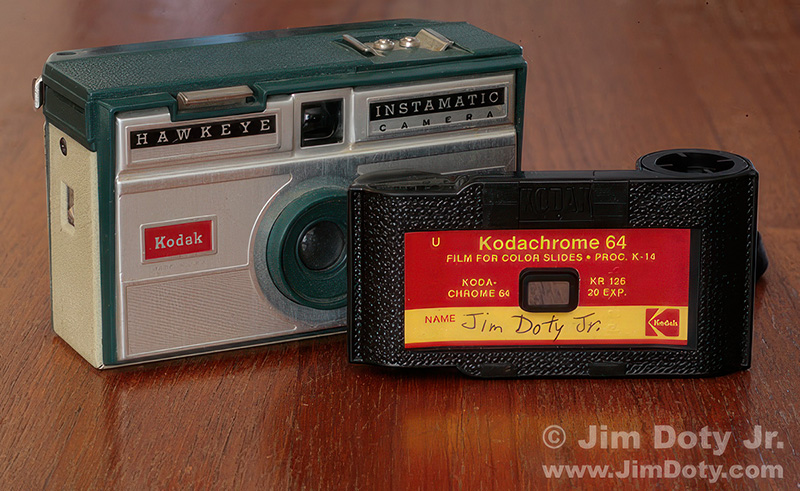
Digital Photo magazine wrote an article on the top three ring lights for 2021. Ring lights are more flattering since they minimize shadows. And these are reasonably priced.
Welcome to my online buying guide for photographers. With over 75 articles it is one of the most comprehensive buyer’s guides on the web.
I get lots of photo questions, and many of them begin with “What is the best . . . .” They usually come from photographers or someone who is shopping for a photographer.
My “best of the best” series recommends the best photo gear, accessories, software, books, DVDs, online photo labs, and a whole lot more. Thanks to the information in these articles I get emails from photographers thanking me for saving them time, frustration, and a lot of money.
I just purchased the Sky-Watcher Star Adventurer 2i. I read several comparison articles before making my choice. I put it through its paces and decided to write a review with a basic introduction as to how to use it. Not only does it work, it works very well. This photo of the Andromeda Galaxy was taken on my first night out with clear skies.
Really Right Stuff makes an excellent, simple to use panorama set up that won’t take up a lot of room in your camera bag. After using bigger, more awkward panorama gear, switching to Really Right Stuff’s set up was like being in panorama heaven. It is compatible with the Arca-Swiss-System.
Put a camera on a tripod and take a picture of the night sky. If the shutter speed is too long the stars begin to streak due to the rotation of the earth. A star tracker compensates for that rotation. A quality star tracker will extend your shutter speeds from seconds to several minutes so you can capture more detail in your night sky photos. A star tracker is the best way to do long exposures of the night sky without going to the time, trouble, learning curve, and high dollar expense of doing guided photography with a telescope.
You would love to take beautiful, long exposures of the night sky, but even with a 24mm wide angle lens the stars start to streak with exposures longer than 20 seconds. And with a 300mm lens the stars start to steak after just 2 seconds. Not that long ago it would cost you well over $1,000 to buy the equipment that would follow the stars and allow you to take longer exposures.
You need help. You can barely move. You are far enough from the trail that no one can hear your voice. You have no cell phone signal. What do you do?
Every now and then you hear tragic stories about people who lose their lives simply because they didn’t have a cell phone signal and couldn’t call for help in an unexpected emergency. A $260 – $340 satellite communicator would have saved their lives.
Your camera falls down a mountainside or off a cliff. An unexpected rogue wave drenches your valuable photo gear in salt water. Your photo backpack is stolen from your home, motel room, or trunk of your car. To add insult to injury, you learn your homeowner’s insurance will not replace the value of your damaged or stolen gear.
If you have precious slides, negatives, or prints that you want to scan, you have come to the right place. Choose wisely from the scanners that are available or you could get burned. A scanner that might be just fine for one person will be totally unsuitable for the next person. When it comes to scanners you need to know what you are getting and, just as importantly, what you aren’t getting. That is what this article is all about.
CamRanger provides wireless image transfer from your camera to your laptop or smartphone. CamRanger also give you wireless control of your camera with your smart phone or laptop.
A red headlamp is an essential tool for night photography. Before you rush out and buy one, make sure it has the most essential feature (other than the red LED). Some inexpensive headlamps have this feature and some very expensive ones don’t, so cost is not the issue.
There’s no question that in some complex metering situations, an incident light meter can be quicker, faster, simpler, and more accurate than the meter in your camera. Many incident light meters can also measure light from an electronic flash, a huge bonus when you are using a flash in the manual mode.
Photographers are always looking for ways to soften the light when doing portraits. The light from an accessory flash can be quite harsh so there are a wide range of modifiers to soften the light for more pleasing portraits. Here are my favorites for both on-camera and off-camera flash.
If I am visiting family and friends and traveling by car, I often bring my “studio in a backpack”. I never know when I might be asked to do some portraits and having some studio gear along helps create better images (especially when natural light is not a very good option). If you want to do portraits on the road (or even at home), these items are very useful. You can order these items from Amazon via the link at the end of this article.
For the best combination of quality and price, it is hard to beat AlienBees studio lights. I’ve been using AlienBees in my studio for over 15 years, and like so many other photographers, I’ve been singing their praises. It would be hard to find the same quality for less money.
Should you spend $499 on a Canon 600EX-RT speedlite, or $138 on Yongnuo’s nearly identical clone, the YN600EX-RT? And what about the radio transmitters? Canon’s is $285 and the Yongnuo copy is $95. So you can buy three Yongnuo speedlites plus the radio transmitter ($509) for a few dollars more than the price of one Canon speedlite. The price advantage is clear, but what about quality, reliability, and service issues?
There are lots of advantages to getting your flash off the camera, and it is probably much less expensive than you think. If you already have a shoe mount speedlite and if your camera has a built in pop up flash a simple $50 optical slave (see below) is all you need to get your flash off the camera.
Twelve articles (links below) to get you started with off-camera flash. The equipment you will need and how to use it.
Getting your flash off the camera opens up a whole new world of photographic possibilities. And the really good news: the equipment is way less expensive than it used to be. If you are ready to get started, I just finished writing (or re-writing) a series of articles on off-camera flash that covers the equipment you will need and shows you how to use it.
If you aren’t careful, you could end up with a fake RØDE Microphone. If you already bought one, here’s how to tell if it is fake. If you don’t have a RØDE mic, here’s how to avoid buying a fake.
Let’s face it. While many recent DLSRs, ILCs and smartphones can give you excellent visual quality in the videos, the sound quality of the built in microphone leaves a lot to be desired. For a modest amount of money you can bring the sound quality up to par with the visual quality. That is why video mic sales have exploded.
A good tripod head will save you lots of frustration. For still photography I recommend two types of tripod heads. If you do a little of everything you will want a quality ball head for the quick and easy aiming of the camera. If you only do landscape or architectural photography and you want precise separate controls in each axis of motion, you will want a 3-way head.
There are several ways to do closeup photography. Closeup filters, extension tubes, and macro lenses are the most commonly used options. The best gear for you depends on your preferences, how you want to work, the subjects you are after, how much stuff you want to carry, and how much you want to spend. I cover your best options.
A lot of photographers have discovered their almost sharp lens was actually a very sharp lens once they tweaked the micro-adjustment settings. You will get sharper images if you adjust the settings for your specific camera and lens combinations. You do this using the micro-adjustment settings in the camera menu along with a lens calibration tool which you can buy or make yourself.
The ads started showing up on FaceBook all the time. They talk about wonderful lenses that will turn your smart phone into a camera that is better than a DSLR costing thousands of dollars. They brag about German engineering, a NASA optical formula, or the testing that proves their lenses are better than expensive lenses from Nikon, Zeiss, Leica, or Canon. The names of the companies change on a regular basis, but the scam is the same. Sad to say, a lot of people actually fall for this nonsense.
Water, sand, and grit can wreak havoc with ordinary cameras, so unless you have a waterproof case for your camera (more about that later), your best bet is to get a rugged, waterproof camera for underwater and the beach. This is especially true if you are around salt water.
Looking for a small, mountable, “ideal for sports and action”, inexpensive, high definition video and still camera with a waterproof housing and image quality that Lucasfilm (the Star Wars people) calls “amazing”? This camera will go anywhere and mount just about anywhere. Prices range from $198 to $399 (which is a lot less than your typical DSLR with HiDef video).
Do you want to buy a Canon DSLR and/or lenses on a budget? Is video quality important to you? This article is for you.