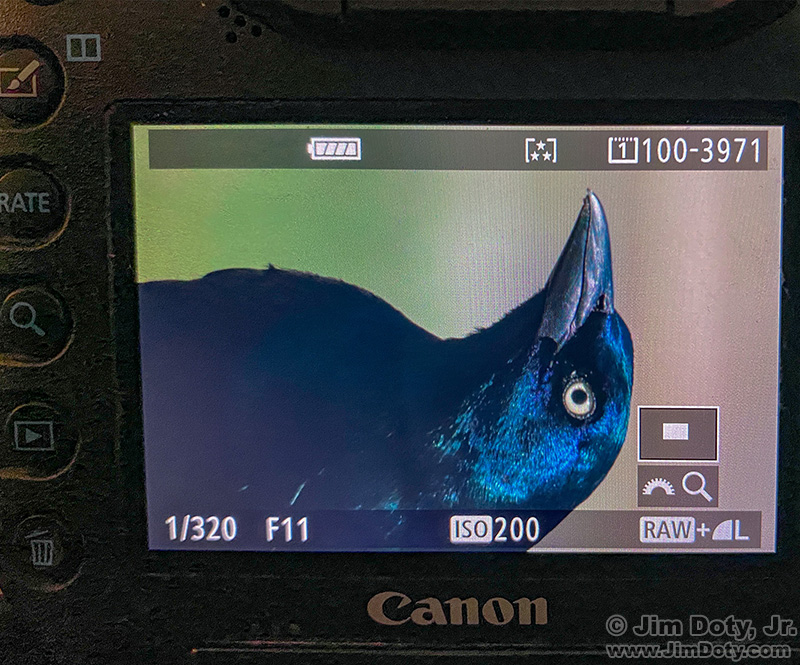
It is simple to rate photos in your camera, provided you have a rate button. (Later on I will tell you what to do if you don’t have a rate button.) If you take a photo you want to find quickly when you download the memory card, just push the rate button. When you download the photos on your memory card you can use Adobe Bridge (more about Bridge later) to quickly find your rated photos.
Originally posted March 18, 2024. Updated January 2, 2026.
Using the Rate Button
For the last couple of days I’ve been trying to get a really sharp photo of a Grackle, but they are so quick and move around so much, it has been harder than I thought. This morning it finally happened. I zoomed in on several photos on the back of my camera and this one is the best of the bunch. I pushed the RATE button (upper left) three times and three little stars showed up at the top of the LCD to tell me how I rated the photo. If I keep pushing the rate button it goes up to 5 stars and then goes back to zero stars (unrated). You can also see my camera settings: 1/320 second, f/11, and ISO 200.
When you rate photos you can give them anywhere from 1 to 5 stars, which is the metadata standard, but I pretty much stick to three. My best photos get 3 stars, and all the rest usually have zero stars which means they are “unrated”. Other kinds of software that read metadata with show you the star ratings for your photos, but not all of that software can do a virtually instant search using the star ratings.
I don’t rate all of my best photos in the camera. I usually do that on the computer using Adobe Bridge. But every once in a while I take a picture, like the Grackle image, and I say to myself, “I want to find this photo right away when I download this memory card.”
If I am using Bridge to go through 100-200 photos of band concert or a dance recital to find photos for the local newspaper, I will quickly go through all of the photos and give the best photos one star. Then I have Bridge show me just the one star photos. I go through the one star photos more slowly to pick out the very best for paper and give them 3 stars. I might end up with 15-25 one star photos the first time through, and then change only 6-10 of them into 3 star photos for the paper.
Finding Star Rated Photos
After I download the memory card using Adobe Bridge software (which is a free download), I can just click on the 3 star icon in Bridge and Bridge will show me only the photos with 3 stars. I can quickly find my best photos (3 stars) without having to look through hundreds of photos, one at a time.
What If You Don’t Have a Rate Button?
What if your camera doesn’t have a rate button? Here’s a simple hack you can use. After you take a great photo which you want to find quickly, immediately after taking the great photo, take a photo of your hand. When you go though your photos, look for the photos just prior to the photos of your hand. What if your great photo isn’t the most recent? What if it is three photos back? Take a photo of your hand with three fingers up. When you download your photos and see a photo of three fingers, go three photos back from the photo of three fingers. What if the great photo is more than 5 photos back? Not to worry. I’m not going to suggest you photograph fingers and toes. You can always write down the photo number. Carry a pen and a 3×5 card in your pocket or a small notebook in your camera bag or car when you are out shooting.
I almost always have a pen and 3×5 card with me, and another pen and a notebook in my backpack or car. I was on a location shoot with a model. After a series of photos, we got back in the car and we went through the photos on the back of the camera. Whenever she said “I really love this one,” I wrote down the number of the photo.
Adobe Bridge
Adobe Bridge can download photos into folders arranged by date. You can use Adobe Bridge to rename your photos and add keywords to your photos. Once keyworded, you can use Bridge to search for photos by keyword. You just click on a keyword and all of the photos with that keyword show up in less than a second. If I want to find all of my elk photos, I just click on the elk keyword and there they are. If I want to narrow that down, I can search for elk+Colorado, or elk+Banff, and in less than a second I can see all of my photos of elk in Colorado or elk in Banff.
I wrote a series of “how to” articles on using Bridge. Check the link below.
Link
How To Series: Adventures with Adobe Bridge – learn all the basics of Adobe Bridge

