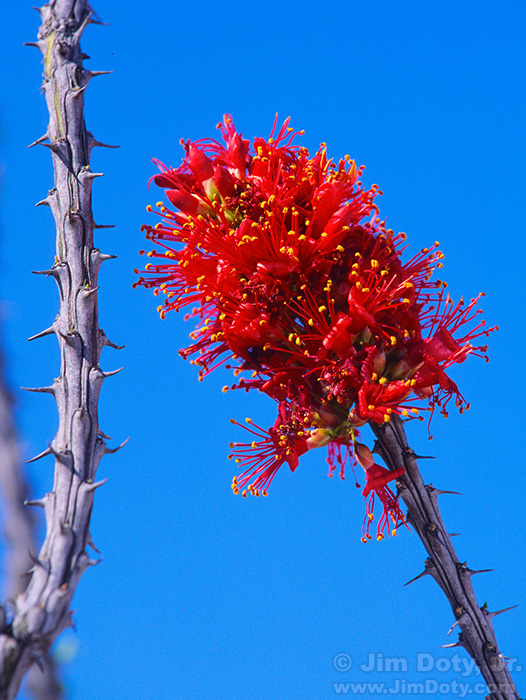
Should you join the growing number of photographers who “geotag” their photos (add GPS data). How do you do it? Are there times you shouldn’t?
Originally posted Jan. 28, 2016. Revised and re-posted Feb. 2, 2017.
Should you join the growing number of photographers who “geotag” their photos (add GPS data). How do you do it? Are there times you shouldn’t?
Originally posted Jan. 28, 2016. Revised and re-posted Feb. 2, 2017.
I was on S. Hantz Road east of Rudyard, Michigan looking for Snowy Owls. According to eBird there had been several recent Snowy Owl sightings in the area, but no owl was to be found the day I was there. Another photographer I met didn’t have any luck either. I had three GPS enabled cameras with me, counting my phone, so with no owls in sight I decided to compare the accuracy of the GPS units.
Originally posted Jan. 31, 2017. Revised and expanded Feb. 19, 2017.
Today (Mar 18, 2014) I was asked by a client where I was when I took some photos in Banff National Park. I was able to provide him with the exact locations, complete with marked satellite images. It is a good idea to known where you were when you created your most important images, and the more specific the information the better. It is good info to have for your own use and sometimes it can make the difference between whether or not one of your images is published.
Originally posted Mar. 18, 2014. Updated and re-posted Jan. 30, 2017.
I had a serious problem with Adobe Bridge freezing on start up. It was totally unresponsive on my MacBook Air. The only way I could close Bridge to remove it from hiding my desktop was to hold down the power button until my laptop shut down.
The national parks in the U.S. and Canada are natural, environmental, and photographic treasures. They are high on the list of preferred destinations for professional and amateur photographers alike. To help you show up at right places at the best times to create beautiful images, I put together this ongoing series of articles.
Posted January 22, 2017. Most recent update: September 10, 2025. Continue reading
Planning a trip to photograph some of our national parks? You will get better images if you visit a national park at its prime season of the year. But when is each park at its very best? And how about great locations that aren’t in the national parks? This article has answers.
Posted January 18, 2017. Updated February 10, 2018.
We’ve been down this road before. The formula is simple. Take a cheap smart phone telephoto lens you can buy at Amazon for $15, sell it for $54.95, say it is a limited half price offer, and imply the lens will do amazing things that every well informed photographer knows the cheap lens absolutely can’t do.
Posted Jan. 8, 2017. Expanded Dec. 2, 2017.
I am planning a winter photography trip to some U.S. national parks, some of which I haven’t been to before. So I am narrowing down my choices to fit the time I have. My search is what led to the advice in this article. I recommend you also read The Best National Parks to Photograph in Winter.
Posted January 17, 2017. Updated Jan. 3, 2018.
Winter provides some wonderful photo opportunities in our national parks. So if you haven’t gone into hibernation for the winter, here are the best national parks to go photograph this winter, grouped by state from the west to the east. There are a few bonus locations thrown in too. At the end I give you my “best of the best” list.
Posted Jan. 17, 2017. Updated Jan. 3, 2018.
I grew up in Colorado where strange weather can strand you in any month of the year. Even though it is rare, I’ve seen blizzards in the high country in July. So I learned to carry some safety essentials when doing winter photography in remote locations. You never know when you might be stranded for several hours, a whole day, or longer, until the blizzard abates and someone can come find you. This is what I carry in my car pretty much year around but especially in the winter. I include a few winter travel tips, too.
Camera LCD Display With The Blinkies Turned On. Washed out pixels in the photo are flashing white and black.
Some camera’s come with a highlight overexposure warning, commonly called “the blinkies”. If you have overexposed, blown out pixels, those pixels in your image will flash white and black. A quick look at the LCD image will tell you if part of your image has white, washed out, featureless pixels. If your camera has a highlight overexposure warning, I suggest you turn it on. If you see the blinkies and you don’t want washed out pixels, tone down your exposure until the blinkies go away.
The full seventeen minute speech is here.
The most important and difficult step in night photography is to focus your lens at infinity. If you have tried to focus on the stars at night you have already learned that it is an impossible task for the autofocus system and just about impossible for you to do manually. You just can’t see clearly enough through the viewfinder in the dark of night to manually focus on the stars. Fortunately, there are some ways to get the job done.
Originally posted Jan. 8, 2017. Revised and expanded Feb. 10, 2017.
It’s that time of year. I downloaded a bunch of holiday photos and it’s also time to check on my overall backup plan.
It is difficult enough to create a beautiful nude image under normal circumstances, much less in the cold and snow. You need to bring some significant skills and experience to the task. So does your model.
You would think a windchill of 4° Fahrenheit (-16°C) would be too cold for a photo shoot, but not with some models. We booked this January shoot weeks in advance so we knew it would be cold, but we had no idea how cold until the day arrived. Here’s the story behind this image and how to work with a model when it is so cold.
The Sunny f16 rule is really useful on bright sunny days in the spring, summer, and fall, but you can’t rely on it on bright, snowy winter days. It will often lead you astray. There are much more accurate ways to meter in the winter.
Twilight, Rocky Mountain National Park. Sirius, Canis Major, Orion, Taurus, the Hyades star cluster, and the Pleiades star cluster are all visible in the fading light. Click for a larger version.
You can photograph the night sky year around, but winter brings an added bonus: SNOW! When you don’t have the benefit of moonlight, most of the year land forms a dark to black silhouetted skyline against the night sky. In winter you have the possibility of including the highly reflective snow. You can see both in this photo. Any place not covered with snow is very dark to black. Having reflective snow is why winter is the favorite time of year for a lot of photographers to go out and photograph the night sky.
Just like metering daytime winter scenes, the key to metering evening winter scenes is knowing what to meter and deciding how much exposure compensation to use.
Most wildlife are medium to dark in tone, making them a challenge to meter properly in the bright, white tones of winter. If you trust one of your camera’s automatic exposure modes, the odds are good you won’t get the best exposure. If you switch over to manual exposure and make the right decisions, you can get great exposures and better quality photos (more about that later).
Metering dark toned wildlife in the snow is a major exposure challenge. It is usually best to avoid large “burned out” areas (washed out, featureless white) in a nature or landscape photograph, but with properly exposed snow, the wildlife can be so dark as to lose all texture. On other hand, metering for the wildlife can burn out the snow. So what do you do?
The white snow in a winter scene can and often does fool a camera meter into underexposing a portrait, so here are the steps to take to get the right exposure. I throw in a few portrait suggestions too.
Metering for scenes with a lot of snow can be tricky since the bright snow fools the camera meter. I see a lot of winter photos with gray snow, which means the camera meter did exactly what it was designed to do and the camera owner didn’t know how to use exposure compensation. The solution is quite simple provided you know what to do.
A pet saddleback tamarin hangs on to Yoina Mameria Nontsotega as the Matsigenka girl takes a dip in the Yomibato River, deep inside Peru’s ManuÌ National Park. Photo by Charlie Hamilton James.
Out of 2,290,225 photographs by 91 photographers, National Geographic picked the 52 best images of the year.
Roxy, one of the competitors in Top Photographer with Nigel Barker messed up and shot JPEG files in a once in a lifetime situation. Barker took her to task, waved his finger at her and said “Bad Photographer!” Why? Because RAW files have so many advantages over JPEG files.
CamRanger provides wireless image transfer from your Camera to your laptop or smartphone. CamRanger also give you wireless control of your camera with your smart phone or laptop.
Article posted Dec. 28, 2016. Updated Dec. 29, 2016.
Snow glistens in the last light of dusk.
Distant clouds glow with the fading light from the sun, long since set.
The photo abilities of smart phones have improved dramatically in the last few years, especially in low light situations. Just point your camera phone at the lights and click the shutter. Exposure can be a bit iffy. If the photo looks too light or too dark and your phone will allow you to alter the exposure, take advantage of that feature.