If your camera offers both RGB and luminance histograms, choose RGB. An RGB histogram is one of your most valuable exposure tools. A luminance histogram can lead to bad exposures and poor colors.

If your camera offers both RGB and luminance histograms, choose RGB. An RGB histogram is one of your most valuable exposure tools. A luminance histogram can lead to bad exposures and poor colors.
Last August I was in a back alley taking pictures against this brick wall. I liked the location and decided to come back and shoot here again. In August the light was pretty even. This time I needed to make some fill flash decisions.
If you write on your FB photography page about a famous Belgian singer (32 million records sold world wide and the best-selling Belgian female artist of all time), it is important to think about what you write. You never know when Lara Fabian might show up, read your post, and like it.
CWR Website The Film from Shervin Communications on Vimeo.
Life (and great photography) is about inspiration as much as it is about information. Whatever it is that moves you to do things is just as important as knowing how to do it. If you aren’t inspired, all the information in the world won’t help you very much. But if you are sufficiently inspired, you will move heaven and earth to find the information you need. It is about vision! This 22 minute video is about finding the kind of vision that inspires your life and your photography.
The colors you see in the movie theater are not the original colors that came out of the movie camera. It is rare that we get to see clips from a movie before they have been color graded. This is your chance. The difference is dramatic and impressive, as you will see in the video clips below.
Snow glistens in the last light of dusk.
Distant clouds glow with the fading light from the sun, long since set.
As I asked at the end of Part One in this two article series, “Why am I so attached to Mt. Ouray (and O’Haver Lake)?” The answer is simple. They have been part of my life for a long time.
Recently, two of my friends were flying from southern Colorado to Denver. They snapped this cell phone photo from their airplane and posted it online. I was quite taken with this photo for several reasons. My friends are two remarkable people, I love the Colorado Rockies, and Mt. Ouray (on the left) is special in my life.
Cold and snow can cause a lot of damage to your camera gear. The simple steps in this article could save you hundreds of dollars in repair bills.
Update: December 18, 2015. This series was revised and expanded last winter (January through March 2015) and I will update it again beginning in January 2016, but for some of you winter is NOW, so I am re-posting this set of links so you have them now.
Update: January 9, 2016. As of today five of articles have been revised and updated from last year’s versions. I have also written several new articles that are related to this series and included links. Over the next few days I will revise and update the rest of the articles. Stay tuned.
In addition to all of the usual photographic challenges, winter provides some extra complications, especially in terms of metering. So I began my series of articles on winter photography. This year I revised three prior articles and added six new ones. They will help you meet the unique challenges of winter photography. So read the articles, get out there, have fun, and create some stunning images!
My initial mission was to get a “normal” portrait of my four year old grandson in front of the Christmas tree. As often happens with young children, things went a little differently than I expected.
You have heard it said a lot, and maybe said it yourself: “This picture doesn’t do it justice.” That is often true and for several reasons. One is that digital cameras do not capture reality. No matter how fancy or inexpensive, digital cameras simply do not capture what your eyes see. That is also true with film cameras. All color photographic films have different color characteristics. Some have better reds, others have better greens or blues. Some are more saturated and others less saturated. But none of them are totally color realistic. Why don’t cameras give you realistic images and what can you do about it?
Note: This article has been updated here.
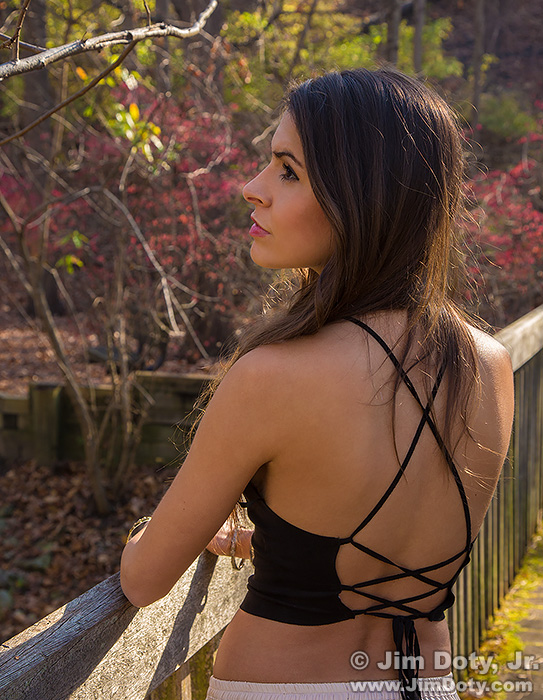
Kristina, a professional model based in L.A., wanted to schedule a photo shoot when she was in Ohio. She arrived right before I left Ohio on a trip, so we had only one day to work together. It was a bright, sunny day and bright sunlight is usually too harsh for good portraits, so we worked as much as possible in shady locations.
Nine years ago this evening, Sarah and I headed for downtown Columbus to do a Christmas photo shoot. We set up with the skyline in the background and I clicked the shutter for this image at 5:55 pm. I deliberately waited until the clock on my computer said 5:55 to post this article.
Posted December 13, 2015. Updated January 25, 2020.
Twelve articles (links below) to get you started with off-camera flash. The equipment you will need and how to use it.
Getting your flash off the camera opens up a whole new world of photographic possibilities. And the really good news: the equipment is way less expensive than it used to be. If you are ready to get started, I just finished writing (or re-writing) a series of articles on off-camera flash that covers the equipment you will need and shows you how to use it.
Off-camera flash can provide more pleasing light and a much more dramatic photograph than on-camera flash. Using two off-camera flash units provides even more dramatic lighting possibilities.
Off-camera flash is so useful because it gives you a different look from the millions of photos that are taken with the flash on the camera. The light can come from any direction you choose, no matter where your camera is, and the latest technology makes automatic flash exposure quick and reliable.
If I am using flash for an environmental portrait, I usually prefer having the flash off of the camera. In this portrait of Warren Stevens (program director and mid-day air personality at Magic 106.3 FM in Columbus), the flash is above Warren and to his right, providing a nice semi side-lit photograph. On camera flash is flat and even. Getting the flash off of the camera and moving it to the side provides more shape and texture to the subject.
There are several ways to do closeup photography. Closeup filters, extension tubes, and macro lenses are the most commonly used options. Each of them have advantages and disadvantages.
This is the last photo of a photo shoot that should have gone a little longer. But my camera broke. So many people kid about “if you take my picture it will break your camera” that I was tempted to say to her “You broke my camera!”
For the best combination of quality and price, it is hard to beat AlienBees studio lights. I’ve been using AlienBees in my studio (and on location) for 9 years, and like so many other photographers, I’ve been singing their praises. It would be hard to find the same quality for less money.
There are lots of advantages to getting your flash off the camera, and it is probably much less expensive than you think. If you shop wisely, you can get a radio transmitter for your camera plus an off-camera flash with a built in radio receiver, all for $111. A $20 adapter will mount the flash on your tripod. You are all set for only $131. If you want to soften the light, a 43 inch umbrella that mounts in the same adapter costs $22. So if you already have the camera and tripod, the whole off camera flash set up is only $153.
Photographers are always looking for ways to soften the light when doing portraits. The light from an accessory flash can be quite harsh so there are a wide range of modifiers to soften the light for more pleasing portraits. Here are my favorites.
Should you spend $469 on a Canon 600EX-RT speedlite, or $120 on Yongnuo’s nearly identical clone, the YN600EX-RT? And what about the radio transmitters? Canon’s is $285 and the Yongnuo copy is $88.00. So you can buy three Yongnuo speedlites plus the radio transmitter for less than the price of one Canon speedlite. The price advantage is clear, but what about quality, reliability, and service issues?
Posted Dec. 7, 2015. Updated Nov. 20, 2017.

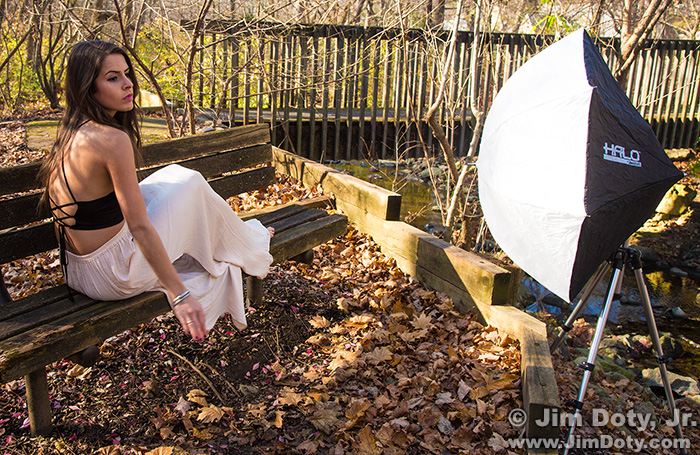
Kristina. Sunlight coming from the right. Halo softbox with Yongnuo speedlite providing light from the left.
After testing a Bob Davis 45 inch Halo Softbox and Yongnuo YN600EX-RT radio flash on my most available model (my dog), I needed to test it out on a real model. Opportunity called in the form of a message from Kristina, a professional model based in Los Angeles (and an absolute delight to work with). She would be in Ohio for Thanksgiving and she wanted to schedule a shoot. I was leaving town for Thanksgiving, but fortunately for us we had one day to shoot after she arrived and before I left.

Halo Softbox set up on location and ready to use. The radio controlled flash and umbrella adapter are inside the softbox.
If you have never used an umbrella adapter to put a flash and umbrella or softbox on a tripod or light stand, the steps below will show you exactly what is involved. If you have already used an umbrella adapter, setting up a Halo softbox will be ridiculously simple for you. Skip to the Halo section below.
If I am visiting family and friends and traveling by car, I usually bring my “studio in a backpack”. I never know when I might be asked to do some portraits and having some studio gear along helps create better images (especially when natural light is not a very good option). If you want to do portraits on the road, these items might be useful for you too.