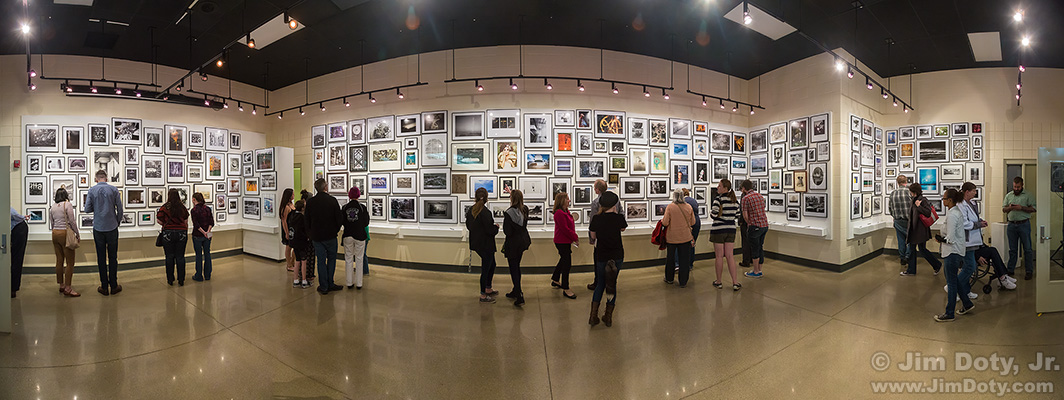
You can create panoramic images with ACR 9.0 and this article tells you how.
The really great news is you can now open RAW camera files, stitch them together with ACR 9.0 (Adobe Camera Raw version 9) and output the panorama as a RAW file in the Adobe DNG format. Why is this such a big deal? This means you can go back any time, re-open the RAW file and tweak it again with all the advantages of RAW image processing. It is also a huge time saver from when we had to process each individual RAW file, output it as a PSD or TIF file, and then stitch them all together. I will walk you through the process of creating a RAW pano with ACR.
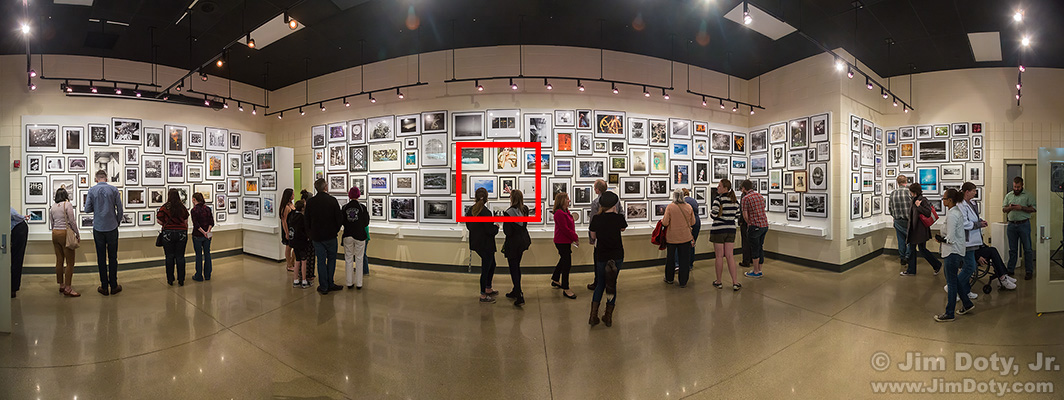
Adobe Camera Raw 9.0 (ACR) was released last week. I downloaded it as soon as it was available and grabbed my most recent set of “make a pano” images. In April I was at the Stivers School for the Arts photography exhibit and auction. Early in the evening I stitched eleven iPhone photos together with the Autostitch app and posted the panoramic image to Facebook while I was still at the auction. I posted the iPhone pano here. As much fun as a fast iPhone pano is, I knew some day I would want photos to create a higher resolution, higher quality pano of the auction.
Standing against the back wall of the gallery, I took 10 overlapping vertical images with my hand held DSLR. Together they gave me a 180 degree view of the whole gallery. I usually do this on a tripod but with people wandering around everywhere a tripod would have been too much of a hazard. ACR 9.0 gave me an excuse to drag out those images and create a RAW pano.
Note: Click on any of the screen captures and photos in this article to see a much larger version.
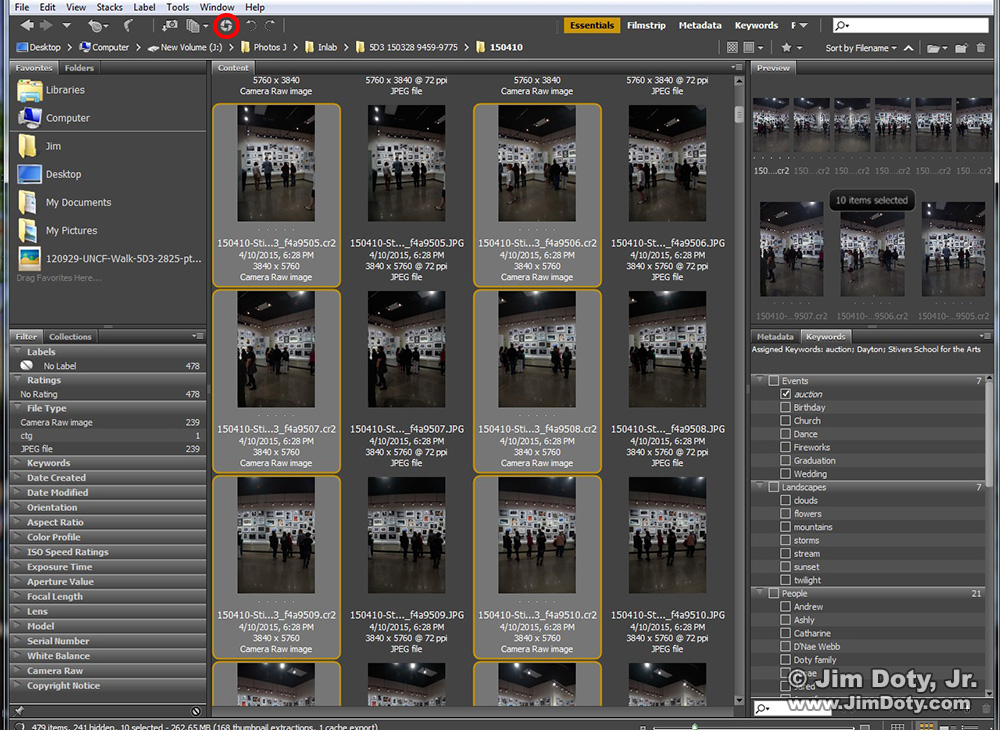
Open Adobe Bridge and navigate to the folder that has all of your individual “make a pano” images. Select the individual photos that will go into the pano. If you shoot RAW + JPEG files, be careful to select only the RAW files, not the JPEG files.
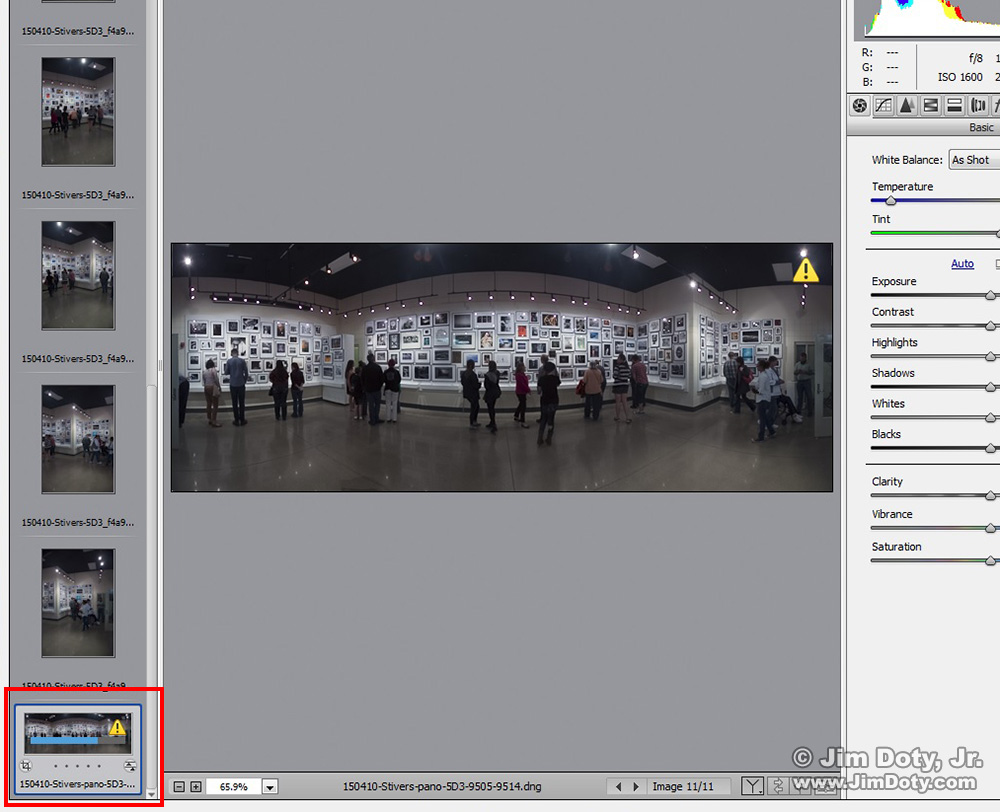
In this article I use the phrase “pano images” to mean the individual images that will be merged/stitched together to make a wide panoramic photo. With your pano images selected, click the “send to ACR” icon at the upper left (circled in red in the illustration immediately above) to send your photo to ACR.
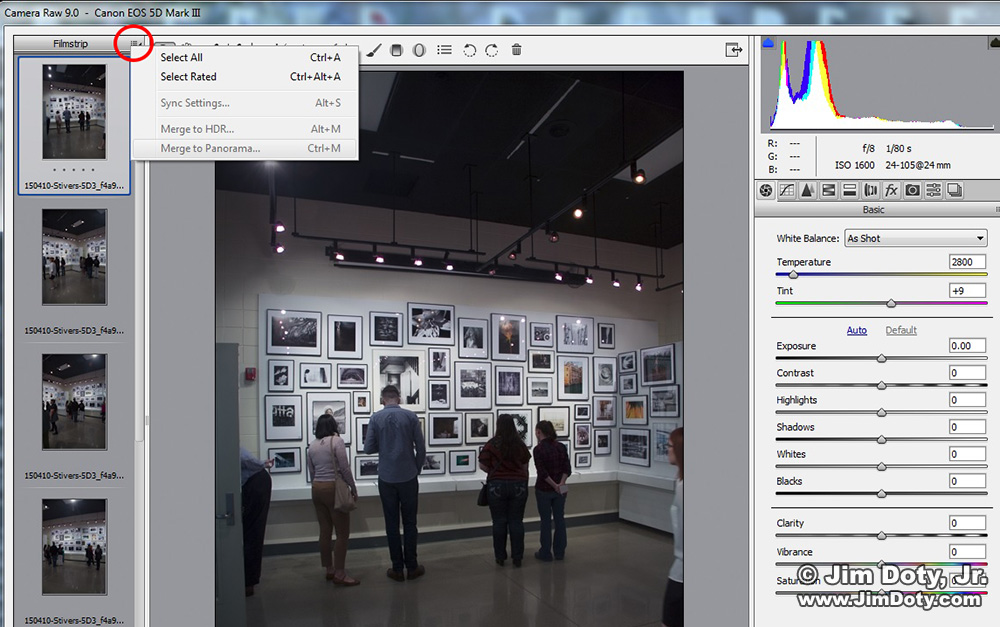
When the ACR window opens, your pano images will be in a filmstrip down the left side of the window. The first image in the film strip will be in the center of the ACR window. Click the icon just to the left of the word Filmstrip (upper left) and in the little drop-down window choose “Select All” to choose all of your filmstrip photos. Then choose Merge to Panorama in the same drop-down window.
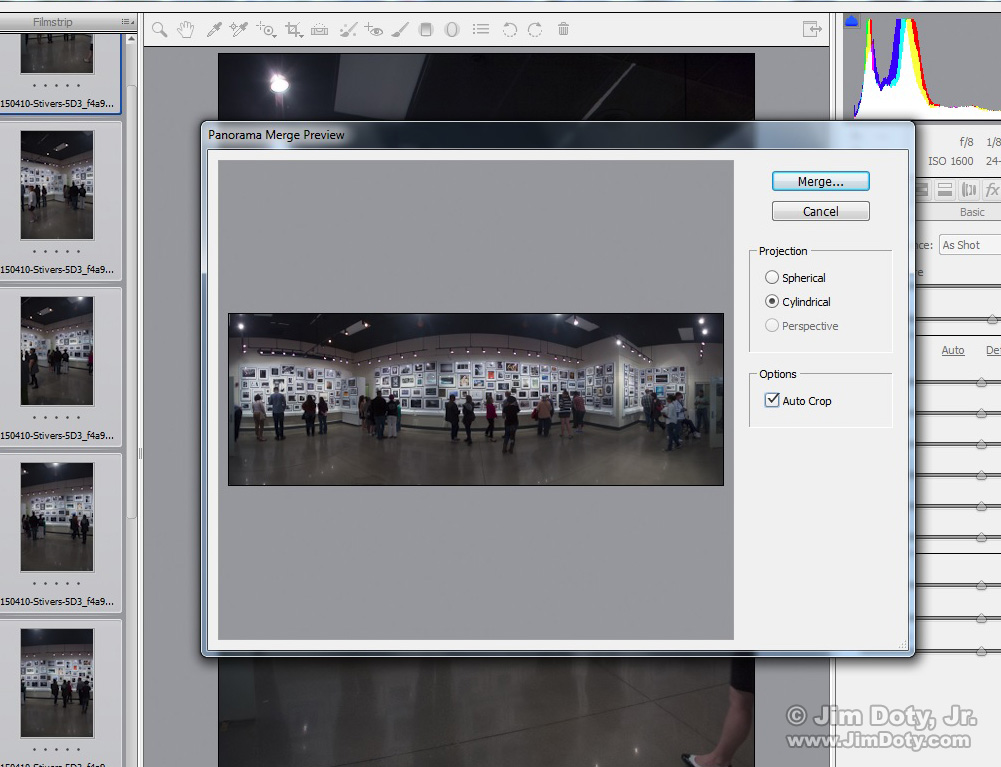
A “Panorama Merge Preview” window will open with a small preview of the merged panorama. Make your Projection selection first. For a wide pano with a single row of images, you will probably prefer Cylindrical. For a 360 degree pano with multiple rows of images you will probably prefer Spherical. To get rid of the non-image parts of the panorama, click the box in front of Auto Crop. IF you want to keep the non-image parts, leave Auto Crop unchecked. When all that is done, click Merge. Now ACR will go to work.
It will take a while to merge all of your individual photos together. At the bottom left a progress window will appear at the bottom of the filmstrip. You may need to scroll down to see it. The blue bar marks the progress and the yellow warning triangle is your clue to not mess with anything until the merge process is over. Don’t change the image sliders (right side panel), don’t save the file, and don’t click Open Object to send the image to Photoshop. Just leave things alone until the blue bar finishes its journey and the yellow triangle goes away. This will take anywhere from several minutes to quite a while depending on the number and size of the pano images that are being merged.
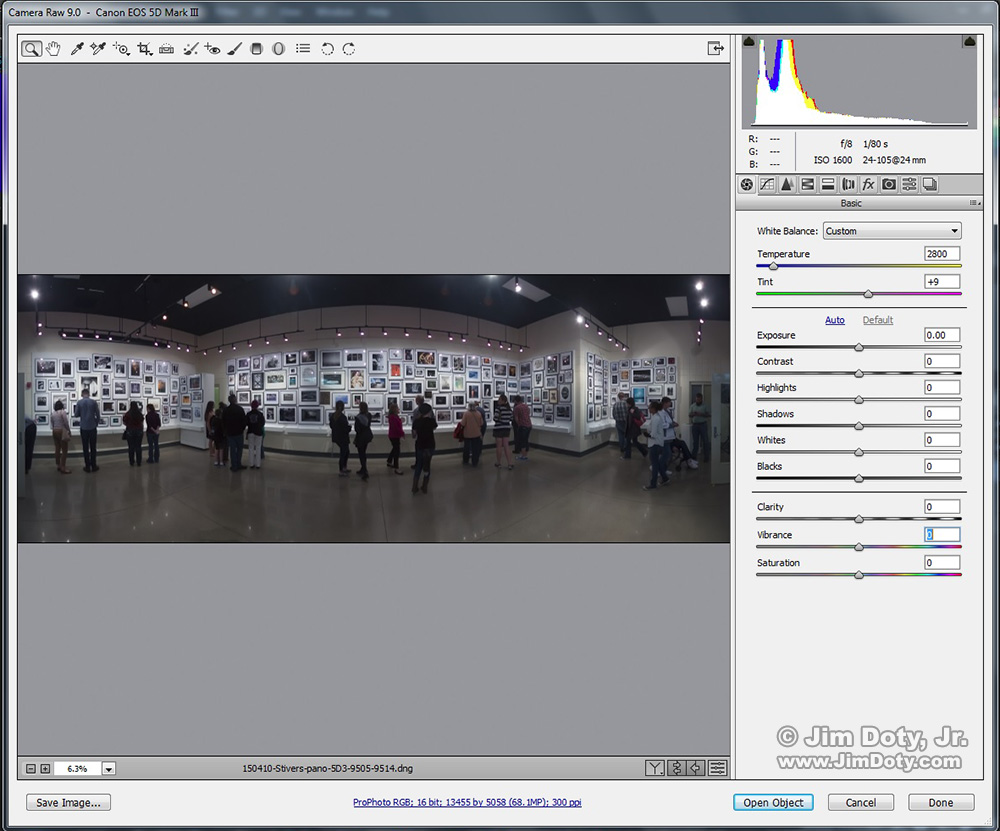
When ACR has finished merging your pano images, the Filmstrip on the left side of the ACR window will disappear. This is when the fun begins. You can save the pano as a RAW DNG file (lower left button) or you can change the RAW file to your heart’s content using the Basic and other panels on the right.
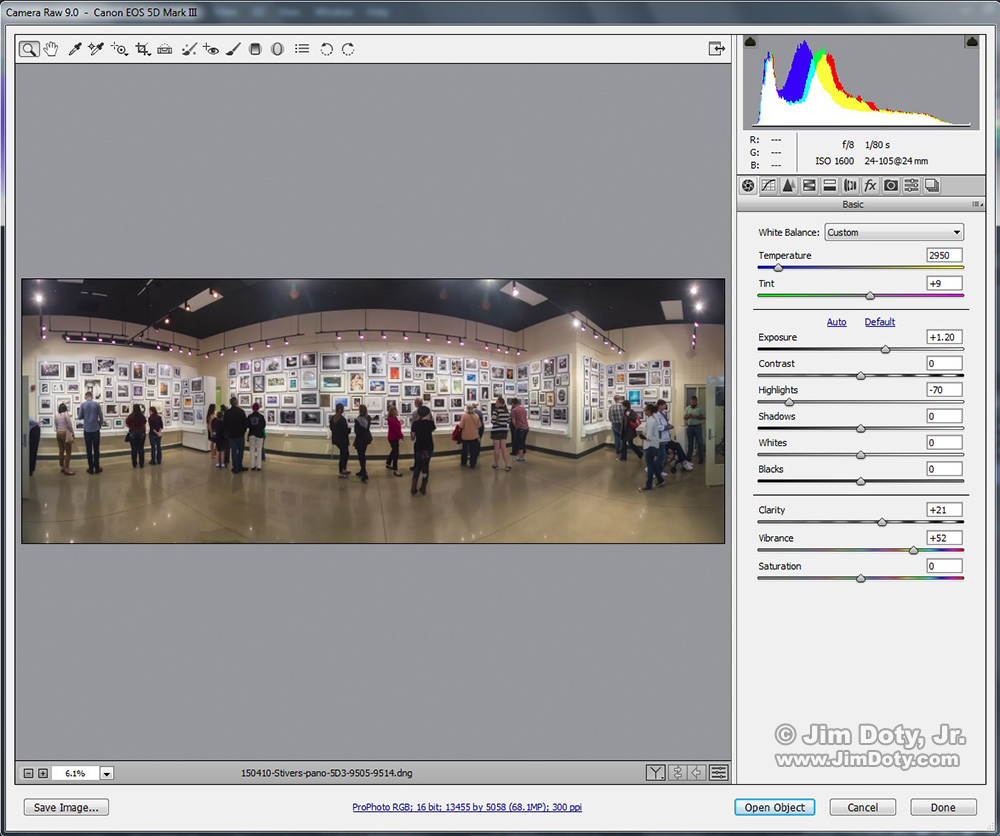
Panorama after changes using the Basic panel on the right. Compare this screen capture to the the screen capture just above.
Before you do anything else, check the bottom center line in the ACR window to make sure it says 16-bit. If it says 8-bit, click the line and in the drop down window that appears change 8-bit to 16-bit. In the same window make sure it also says Adobe RGB or better yet ProPhoto RGB. I also set the bottom line to 300 ppi.
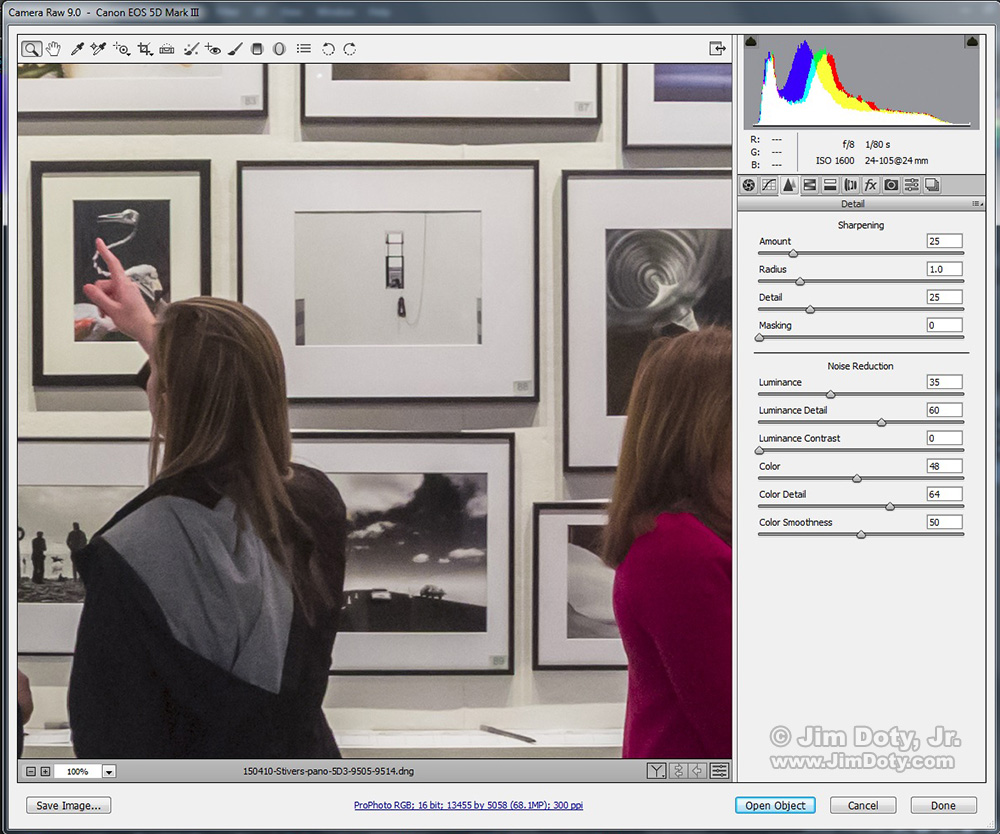
I used ACR to make several changes to the image which you can see in the Basic panel on the right. The contrast range of the original image was quite high. I underexposed much of the image when I was taking the individual pictures to avoid burning out the bright highlights high on the walls near the small floodlights. I used ACR to fix that. I lightened the overall image by dragging the Exposure slider to the right (+120). I reduced the highlights by dragging the Highlights slider to the left (-70). The image was a little cool for my tastes so I dragged the Temperature slider a little to the right (from 2800 to 2950). The last thing I did in the Basic panel was to boost Clarity (+21) and Vibrance (+52) by dragging those sliders to the right. You can see the difference these changes made by comparing the screen capture immediately above with the screen capture above that. Next I went to the Detail panel (click the double triangle icon just above the Basic panel).
I changed the magnification (toward the lower left) to 100%. That way I could better see any noise in the image. To reduce the luminance and color noise I dragged those sliders to the right. Be careful not to drag these sliders too far to the right or you will be destroy a lot of image detail. Using these sliders is always a compromise between removing noise and losing image detail. After reducing the noise I was done processing the RAW file in ACR.
When you are done processing your image and it looks the way you want it to look, the first thing you should do is to click Save Image at the lower left to save your image as a RAW file in the Adobe DNG format. The great thing about having your panorama as a DNG RAW file is you can open the RAW file again any time and tweak the changes you made. Or you can zero out all the sliders and start all over again. The whole process is non-destructive. You can make all the changes you want without losing the image quality of the underlying RAW file. If you over-do something, you can back up and do it differently.
If you click Open Object (bottom right corner in the ACR window), it will send the image to Photoshop. Before you do that, first be sure you saved the image as a raw file.
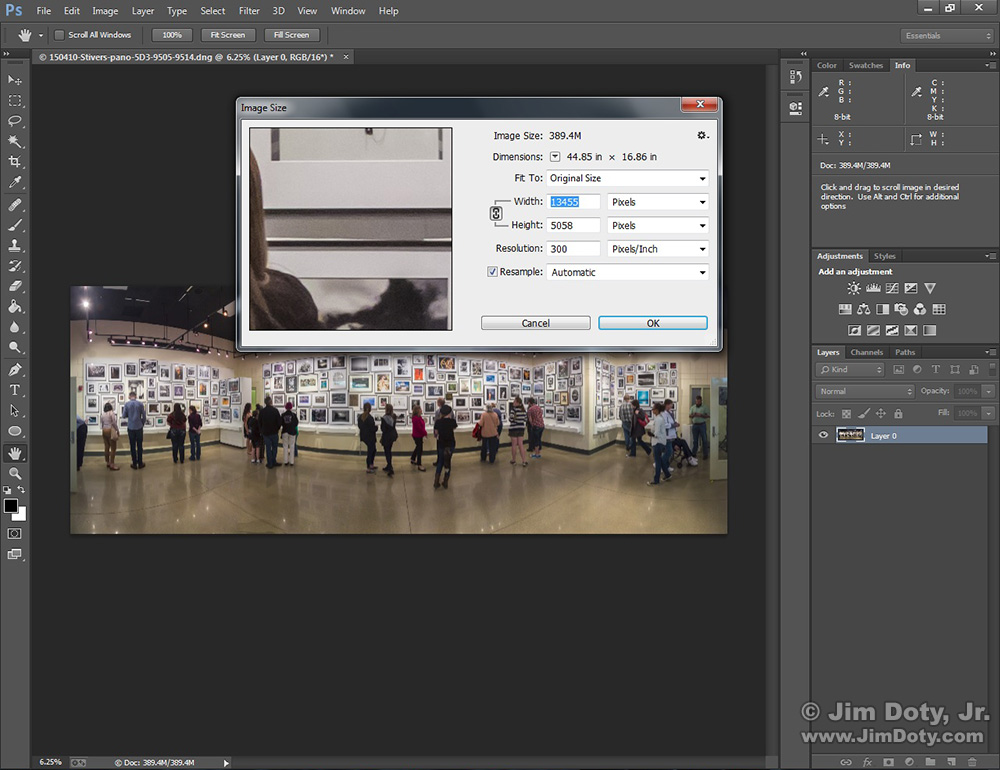
When the image is open in Photoshop you can tweak it some more if you need to, retouch anything that needs to be retouched, and save the image as a PSD or TIF file. After saving the image as a PSD file, I went to Image > Image Size to resize the image for the web. The screen capture above has the resize window before any changes are made. The file measures 13,455 x 5,058 pixels and prints out at a bit under 45 x 17 inches at 300 pixels per inch. If you really want a big print you could print the file at 200 pixels per inch and you would have a print about 67 x 25 inches.
I also changed the Color Space from ProPhoto RGB to sRGB. sRGB is the best color space for posting photos on the internet.
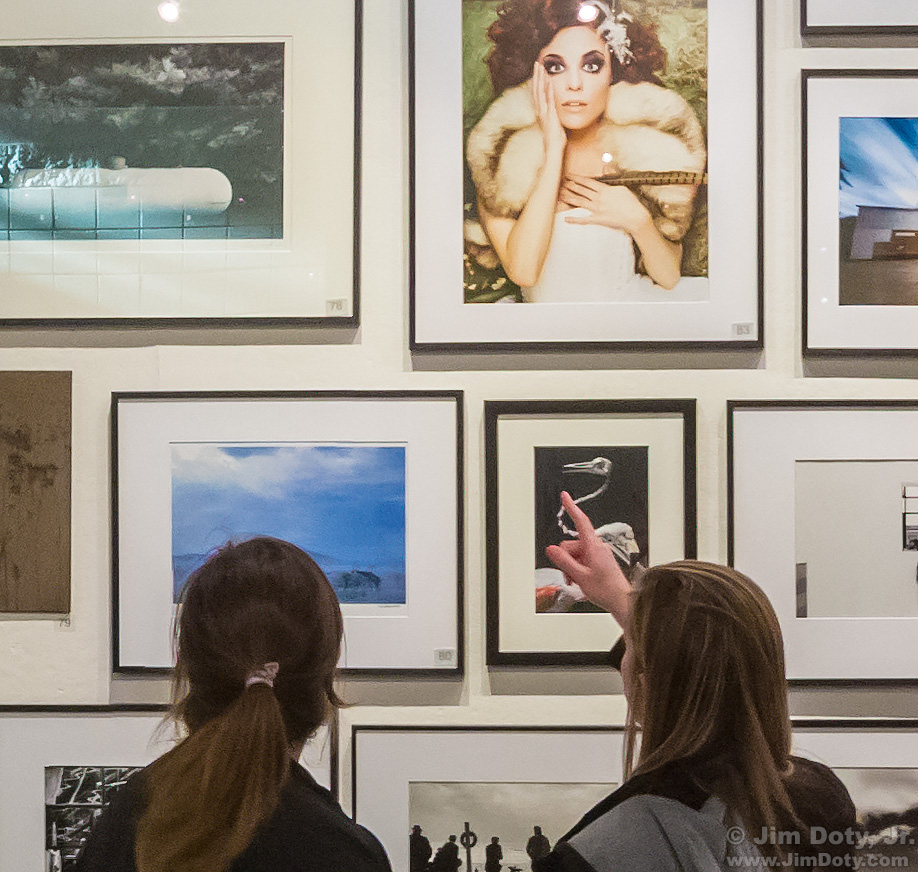
The full size original file is too big to post here but I can give you an idea what it looks like. I took the original file and selected the area marked above in red. This cropped area is less than 1/4 the height of the total image, and less than 1/12 the width of the total image.
This is the cropped area at 100% “actual pixels” which means each pixel in the file is represented by one pixel on your monitor (provided you aren’t looking at the small version that WordPress initially shows you). Click the image to see the cropped area at 100% magnification. If you see a tiny magnifying glass on the image, click the image again to bring it all the way up to full size on your monitor. If should just about fill the typical monitor from top to bottom (depending on the size and resolution of your monitor).
With this cropped part of the image at or close to full size on your monitor, you can get an idea what this would look like as a panoramic print. Back up 4 to 5 feet from your monitor and imagine what the image would look like if the whole image was there. That means you would be looking at a print 4 times taller and 12 times wider than the cropped portion you see on your monitor.
If you have ACR, it is time to upgrade to version 9.0. If you aren’t using ACR, maybe it is time you should. It is one of the two best things you can do for the quality of your images, even if you never create a single panorama. It comes with Photoshop Elements (well under $100), Adobe Photoshop, and Adobe Lightroom (about $150).
This article was originally written May 5, 2015 and updated May 20, 2015.
Links
ACR and RAW, Two of the Best Things You Can Do For your Images
There are lots of good reasons for shooting RAW files:
The RAW versus Jpeg Exposure Advantage
The more adept you become at using ACR, the better your images will be.
Mastering Photoshop & Lightroom: Adobe Camera Raw (ACR)
The Best Image Editing Software
Does your software have the best and most recent “process version� Find out here:
Adobe’s Improves “Process Version†for Adobe Camera Raw
Some Examples of What You Can Do Using ACR:
How To Save A Sun Flared Image With ACR And A Soft Light Brush
Color Correction for Images Created in the Shade
Evening in the Rockies: ACR and RAW Files to the Rescue
Sisters: Color Correction With Adobe Camera Raw
Bride’s Portrait: Solving Mixed Lighting challenges with ACR
How to Photograph the Milky Way
Bobcat: Fast and Simple Tonality Adjustments with Adobe Camera Raw

