Mixed lighting (lighting with different color temperatures) can be a real color nightmare, especially if you are shooting JPEG files. Shooting RAW files and processing them with Adobe Camera Raw (ACR) is one of the best solutions to the problem. ACR comes with recent versions of Photoshop Elements and Photoshop.
When you are dealing with one light source, match the white balance setting on your camera to the color temperature of the light and you should end up with a photo that is very close to the final result you want. The white balance settings on your camera won’t affect the actual RAW files, but they do affect the JPEG files and they influence how ACR displays your RAW files (depending on how you set the ACR preferences).
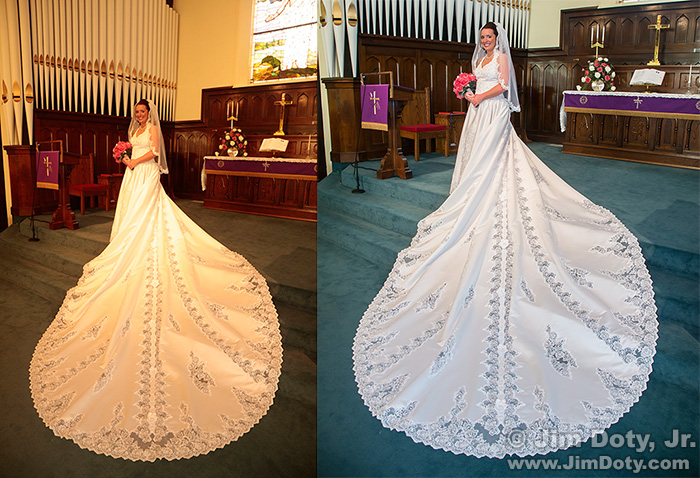
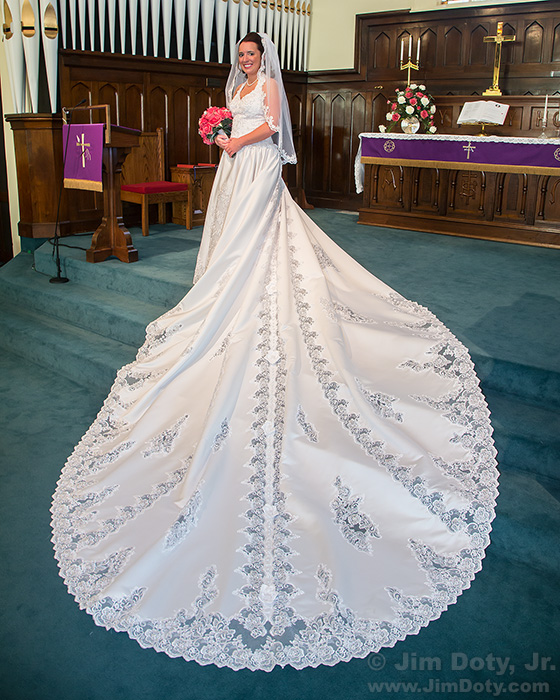
The primary light source for the photo above was an electronic flash and the camera’s white balance setting was set to flash. The lighting challenge was the length of the train. The bride was twice as far away from the camera (and flash) as the closest end of the train.
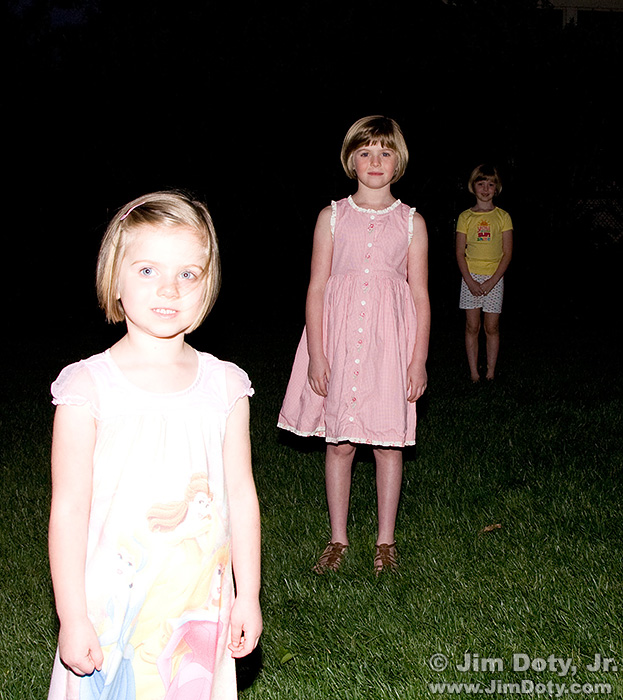
Light falls off with the square of the distance. That means as the distance to the light source doubles, the light drops to 1/4 the intensity (a loss of two stops of light in photographic terms). If the flash exposure was based on the closest part of the train, the bride would be lost in darkness. If the flash exposure was based on the bride, the closest part of the train would be totally washed out. Here’s an illustration of the light fall off problem.
The girl to the left is 5 1/2 feet from the camera mounted flash. The girl in the center is twice as far from the flash at 11 away, and the girl to the right is 22 feet from the flash, twice as far as the girl in the middle. The flash exposure was set to the girl in the middle. The girl to the left is two stops over exposed (and washed out) and the girl to the right is two stops underexposed (and lost in the darkness).
I based my flash exposure on the part of the train that is closer to the camera. That’s because there are few things that are worse (photographically) than a totally washed out wedding dress. I used a longish shutter speed to add more ambient light to bring up the exposure on the bride. To keep the shutter speed useable, I boosted the ISO to 800. That gave me a shutter speed of 1/15 second for a good exposure with the ambient light. (1/15 second is uncomfortably slow, but useable with a lens that has image stabilization.) An aperture of f/8 gave me enough depth of field (apparent near to far sharpness) to keep the bride and the entire train looking sharp. The lens was focused on the bride’s face, not the train.
During the fast pace of a wedding photo session with lots of groups to shoot before the guests arrive, all these decisions have to be made in seconds.
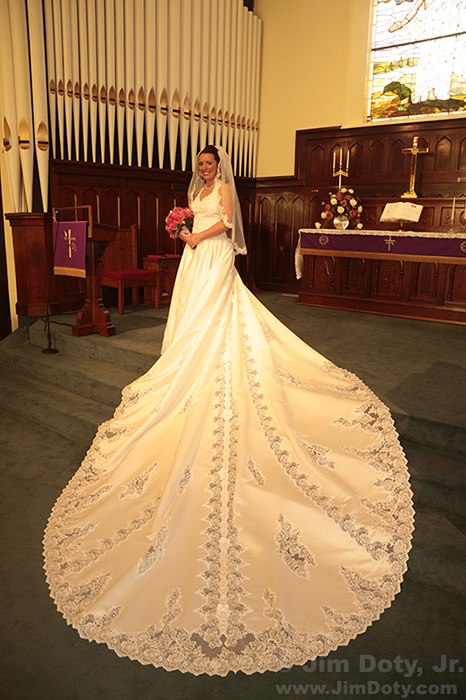
I knew in advance that the ambient light in the room would make things too warm, but I would fix that later. I could have changed the white balance setting on the camera, but it wouldn’t affect the RAW file, it would only have been an approximation so it would need an ACR adjustment anyway, so it wasn’t worth changing.
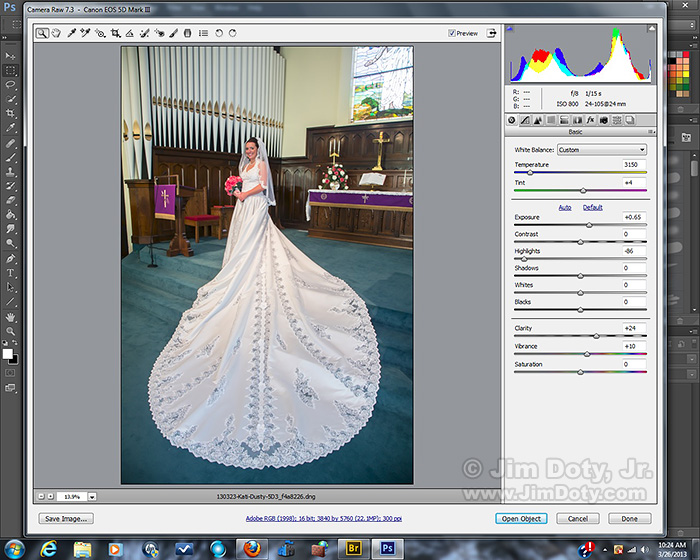
The photo immediately above is what I saw when I opened the RAW file in ACR. One of the ceiling lights is creating an unattractive hotspot (overly bright) on the train. This is why photographers don’t like mixed lighting. In a studio situation, or on a location shoot with all the time in the world, this problem would be solved with multiple flash units. But many right-before-the-wedding photo sessions run with the pace of a photo-journalistic event!
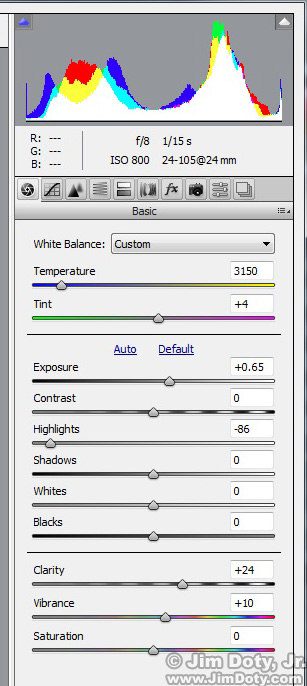
I began adjusting the sliders in the first panel in ACR (shown above). I corrected the overly warm color by moving the Temperature slider down to 3150. The light and dark tonality mismatch on the train was corrected by reducing the Highlights slider to -86 (toning down the hotspot) and bringing up the Exposure slider to +0.65. The Clarity and Vibrance sliders were also adjusted. The sliders in other ACR panels (not shown) were also used to tweak the photo. The total time in ACR to get things just the way I wanted was probably between 5 and 10 minutes. With a less complicated photo, two or three minutes in ACR would do the job.
After working on the photo in ACR, I sent it to Photoshop. The ceiling lights cast some weird shadows on the bride’s face, so these needed to be digitally retouched and a few other things needed to be fixed. You can’t see this in these small, web sized images, but they would be obvious in a large print.
After saving the master file with all of the “retouching” layers intact, I flattened the layers to create a single layer file and cropped the image to a standard aspect ratio (8×10, 11×14, 16×20) for printing. I changed the color space and optimized the file for printing at a professional lab. Total time working on the photo (ACR plus Photoshop) was 47 minutes. Most of the images from the wedding won’t require this much time.
Photo Data: Canon 5D Mark III, Canon EF24-105mm f/4L lens at 24 mm. Canon 550EX flash. 1/15 sec, f/8, ISO 800.
Links
To learn more about flash, using the light, working with the color temperature of the light, depth of field, and portrait photography, read Digital Photography Exposure for Dummies. It has excellent reviews from professionals and amateur photographers alike, and a five star rating at Amazon. Learn all about it here and order it from Amazon.com.
How To Get The Best Results From The Best Online Photo Labs
The Best Book On Photographic Lighting
Basic And Intermediate Books On Photoshop And Digital Photography
The Best Books: Mastering Photoshop Series

