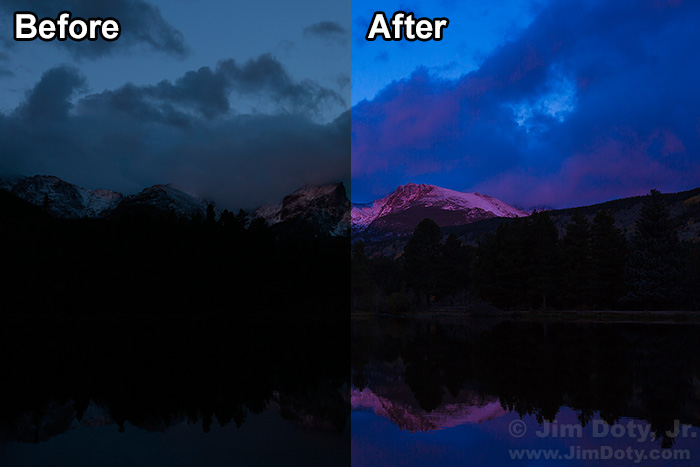
Alpenglow on Hallet Peak and Flattop Mountain. Left side: Before processing with ACR. Right side: After processing with ACR. Click to see a larger version.
My eyes saw the wonderful alpenglow on the mountains, but it was barely there in the JPEG file right out of the camera. The unprocessed RAW file looked just like the JPEG, but a RAW file has a lot more potential to bring out the color in the image. After the RAW file was processed with Adobe Camera Raw (ACR) the image matched what I saw with my eyes. The color channels in a RAW file have 16 times the color tonality range of the color channels in a JPEG file. If you aren’t shooting RAW files and processing them with ACR, you aren’t getting all the color quality your camera is capable of producing.
On the other hand, if you are shooting RAW files and processing them with ACR, not only will you get better color quality in challenging situations, you can make major adjustments to the image with less risk of the image quality falling apart. Just set your camera to capture RAW +JPEG and the camera end of the deal is all set. Now you need ACR.
Adobe Camera Raw cost $99 when it was first released in 2003 as a plugin for Photoshop. Now it comes free with Photoshop Elements (which costs well under $100), Adobe Photoshop, and Adobe Lightroom (about $150) and it has been improved and updated several times since then. I consider ACR absolutely essential if you want the very best image quality your camera is capable of producing, which means you will need to have one of these three programs. Adobe Photoshop used to sell for a little more than $650. Now you can get Adobe Photoshop combined with Adobe Lightroom (a total package that used to cost over $800) as part of a monthly Creative Cloud subscription for $9.99 per month. That is less than the cost of two fast food meals per month to have top of the line image editing software and file management. If you aren’t sure what the difference is between these three programs, check out the Best Imaging Editing Software link below.
Put simply, the purpose of ACR is to do the best possible conversion of your RAW file data into a pixel image without any loss of image quality and without throwing away any valuable image information. JPEG files are made up of pixels. A RAW file does not have pixels. A RAW file is the collection of all the data taken from the image sensor. When you convert a RAW file with ACR, the ACR software turns the RAW data into a pixels according to the choices you make when you use ACR (see the ACR sliders in the screen captures below), but the pixel image from a converted RAW file is much better than the JPEG pixel image your camera creates.
RAW vs JPEG Bit Depth
When you click the shutter a typical DSLR creates a RAW file with a digital bit-depth of at least 12 bits per channel (and many have 14 bits per channel). A 12 bit per channel RAW file data has 4096 different tonal values (from light to dark) for each of the three digital color channels, red, green and blue. When your camera creates a JPEG file, it takes the data from the 12-bit per channel RAW file and does a quick conversion on the fly to make a JPEG file. The bit depth of a JPEG file is only 8 bits per channel which means the JPEG file has only 256 different tonal values (from light to dark) for each of the three color channels. There is a huge difference between 4096 tonal values and 256. (If you just read yesterday’s post, which was originally written two years ago, this paragraph should sound very similar.)
If you set your camera to capture RAW plus JPEG files and you convert the RAW files with ACR, you get to keep the all of the fabulous range of the tonal values of the original 12-bit per channel RAW file and save it as a 16-bit per channel PSD or TIF file. You still have the JPEG files for occasions when you need a quick image to use in non-critical situations. If you set your camera to capture only JPEG files, it creates the 8-bit per channel JPEG files and then throws away all the rest of that wonderful image information that was in the RAW files.
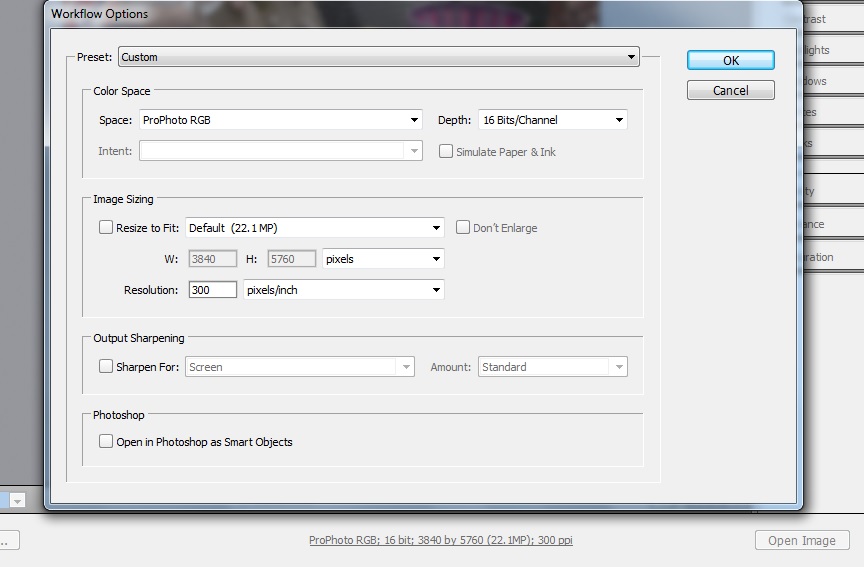
FYI: Do not set up ACR so it outputs your converted images as 8-bit JPEG files. It is possible to do that with ACR but you have just thrown away all the extra image information from your RAW file. When you open a RAW file with ACR, check your current Workflow Options which are described in the line at the bottom center of the Camera Raw window.
To change your Workflow Options, click on the Workflow Options line and make the changes you want in the window that opens. For “Depth” you should definitely choose 16 Bits/Channel and I recommend you set “Space” to ProPhoto RGB and “Resolution” to 300 pixels/inch.
An 8-bit per channel JPEG file has so much less image information it can easily fall apart when you work with it in your favorite image editing software. You can end up with banding and pixelization. A comparison example is in this article (don’t miss the banding illustration farther down the article). A pixel image created from a RAW file with ACR has a lot more information and is less likely to fall apart.
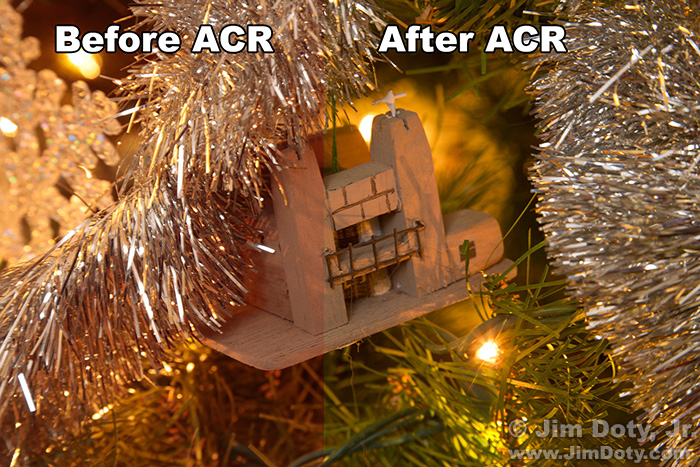
And there is more bad news. When the camera creates a JPEG file the camera makes all of the decisions in the conversion process based on whatever canned picture style is set on the camera. When you use ACR to create a pixel image from the RAW file, YOU get to control the decisions for the conversion process so you get the image YOU want. Just look at the right side of the image above. In the conversion of the RAW file I chose to make the needles green (just like they were on the tree). The canned program in the camera (left) didn’t create green needles, distorting the colors of the original scene.
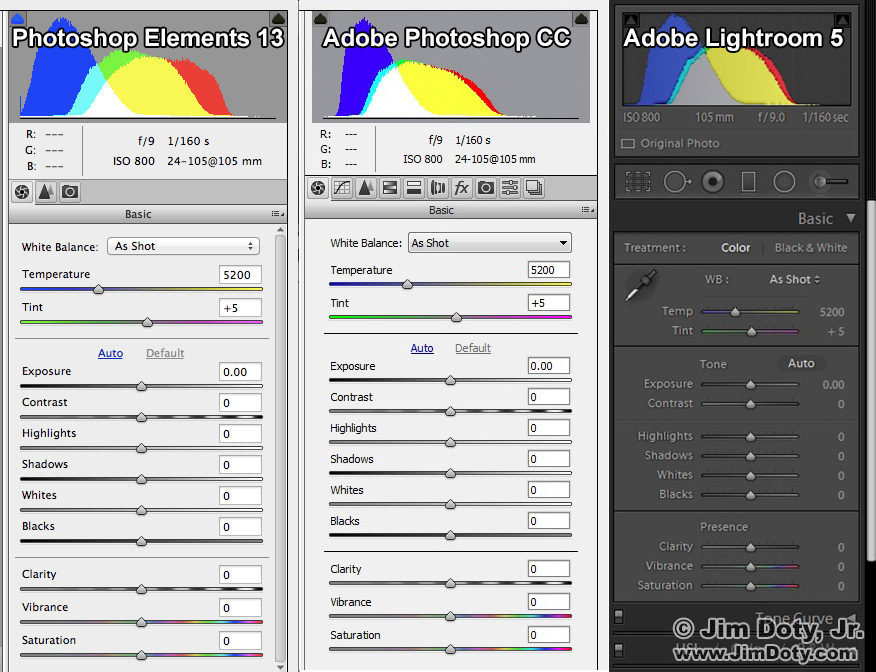
The ACR “Basic” panel in Photoshop Elements and Adobe Photoshop are exactly the same. The color and interface in Adobe Lightroom are different, but all of the control sliders are the same and they work in exactly the same way. The underlying raw processing technology for all three is the same. The eleven sliders in the Basic panel given you the tools to create the best possible images. This is where much of the magic happens.
In addition to the Basic Panel shown above, Photoshop Elements has two additional panels, one for removing noise (luminance noise and color noise) from high ISO photos, and the other for correcting for lens aberrations and lens distortion. Adobe Photoshop has more additional panels for tweaking your images so you get more options and therefore more image control with Photoshop, including the ability to change the hue, saturation, and luminance of six distinct color channels.
Occasionally you will find a photographer who insists ACR doesn’t come with Lightroom, or that it isn’t the really the same, but Adobe’s web site makes it clear all three programs (if you have the most recent versions) use the same ACR processing engine: “The Adobe Camera Raw plug-in became the latest must-have tool for professional photographers when it was released in February 2003. This powerful plug-in has been frequently updated to support more cameras and include more features and is available as part of Adobe Photoshop CC. Adobe Photoshop Lightroom software is built upon the same powerful raw processing technology that is available in the Camera Raw plug-in.”  “The latest version of Adobe Camera Raw (ACR 8.6) is integrated into Photoshop Elements 13.” (More at the Adobe links below.)
To make the most of ACR you need software that has the most recent process version. Raw conversion software gets better all the time so having the most recent version is important.
What can RAW files and ACR do for you? Look at the before and after images in the series of ACR articles linked below.
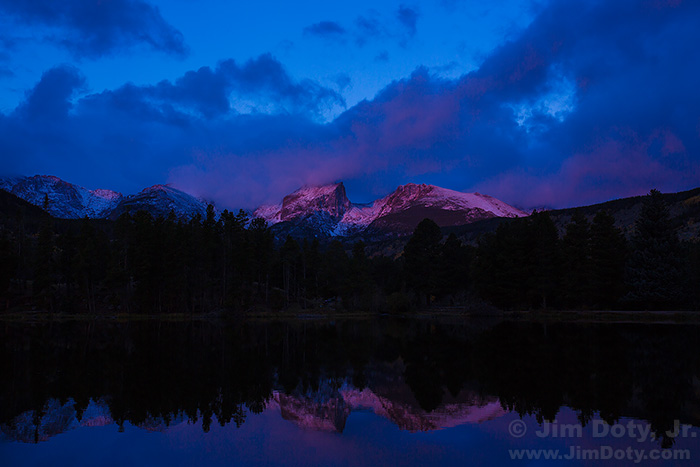
Alpenglow, Hallett Peak and Flattop Mountain from Sprague Lake, Rocky Mountain National Park. Click to see a larger and better version.
Photo Data: Canon 5D Mark III, Canon EF17-40mm f/4L USM lens at 40 mm. 1/25 sec, f/11, ISO 100.
Links
There are lots of good reasons for shooting RAW files:
The RAW versus Jpeg Exposure Advantage
The more adept you become at using ACR, the better your images will be.
Mastering Photoshop & Lightroom: Adobe Camera Raw (ACR)
The Best Image Editing Software
Does your software have the best and most recent “process version”? Find out here:
Adobe’s Improves “Process Version” for Adobe Camera Raw
Some Examples of What You Can Do Using ACR:
How To Save A Sun Flared Image With ACR And A Soft Light Brush
Color Correction for Images Created in the Shade
Evening in the Rockies: ACR and RAW Files to the Rescue
Sisters: Color Correction With Adobe Camera Raw
Bride’s Portrait: Solving Mixed Lighting challenges with ACR
How to Photograph the Milky Way
Bobcat: Fast and Simple Tonality Adjustments with Adobe Camera Raw
From Adobe’s site:
Photoshop Elements Help / Processing camera raw image files
Photoshop Elements Help / What’s new in Photoshop Elements 13

