Shooting in the shade on a clear sunny day can cause color temperature problems. If you want your colors to be true to life, you need to correct for the color shift.
Light has a “color temperature” which ranges from warm (yellow-amber) to neutral to cool (bluish). Sunrise and sunset are usually warm in color temperature, bathing the landscape in golden tones. Sunlight in the middle of the day has a neutral color temperature. Anything in mid-day sunlight looks like it is in real life. White looks white, blue looks blue, red looks red. At twilight, the color temperature is cool and everything looks more blue. This is most obvious when you look at white snow in the evening. In addition, on a clear sunny day, anything in the shade is lit by the blue sky and takes on a slightly bluish cast. So white looks like a pale blue, and everything else gets shifted to a cooler, more bluish tint.
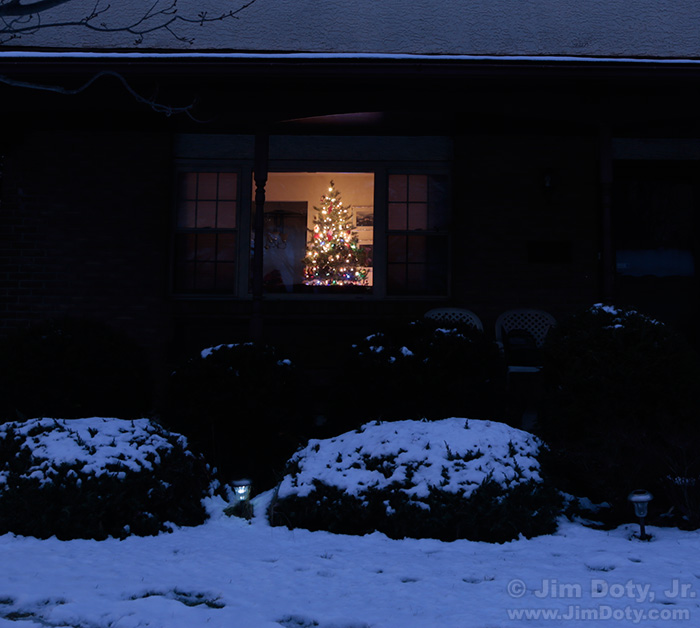
It gets even more complicated because our eyes try to auto-correct for the color temperature of the light. What we see is not necessarily what we will get in our photos. For example, if we are inside at dusk in a room lit by tungsten light bulbs (which have a very warm color temperature), our eyes make the light look neutral and a white wall looks white (technically it is our eye-brain connection that does this correction). If we go outside and look back at the window for the room we were in, it is obvious the cool evening light has turned the snow blue and the light inside has turned the white wall a warmer tint.
On a clear sunny day I photographed Kristina in the shade. The wall behind her is actually slightly warm in color but in the original photo above it looks slightly cool due to the light from the blue sky. Kristina is also shifted to cooler (bluish)Â tones.
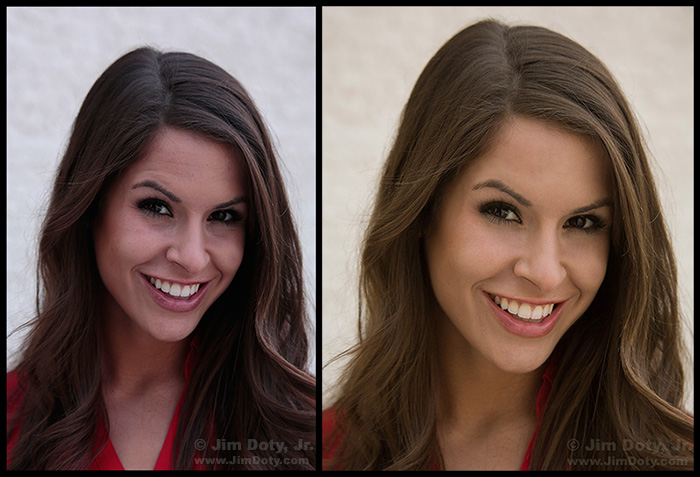
Kristina photographed in the shade (original on the left) and the same digital files with the white balance color corrected (right).
For the version on the right, I color corrected the white balance to restore her normal skin tones, which also makes the wall in the background its normal, slightly warm tone. Everything is back to their normal, true to life colors. The version on the right is also cropped differently.
Why didn’t I shoot her in the sunlight? Because sunlight creates harsh shadows that are generally unflattering for a head and shoulders portrait. She needed some classic headshots for her page at the IMDb (she is an actor/model) and headshots are usually done in soft light. Note that the color temperature of the photo on the right is slightly different than the two versions I posted above, warmer than my original, but slightly cooler than my color corrected version.
Anything you photograph in the shade on a clear sunny day is going to look bluer than it is in real life. If you want the colors in your photo to look true to life, you will need to correct the white balance in the camera or after the fact in your favorite image editing software.
Color Correction with ACR
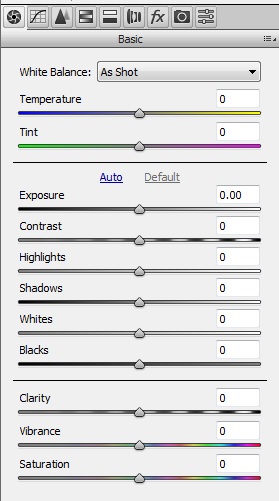
One of the best ways to color correct an image is to use Adobe Camera Raw (ACR) which comes with Adobe Photoshop Elements, Adobe Lightroom, and Adobe Photoshop. You will have more flexibility if you shoot RAW or RAW plus JPEG images. Open your RAW file with ACR and you will see the “basic” panel to the right of your image with a set of image adjustment sliders.
Grab the Temperature slider and drag it to the right until the blue color cast goes away and the colors look true to life. You may need to tweak the Tint slider a bit too. If the image looks too light or too dark, grab the Exposure slider and drag it left or right. Now the colors in your image should look like they are supposed to look.
What about all of those other sliders? Feel free to experiment!
Color Correction in the Camera
When you are working in the shade on a clear sunny day, set the white balance on your camera to Shade (which is often represented by a house pictogram with shade on one side). This will get you close to the correct white balance. You may still need to tweak the final white balance in ACR, but setting the white balance on your camera to Shade should get you close.
Another option (one of the best) is to set a Custom White Balance on your camera. Usually this involves taking a picture of a neutral object (with no color tint), like a gray card or something white, in the same light in the shade as your subject. Then use that photo to set the custom white balance for that particular scene. Every camera does this a little differently so check your camera’s manual.
Creative Options
Should you color correct every image? Not necessarily. But you should at least explore your creative options. Photography is, after all, a creative art form. You might want a particular image to look warmer or cooler than it would look in the neutral light of the mid-day sun. It’s your photo. It’s your choice!
Kristina, Photo Data: Canon 5D Mark III. Canon EF70-300mm f/4.5-5.6 DO IS USM lens at 120 mm. 1/320 sec, f/5.6, ISO 400.
Links

