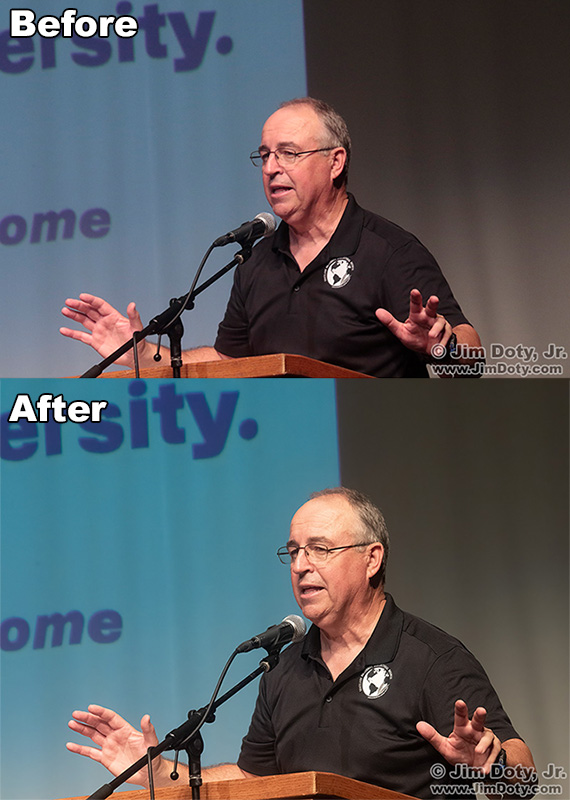
Max, Before and After ACR.
In this tutorial I will show you how to change the color balance of a RAW or JPEG file, and how to remember those changes to make the same exact changes to other files shot in the same lighting conditions.
Adobe Camera Raw (ACR) is a powerful Adobe tool for changing and converting RAW files into PSD and JPEG files. You can also use it on original JPEG files, but it is more limited since JPEG files have a significantly reduced amount of data to work with. You can make dramatic changes to RAW files and limited changes to JPEG files.
Max was on stage at an awards ceremony. Before the ceremony began I went to the stage and pre-metered the stage lights so I wouldn’t have to worry about that later. I set the white balance in the camera to tungsten to match the color temperature of the stage lights. However I have taken pictures at this venue often enough to know the light crew varies the settings from time to time which can change the exposure and the color temperature of the lights. But presetting things usually gets me close.
 This is my unprocessed image of Max right out of the camera. It is a tad too dark, and a bit too warm.
![]()
I clicked on the original RAW file and Adobe opened it in the Camera Raw window (above). You can see the settings on the right. There are several sections. I clicked on the LIGHT section first and dragged the exposure slider to the right to lighten the image.
 I went to the Color section next (white arrow), which is expanded here so you can get a better look at the four sliders. I have two choices for correcting the white balance. I usually click the eye dropper to the right of the words White Balance. Then I click on something white in the photo, like the white globe on Max’s shirt. That usually gets me close to a great color balance for the image, and sometimes that is all I need to do. If the image still needs tweaking, I start dragging the Temperture slider which adjusts the blue/yellow balance, and the Tint slide which adjusts the green-magenta balance. The Vibrance and Saturation sliders adjust the intensity of the color. I played with three of the sliders. You can see the settings I ended up with.
I wanted to change the blue color without affecting the other colors in the image. So I went to the Color Mixer section (not illustrated) and played with the blue slider to adjust the hue and saturation without changing the whole image.
Before I clicked “Open Object” at the bottom of the screen to open the image in Photoshop, I had one more thing to do. I had another image of a person at the event who was at the same lectern. I wanted to color correct that image using the exact same settings that I used for Max’s photo. I have learned from past painful experience that I can always re-open an image, but I can’t always see the original ACR settings I used. Sometimes they get zeroed out. So I wrote down the settings on a 3×5 card. Then I opened the image of Max in Photoshop and saved it as a PSD file.
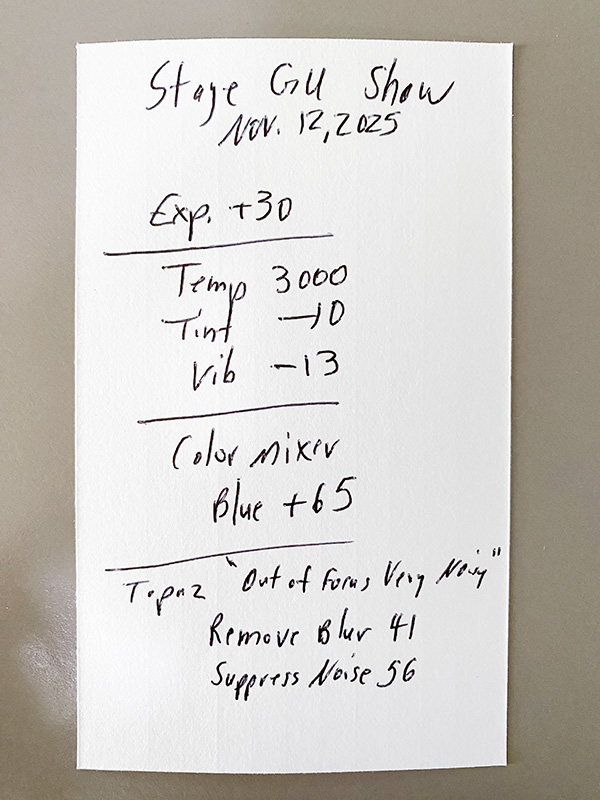
I opened the second image, dragged the sliders so the numbers matched the numbers on the 3×5 card and I was done. I also had photos of people at the same lectern that I did not need to optimize. But just in case I might need to optimize one of them in the future, I photographed the 3×5 card and put it in the folder with all of the other event photos. I have the setting if I ever need them.
My camera was set at ISO 3500 to give me a usable shutter speed. That means the images had a lot of digital noise. I used Topaz software to remove the noise. I wrote those settings on the 3×5 card too. To learn more about Topaz, check the second link below.
In Adobe Photoshop, you access ACR by using the “Camera Raw Filter”. You can use it on JPEGS, subject to the limitations mentioned above.

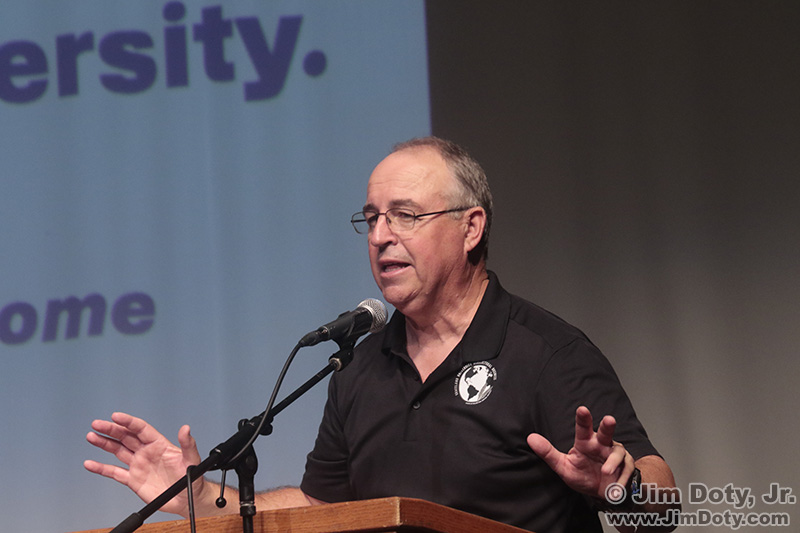
Max’s image after processing the RAW file with ACR and Topaz.
To see a more detailed example of how I optimize an image from start to finish, read the fully illustrated article at the first link below.
Link
How To Optimize a Photo with Adobe Camera Raw
Fixing a Photo for Publication with Topaz Sharpen AI