

Elk in the Snow, Horseshoe Park, Rocky Mountain National Park, Colorado
Metering dark toned wildlife in the snow is a major exposure challenge. It is usually best to avoid large “burned out” areas (washed out, featureless white) in a nature or landscape photograph, but with properly exposed snow, the wildlife can be so dark as to lose all texture. On other hand, metering for the wildlife can burn out the snow. So what do you do? And what about the complications of metering white animals?
This is the third in a series of over a dozen articles on winter photography. To see the rest of the articles, go to the series link below. This series is updated every year in January.
It would be especially helpful if you read Metering Daytime Winter Scenes if you haven’t already. The principles in that article apply to this one.
Do you meter for the wildlife or the snow? Deciding which way to bias the meter reading depends a lot on how big the wildlife are in the frame.
If the photo is mostly a landscape with the wildlife as a smaller element in the scene, you should bias the exposure for the snow and let the wildlife go dark, even if they lose texture. The wildlife are just another element in the scene, like trees and rocks. Meter the brightest area of the snow and use the exposure compensation scale on your camera to make the snow light and bright without burning it out. The Metering Daytime Winter Scenes article will show you how. Turn on the blinkies in your camera to guard against blown out pixels.

Squirrel in the snow.
On the other hand, if you are doing a closeup of one or more animals, like the elk at the top of this article or the squirrel immediately above, you should meter the wildlife so they aren’t too dark, even if you burn out some of the surrounding snow. In this case the wildlife are primary and the snow is just a backdrop.
Unlike portrait photography with humans, there are times you are too far away from wildlife to accurately meter just the the wildlife. This means doing some substitute metering. You meter a known tonality and apply whatever exposure compensation might be necessary, taking into consideration the tonality of the wildlife. For elk and red fox photos in this article, substitute metering was used.
How do you meter for the elk photo above? If your camera has a spot meter, you can meter the side of the elk and make that a medium tone (no exposure compensation), or better yet add from 1/3 to 2/3 stops of plus exposure compensation (+1/3, +1/2, +2/3) to make the side of the elk is a little lighter than a medium tone so you can maintain texture in the darker fur on the head, neck, and legs. You can learn more about exposure compensation in this article on Using Reflected Light Meters.
If your camera doesn’t have a spot meter, the camera meter will see enough of the larger scene to make metering less reliable. The simple solution is to meter a gray card in the same light as the elk (which is easy in this case since the light on the overcast day is the same everywhere except for back in the trees) and use that as your base exposure. I would suggest adding about 1/3 to 2/3 stops of plus exposure compensation (+1/3, +1/2. +2/3) to the result you get from metering the gray card to insure a better exposure for the darker areas of the elk.
The angle of the gray card is important. You are exposing for the side of the elk, not the top, so don’t point the flat surface of the gray card up at the sky when you meter it. Hold the gray card so it is more or less parallel to the side of the elk, with maybe a slight upward angle, very much like the side of a steep pyramid (think Transamerica Pyramid in San Francisco). You can learn more by reading How to Use a Gray Card.
Sunlight is a major nemesis when photographing dark wildlife in white snow. The sunlight can increase the contrast level well beyond the ability of a camera sensor to record without losing the highlights and/or the shadows.
On a bright, overcast day, the contrast is tamed so it is much easier to get a good exposure for the wildlife without burning out the snow. This is much better light for dark wildlife in the snow. It is important to leave out the sky on a cloudy day since the sky would be burned out in the photograph.

Red Fox, Wildlife Prairie Park
Metering this red fox was a challenge thanks to the high contrast created by the strong sidelight on the fox. My camera did not have a spot meter. An exposure for the shady side of the fox would burn out the snow and seriously overexpose the sunlit part of the face. So I metered some sunlit snow near me and added about two stops of light to make the snow a nice, bright white without burning out too much of the snow. This gave me a pretty good exposure for the sunlit part of the fox’s face and back. The shady side of the fox was quite dark. I scanned the original slide and used a curves adjustment layer in Photoshop to lighten up the shady side of the fox a bit without changing the exposure on the sunlit part of the fox’s face or the snow. A cloudy bright day would have given me a less contrasty scene that would be easier to meter, but less dramatic than the light in this scene.
Another option for metering the fox would be to use a gray card and point the surface of the gray card at the sunlight. That would give me a good exposure for the sunlight on the face of the fox.
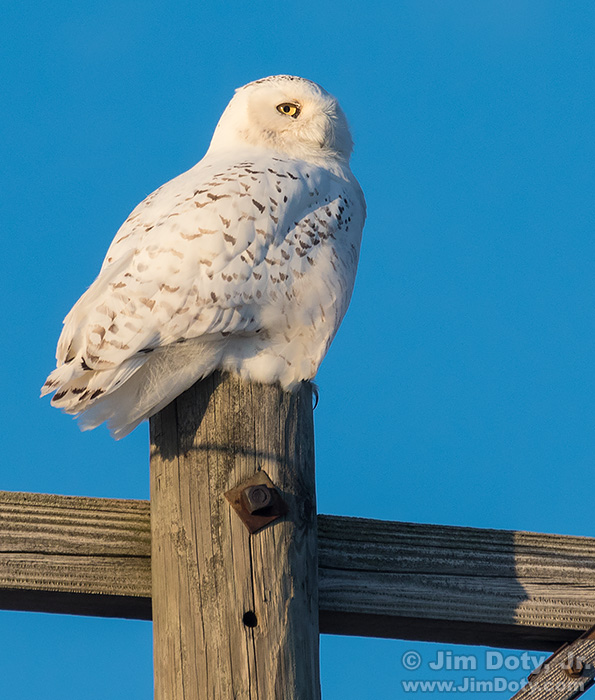
Snowy Owl
The good news is white animals against a snowy background are easy to meter. Just meter all that whiteness and dial in about 1 1/2 to stops of plus exposure compensation to keep everything white. Check your histogram to make sure you aren’t burning out any pixels.
What if your white animal, like this snowy owl, isn’t against a white background? If you can accurately spot meter the owl, dial in about 1 1/2 stops of plus exposure compensation. If you can’t spot meter the white animal, take a gray card reading of the light. Just make sure the intensity of light hitting your gray card is the same as the light hitting your subject. Then subtract one stop of light from the gray card reading to make sure you don’t burnout your white animal. For example, if you meter your gray card and the meter reading is 1/250 at f/8, shoot at 1/500 at f/8, which is one stop less light than 1/250 at f/8. See the gray card article linked below.
If your white animal is in bright sunlight and it isn’t close to sunrise or sunset (which reduces the amount of sunlight), just use Basic Daylight Exposure and subtract one stop of light.
You can also use substitute metering. Meter something of a know tonal value that is in the same light as your white animal, and compensate accordingly.
Be sure to read the companion article, Metering Wildlife in the Snow, Part Two.
Photo Data
Elk: Canon 20D. Canon EF 100-400mm lens at 285mm (a full frame 35mm equivalent of 456mm). f/8, 1/50 sec, ISO 400.
Squirrel: Canon 7D Mark II, Canon EF 100-400mm lens, Mark II, at 300mm (a full frame 35mm equivalent of 480mm). f8, 1/1000 sec, ISO 400.
Red Fox: Canon AE-1 camera body. Kodak Ektachrome Lumiere 100X slide film. Exposure unrecorded. The lens was not recorded but was probably a Canon FD 300mm f/4 telephoto lens.
Snowy Owl: Canon 7D Mark II, Canon EF 100-400mm zoom lens at 400 mm. f/8, 1/250 sec, ISO 400.
Originally posted January 16, 2013. Revised and re-posted January 5, 2022.
Winter Photography Series Links
“How To” Series: Winter Photography – An Overview with links to all the articles
Metering Daytime Winter Scenes
Metering Wildlife in the Snow, Part Two
More Article Links
The Best National Parks to Photograph in Winter
One Photographer and Nine Outdoor/Travel Writers Pick the Best Winter National Parks
“How To” Series: Snowy Owl Photography
Understanding apertures, shutter speeds and ISO settings
Using Reflected Lights Meters, Part One. Exposure compensation is explained 2/3 of the way down this article.
How To Use Your Camera’s Exposure Compensation Scale.
Why Is Exposure So Important? The first in a series of articles covering the basics of exposure with links to the rest of the articles.
Exposure Warning: Turn on the Blinkies
Links to Articles About Books
Mastering exposure is one of the first and most important steps to becoming a better photographer. One of the best ways to do this is to read Digital Photography Exposure for Dummies and do the exposure exercises in the book. This book will teach you the basics and then take you well beyond the basics. Digital Photography Exposure for Dummies is one of the highest rated photography books at Amazon.com (5 stars) and it praised by amateurs, professional photographers, and photography magazines as one of the most helpful and comprehensive books on exposure currently available. You can learn more here and order it at Amazon.com.
How To Find Wildlife, The Best Books
How To Photograph Wildlife, The Best Books
The Best “How To” Nature Photography Books including the excellent Stackpole series of books on photographing wildlife.
Location Links
Rocky Mountain National Park – the official NPS web site. RMNP is one of my favorite places to photograph elk and especially in the fall when they gather in open areas of the park for the rut. Make the rounds between Moraine Park, Upper Beaver Meadows, and Horseshoe Park (where the above photo was taken). These areas are all marked on the map they give you at the park’s entrance station.
The red fox was photographed at Wildlife Prairie Park west of Peoria, Illinois. It is a great place to photograph North American wildlife in large, open settings.