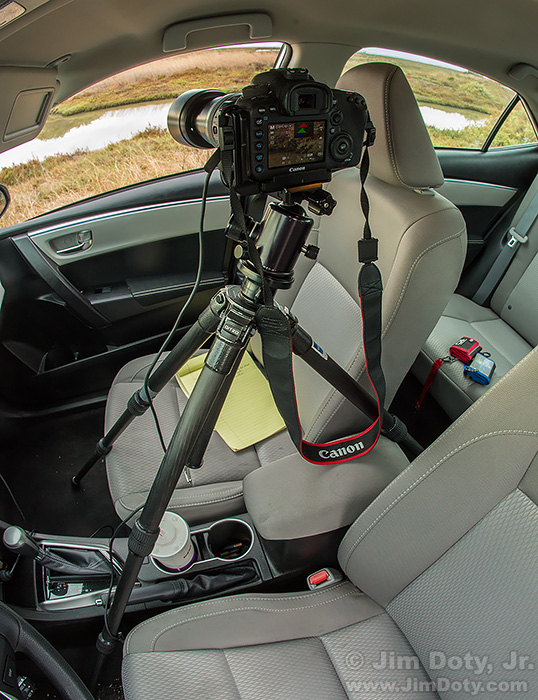
Tripod mounted camera in live view mode. The image is visible on the LCD along with the RGB histogram.
“Live View” mode is a huge boon to digital photographers and magnified focus is one of the reasons why. Focusing this way is more accurate than the camera’s autofocus modes, at least with non-moving subjects, and you will have sharper images. Landscape photography is the usual time to use this technique but sometimes it works for wildlife.
Originally posted March 18, 2016. Revised and re-posted September 8, 2019.
When everyone used film, photographers could put a magnifier over the viewfinder to magnify the center of the image, allowing them to manually focus the lens with more accuracy. Of course the camera needed to be on a tripod and you needed a non-moving subject. Much of the time the most important part of the image was not in the center of the frame, so photographers would manually focus on the most important part of the image, remove the magnifier and then recompose the scene before taking the picture. This not only worked for landscapes but also some relatively inactive wildlife.
Live view mode in digital cameras does the same thing with one added advantage – you don’t need to put the critical focus point in the center of the frame. As you will see, the area you want to magnify can be anywhere the frame.
I spotted a Great Blue Heron stalking minnows in shallow water. My first few photos were hand held shooting out the car window, and they were not what I wanted in terms of sharpness. The heron was motionless for several seconds to a minute or so at a time so I slowly set up my tripod up inside the car (top photo). I knew getting out of the car would spook the heron. To shoot properly from a tripod inside the car the car motor needs to be off and you need periods of time when the wind isn’t moving the car.
Once everything was in place I turned on “live view” mode (which I consider an essential feature when choosing a modern camera). This raises the reflex mirror in a DSLR so the image sensor can see the image and send it to the LCD on the back of the camera. The image sensor is high resolution and the LCD is low resolution so this limits the image quality you see on the LCD, but it does allow you to see the image and check the focus.
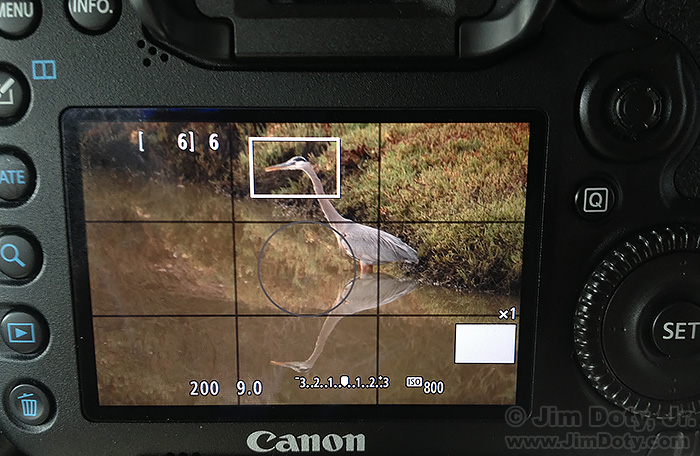
When you turn on live view mode the default magnification is 1X so you see everything the image sensor sees. With Canon DSLRs you see a white square that you can move around the screen with the joy stick type toggle button near the upper right corner of the LCD. The white square indicates the area that will be magnified as you switch between magnification levels. In the case of this particular image, the critical point of focus is the heron’s eye so I moved the white square up to the heron’s head. I also push the INFO button above the LCD to turn off most of the information showing on the LCD. When I am doing landscape photography in live view mode I push the INFO button to turn on exposure information, the camera level, and the RGB histogram.
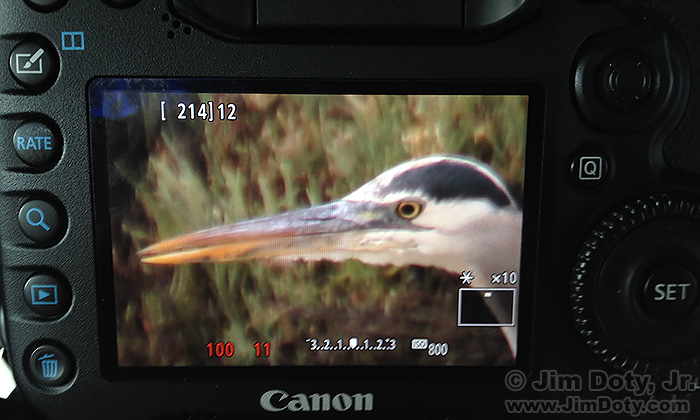
By pushing the magnification button to the left of the LCD (marked with a magnifying glass) you can toggle between 1X, 5X, and 10X magnifications. At 5X and 10X magnification you can manually focus the lens with a very high degree of accuracy. The lower right corner of the LCD shows the magnification you are at and the small white solid rectangle in the larger white outline rectangle shows which part of the whole image you are looking at. In this particular case I am magnifying an area close to the top center of the frame. If you aren’t using a Canon DSLR, check your camera’s manual to see how to do all of this with your camera.
Contrary to popular opinion, autofocus does not always give you the best possible focus. You can test this for yourself. Put your camera on a tripod and autofocus on a non-moving subject. Turn off autofocus, turn on live view mode, magnify the image to 10X and see if it is totally sharp or if you can improve on the focus. Sometime the autofocus will be spot on, and sometimes not. If you don’t check the focus in live view mode at high magnification, you don’t know if autofocus got it right or not. With live view and stationary subjects, you can take control yourself and you will know if you have the best possible focus.
Of course autofocus is a very powerful tool, especially predictive auto focus (called “AI SERVO” on Canon cameras) for moving subjects when it does a better job than the human eye. But for stationary subjects, especially when using long lenses and the depth of field is minimal, autofocus is not always the best choice.
Incidentally, if you at 10X magnification and you just focused, you can snap the shutter immediately without taking time to go back to 1X magnification. The sensor will still record the whole scene. This Great Blue Heron was moving about a bit so as soon as I focused at 10X magnification I clicked the shutter before the Heron moved again.

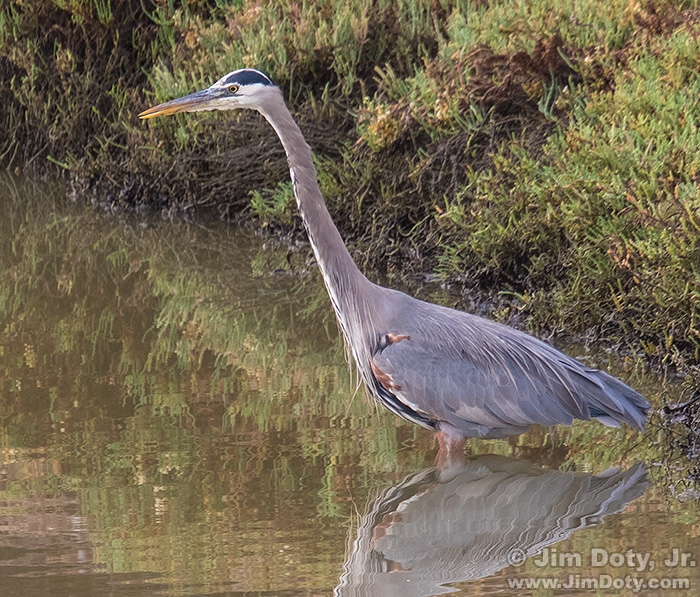
Great Blue Heron, full frame. I manually focused the lens with the camera in live view mode at 10X magnification.
My tripod mounted manually focused images using live view mode were sharper than my initial hand held aufocused photos. When I first pull up to wildlife in my car my first shots out the window are always hand held with autofocus turned on. They may be the only shots I get and sometimes they turn out great. If the wildlife stays put, I do myself a favor, get out the tripod and switch to manual focus live view mode with a magnified image. This means the tripod needs to be inside the car with you, not in the trunk. I keep mine on the floor behind the front seats where it can easily be reached. My backpack is in the back seat and open so I can quickly grab whatever I need.
There is another advantage to shooting in live view mode, especially for landscape photography. With longer lenses (over 100mm) and slower shutter speeds (from 1/4 to 1/30 second with most cameras) the motion of the reflex mirror will cause some degradation of the image due to mirror slap. For a long time photographers have used mirror lock up to get sharper images in the 1/4 to 1/30 second “blurry image zone”. In live view mode the mirror is already up. When you are in live view mode use an electronic cable release (so you don’t touch the camera) or use a two second self timer (so the camera has two seconds to calm down after you push the shutter button) and you will get sharper images. For more tips on getting sharper images, read this article.
Photo Data: Canon 7D Mark II. Canon EF 70-300mm DO IS lens at 300mm. f/11,1/100 sec. ISO 800.
Location: Don Edwards San Francisco Bay National Wildlife Refuge. Fremont, California.
Links
How To Find Wildlife, The Best Books
How To Photograph Wildlife, The Best Books
How to Be A Better Wildlife and Nature Photographer
To learn more about nature, landscape, and wildlife photography, read my book, Digital Photography Exposures for Dummies, one of the highest rated photography books at Amazon.com. More information here. Order it here.
If you want to spend a day or a weekend learning how to be a better nature photographer, I do workshops and photo safaris in Colorado and Michigan. You can find information at JimDoty.com.


