
Â

Before and after setting a custom white balance.
To get the most accurate colors your camera is capable of creating you need to set a custom white balance. Every camera does this a little differently, but it involves taking a picture of an 18% gray card (or something pure white) and using that photo as a standard to create a custom white balance setting. I will show you the process with a Canon camera, but other brands should be somewhat similar. Check your camera’s manual for specific instructions.
Note: Most of this article is extracted from a longer article on copying analog prints so most of the illustrations are from that article. I was copying prints on the road using the light coming through sliding glass doors. But all the steps to setting a custom white balance are the same, no matter what your photo situation.
At the top of this article I spliced together parts of two images taken at an art auction. The walls of the room are white. The tungsten lights give everything in the room a yellow amber color cast (left image). By setting a custom white balance everything is restored to their correct colors (right image).
In almost all situations setting a custom white balance will give you more accurate colors. It will save you a lot of time later when you are processing your RAW files in Adobe Camera Raw (ACR). If the light is too cool, too warm, too green, or shifted to any other color, you can almost always fix that.
What are the exceptions? Some lights, especially those that are used in some sports arenas are not “full spectrum” lights. Not only are the colors shifted, some of the colors in the visible spectrum are actually missing. You can shift the spectrum in the right direction to compensate for the color shift, so your images will look better, but some colors will still be missing so the photos will still look a little off.
One of the nice things about tungsten lights is they are full spectrum bulbs. The colors are shifted but all the colors of the spectrum are still there. When you compensate for the color shift by setting a custom white balance, the photos will look great.
To begin with, I suggest you set the white balance on your camera to “daylight”. You can actually start with any white balance setting, but if you start with daylight you will get instant feedback on the actual color cast of the ambient light. This trains your eyes to understand color shifts in a variety of situations.
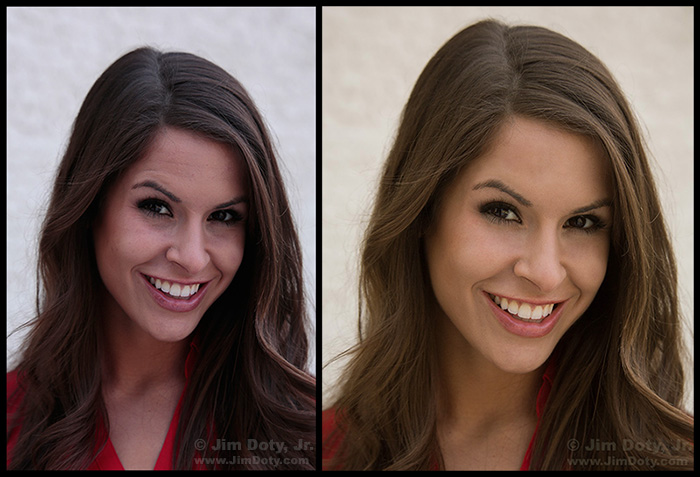
Kristina photographed in the shade on a sunny day (left) and with the white balance color corrected (right).
With a daylight white balance setting, if your first picture of the gray card is bluish you know the light is too cool, like in the shade on a sunny day. This is the case with the photo of Kristina on the left. On the right I corrected the white balance
If the first picture of the gray card is yellow or amber, you know the light is too warm (as is the case with tungsten lights). If the gray card photo is too green you are probably working with an old style of fluorescent light.
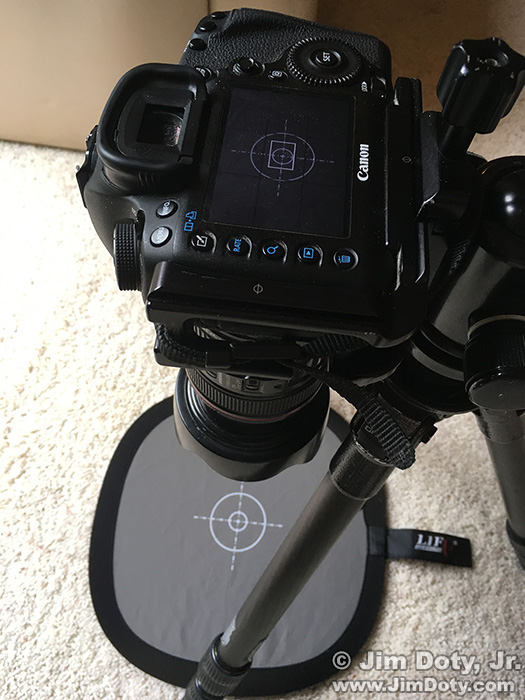
Camera, tripod, and an 18% gray card which has a white focusing target.
First, meter the gray card. Change the shutter speed until the exposure compensation scale reads zero. Make sure you fill the frame with the gray card. If your camera sees anything other than the gray card it will mess up the custom white balance. Take a picture of the gray card.
18% gray card image. Light source: blue sky. Camera white balance set to daylight (red arrow).
On the day I set this custom white balance, the light coming through the sliding glass doors came from a beautiful, clear blue sky. It turned my gray card blue. In photographic terms this bluish light is called a “cool” color balance with a color temperature around 10,000° Kelvin. The white balance on the camera was set to daylight (the sun symbol, red arrow). Note the blue pixels in the histogram (upper right corner) that are shifted to the right, and the red pixels shifted to the left.
Setting a custom white balance will shift this bluish tone back to a true neutral gray.
 The first step to setting a custom white balance with a Canon camera is to go to the camera menu, choose Custom White Balance, and press the “SET” button on the back of the camera.
 It will show you the photo you just took (in this case, the bluish looking gray card image) with this message: Only “compatible img’s displayed”. That message will disappear in a few seconds.
 Press the SET button again and the camera will ask you this question: “Use WB data from this image for Custom WB”? The camera wants to be sure you have the image you want to use. Spin the rear control dial to choose “OK” and push SET again.

Reminder message to change the camera’s WB to custom white balance.
The camera has now stored your newly created custom white balance data into its memory, but it won’t use this information until you tell it to use it. So the camera will send you this reminder message to set your camera’s white balance to “custom white balance”. Press SET on the back of the camera to answer the reminder.
Canon custom white balance icon.
Then change your camera’s white balance from Daylight to Custom White Balance. The Canon custom white balance symbol looks like a white semi-rounded shape over two tiny triangles. The Sony icon is similar and the Olympus icon has a rectangle over the two triangles. Some cameras use the letters CWB instead of an icon.
Meter the gray card once again. This is important. A change in the white balance setting can change the exposure. Make sure the exposure compensation scale is again at zero and take another picture of the gray card.
Light source: blue sky. Camera white balance set to “custom white balance”.
You should get an image like this. The camera applied the custom white balance data to make the 18% gray card look “gray”, like it is supposed to look, not blue. Note the custom white balance symbol (red arrow). The red, green, and blue pixels in the histogram are lined up on top of each other, which is how they should look when you photograph a gray card after setting a custom white balance. The pixels are also centered in the histogram, which is where they should be. If the gray card image on your LCD doesn’t look gray and if the RGB pixels aren’t lined up on top of each other in the histogram, you didn’t get something right along the way. Back up and do it again.
As long as the light doesn’t change, you are now all set to take pictures. If the light intensity changes, you will need to meter again. If the color of the light source changes (like from blue sky to a cloudy sky) you will need to create a new custom white balance.
If you aren’t used to setting a custom white balance, this might seem complicated at first but it will soon become second nature and easy to do.
There are some cloudy bright days when the color temperature of the light is neutral. Setting the custom white balance doesn’t change the color of the gray card at all. The before and after gray card images are the same exact neutral gray color. On days like this you can leave the white balance setting on Daylight.
The Custom White Balance Is Saved in Your Camera’s Memory
The custom white balance you just created is saved in your camera’s memory so you can go back to it at any time. Let’s say you set your custom balance for the existing lighting conditions in an indoor room. After taking some pictures indoors, you go outside to shoot in the bright sunlight. Just change the white balance on your camera to Daylight. If you decide to go back inside to take pictures in the room you were in before (and if the light in that room hasn’t changed), just switch the camera settings back to the custom white balance icon. Your camera will remember the custom white balance setting you created. The custom white balance setting you created will stay in the camera’s memory until you create a new custom white balance.
Some cameras allow you to save more than one custom white balance in the memory. If you are shooting an event in two rooms and one room has tungsten lights and the other room has fluorescent lights, you can create a custom white balance setting for each room. As you move back and forth between rooms, just make sure you select the right custom white balance for the room you are in.
Be sure and read the companion article which has more tips for setting a custom white balance.
Article Links
Why and When To Set A Custom White Balance
You Can Create High Quality Digital Images of Analog Prints, Even if You are Traveling
Setting a Custom White Balance Will Save You a Lot of Time
How to Use Your Camera’s Exposure Compensation ScaleÂ
How To Get Critical Focus in “Live View†Mode with a Magnified Image
ACR and RAW: Two of the Best Things You Can Do For Your Images – Be sure to check out the links at the end of the article.
Purchase Links
Double Bubble Level at Amazon.com
18% Gray Card with Target, (collapsible fabric) at Amazon.com