
It is difficult enough to create a beautiful nude image under normal circumstances, much less in the cold and snow. You need to bring some significant skills and experience to the task. So does your model.
Before you book your first nude shoot in the snow, you need to take off all of your clothes (including shoes and socks) and stand outside in the snow for a couple of minutes so you know what it is like.
Background Information
If you haven’t read them already, read these articles for background information.
Metering Wildlife in the Snow, Part One
How To Work With A Model When The Windchill is 4°
Testing Your Camera’s Snow Exposure Latitude
Protect Your Camera Gear in the Cold and Snow
Experience
It should go without saying that your first nude shoot should not be outside in the winter. You should have experience working with nude models in pleasant temperatures before you try shooting in the cold.
Posing
Outside in the cold is not the time to be teaching someone how to pose. It is too cold and it takes too much time. Work with an experienced nude model who knows how to pose. If you are working with a new nude model, shoot in the studio or shoot outside when it is warm, not in the winter.

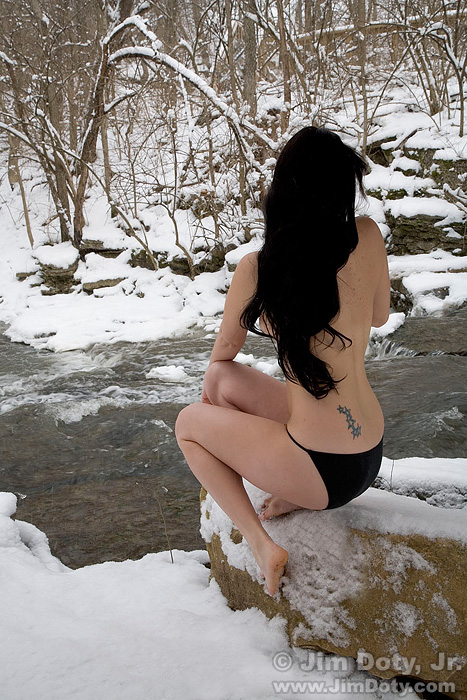
Sarah, Northern Michigan. Windchill 0°F.
Choosing a Model
Choose the right model. First you need an experienced nude model who knows how to pose. Second you need a nude model who is willing to shoot in the cold and snow. Very few models are suited for this kind of work. There are some excellent, first rate models who do not shoot in the cold. So find a model that is used to shooting in the snow (see How To Work With A Model When The Windchill is 4°). Communication is important. Even if the model has worked in the snow before, when you book the shoot make sure your model knows this will be a shoot in the snow.
Metering Considerations
Metering a nude model in the snow is a combination of the skills used for metering people in the snow and metering wildlife in the snow. Both the tonality of the model’s skin and the brightness of the snow are important.
When you do portraits in the snow the snowy background is not so important and the snow can be a bit blown out. When you do nudes in the snow the snow is more important. The goal is to find the right balance between of exposure compensation for the model’s skin (Metering People in the Snow) and exposure for the snow* (Metering Wildlife in the Snow, Part One). After you meter the model’s skin and add the correct amount of exposure compensation, make sure you are not two stops lighter than a meter reading for the snow. If you are more than two stops brighter, the snow will probably burn out*. Dial back on the exposure compensation for the skin so you don’t blow out the snow. This is easier to do with light skinned models and harder to do with dark skinned models. When in doubt, meter the snow and add 1 1/2 to two stops of light*, even if the model’s skin goes a little dark. Low contrast, cloudy-bright days work best.
*Every camera is different. It helps if you know your camera’s snow exposure latitude (read Testing Your Camera’s Snow Exposure Latitude) so you know the limits for your camera.
If you are shooting a dark skinned model, push the snow tonality so it is as light as possible without getting a significant amount of blinkies in the scene. Shoot RAW and use Adobe Camera Raw in post-processing to bring up the tonality of the model’s skin.
One creative way to balance the tonality between the model and the snow is to use silver body paint.

Brooke, Colorado. Windchill 35°F.
Dealing with the Cold
Do everything you can to get ready before the model gets out of the car (or disrobes if you are a long way from the car). That includes metering, deciding on the composition, setting up the tripod, and getting the camera ready to go. You should be shooting within a few seconds of the model stepping into the scene and posing. Shoot for a couple of minutes and give the model a break to warm up (follow the suggestions in How To Work With A Model When The Windchill is 4°). After the model has warmed up, shoot for another couple of minutes. Take another warm up break and shoot for another couple of minutes. Stop this process when the model is done. Don’t push to shoot a little longer. Your model’s well being is way more important than your images.
Keep track of the windchill. It makes a big difference. The windchill was zero (0° F) when Sarah and I created the image on this page. The lower the windchill, the shorter each shooting session will need to be, and the few the number of sessions your model will be able to do.
Protect Your Camera
Don’t bring your cold camera into a warm car or you could do some serious damage. (Protect Your Camera Gear in the Cold and Snow). Keep your camera in the cold until the whole shoot is over. Then zip it up in a camera bag before you put it in the warm car.
There is a lot to keep track of and all of this can feel a bit complicated, but the results are worth it.
Originally posted Feb. 20, 2016. Updated and re-posted January 8, 2017. Updated December 27, 2018.
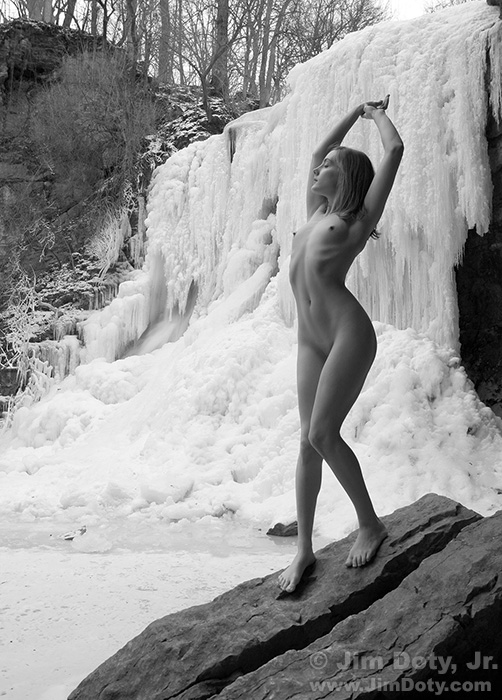
Brooke, Ohio
The Winter Photography Series
“How To” Series: Winter Photography – An Overview
Metering Daytime Winter Scenes
Metering Wildlife in the Snow, Part One
Metering Wildlife in the Snow, Part Two
Metering Evening Winter Scenes
Metering Nighttime Winter Scenes
How to Protect Your Camera Gear in the Cold and Snow
Testing Your Camera’s Snow Exposure Latitude
The Sunny f16 Rule Isn’t Reliable in Winter
How To Work With A Model When The Windchill is 4°
How to Photograph a Nude Model in the Snow
Winter Photography Safety Essentials
More Links
Exposure Warning: Turn On The Blinkies
ACR and RAW: Two of the Best Things You Can Do For Your Images