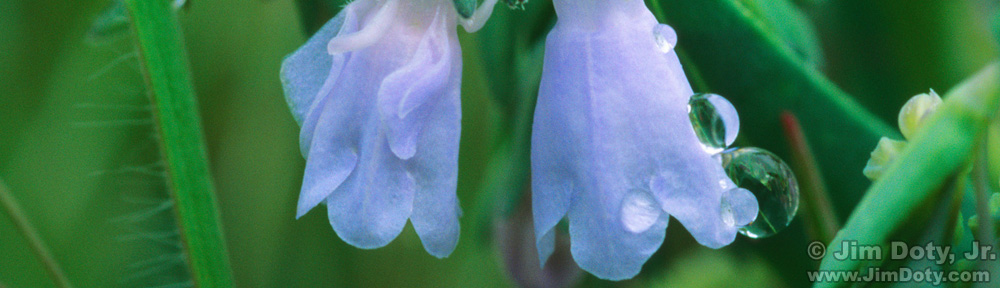

Sarah
Sarah is a professional fitness trainer and we have worked together before. We had another photo shoot Saturday morning and this is the first photo I optimized from the shoot.
One of the keys to creating a photo like this is to work with someone with a well toned body who has experience controlling the various muscle groups of the body. Sarah has that kind of background and experience. In addition to knowing how to pose, Sarah is also good at following directions to tweak a pose for the best results.
A medium lens focal length (58 mm for this photo) gives a nice perspective for a 3/4 portrait with pleasing body perspectives. If you move in too close you will end up with a distorted version of the body.
A big key is lighting. Sarah’s body is at an angle to the camera. If you imagine a large, analog clock face on the floor of my studio, Sarah is in the middle of the clock face and the camera is at 6 o’clock on the dial. Sarah’s body is turned toward 7:30. I moved the studio flash units (also called “strobes”) around the dial of the clock until I had just the combination of light and shadow that would best accentuate the muscles. One strobe was close to 10 on the clock dial and the other was between 3 and 4. Moving the strobes as little as two or three inches either way around the clock face made a big difference in the lighting, so exact positioning was important to get the look I wanted. Most quality studio strobes have a modeling lamp, a continuous light source that allows you to preview the look of the photo, the relative intensity of the light and where the light and shadows will be. I wouldn’t buy a studio strobe that didn’t have a variable power modeling lamp that allows you to preview the look and intensity of the flash output. Both studio strobes (Alien Bees model B800) were bounced into umbrellas to soften the shadows for a more contoured look.

Alien Bees B800 studio flash with umbrella and light stand.
With a pair of B800 flash units (“Alien Green” color in the photo above) I have all the power I need for a small studio space (13×18 feet). I also have a pair of B400 flash units (“Martian Pink” in the above photo) when I need to use three or four strobes. I almost never have all of the strobes set to the same power output so the B400 strobes (which have half the maximum power output of the B800 strobes) work just fine for lower power settings. (More Alien Bees info at the links below.)Â If you aren’t sure if you will like working with studio strobes you can always rent one or two of them to try them on for size (link below).
Going low tech to trigger the Alien Bees, I use a Canon Speedlite on my camera set to 1/128 manual power and swiveled to point away from Sarah. The power output of my in camera flash is too low to affect the image, but enough to trigger the optical slaves on the studio strobes. No wires necessary.
Set the white balance on your camera to match the studio flash units. The “Daylight” or “Flash” settings usually work well. Or even better, you can do a custom white balance. Check your camera manual to learn how to do this for your particular camera model.
Metering is very important. Choose an aperture that will give you the depth of field you want and adjust the power of the strobes to match your chosen aperture. Studio strobes are not automatic and the power output has to be set manually. An incident light meter will give you the most precise metering and I use one for tricky lighting situations (link below for more information). If you don’t have an incident light meter, take a closeup photo of mostly skin (in this case I used the shoulder facing the strobe). If the photo isn’t mostly filled with skin, you won’t get an accurate histogram for the skin exposure. Check the histogram to make sure none of the channels are blown out (see below). If one of the channels is blown out, reduce the power output for that strobe, do another test shot and check the histogram again. Then repeat the process on the other side for the other strobe.

Histogram with blown out red channel.
The histogram for this photo of Sarah’s shoulder shows a blown out red channel. Note the red pixels that are bunched up against the right edge of the histogram. The green and blue channels are safe. After taking this photo and checking the red channel (the one most likely to be blown out when photographing human skin), I dialed down the power of the studio strobe. Don’t use the photo on the LCD panel on the back of your camera to judge exposure. It isn’t accurate enough to get a good exposure. Use the histogram.

Histogram with a good red channel for light toned skin.
After dialing down the power of the studio flash and taking another photo, the red pixels in this histogram are “safe”. There is a “mountain peak” of red pixels to the right of the center of the histogram and there are no red pixels jammed up against the right edge of the histogram. This is just about ideal for light toned skin. For dark toned skin the red pixels should be closer to the center of the histogram. Note the aperture and shutter speed for both photos is the same, 1/125 at f/8. I corrected the exposure by changing the power on the studio strobe. If the red channel pixels were too far to the left, I would have upped the power on the strobe to get the mountain of red pixels to the right of center.

Alien Bees B800 studio flash set to 3/8 power.
The white power lever on the back of this B800 is set to 3/8 power. The continuously variable power output can be set anywhere from full power to 1/32 power. You aren’t limited to a fixed set of positions so you can get exactly the amount of power you want.
Once the lights are positioned and metering is taken care of, try a number of variations on the basic pose. Take plenty of pictures. Stop periodically and show the photos on the back of your camera to the person you are working with. Talk about what you both like best, what’s working and what isn’t. When you’ve got what you both want, move on to the next basic pose and again try several variations on the pose. Experiment.
If you change the angle of the body, you will have to move the strobes to get the look you want. Every body angle change means a change in strobe positions. It takes time but it is worth the effort. If you change the “strobe to body” distance to get the look you want (the strobe to body distance changes the look of the shadows), you will need to meter again. To soften the shadows, move the strobes/umbrellas closer to the body. To intensify the shadows, move the strobes/umbrellas farther from the body, or take off the umbrellas and aim the strobes at your subject.
I happen to like this photo in black and white. After opening the image in Adobe Camera Raw, the conversion was done with a black and white adjustment layer in Photoshop.
Have fun. A good shoot can be hard work but it should still be fun!
If you are looking for a fitness trainer, portrait photographer, or on-on-one photography lessons (including Photoshop Elements and Photoshop) in the Columbus Ohio area, check out the links below.
Photo Data: Canon 5D Mark III. Canon EF 24-105mm f/4L IS USM lens at 58mm. 1/125 sec, f/8, ISO 100. Two Alien Bees B800 studio strobes bounced into umbrellas and set at 3/8 power.
Links
To learn more about portrait photography, lenses and perspective, lighting, white balance, metering, using histograms, choosing apertures to control depth of field, flash photography, studio strobes, and a whole lot more, read my book Digital Photography Exposure for Dummies. It is one of the highest rated photography books at Amazon.com. Learn more here and order it at Amazon.
After you have mastered the basics in my book, if you want to make portrait photography your thing, you will want to move on to some specialized books on portraits, posing, and lighting. This set of books is the place to get started: Excellent “How To Photograph People†Books.
If you need a good fitness trainer check out Sarah’s site: BodyBalance.tv. There are options for groups, partner sessions, and individual sessions. Be sure to check out the recipes under “Blog”.
If you are looking for a portrait photographer in Columbus Ohio, send me an email.
If you want to learn photography, one of the best and fastest ways is to shoot with a professional photographer. I do one-on-one “Shoot with a Pro” photo sessions in Columbus. If you want to work with a professional model or fitness trainer as part of your one-on-one photo session, I can arrange that.
I highly recommend Alien Bees studio flash units for the photographer that wants good, consistent quality at an economical price. There are cheaper strobes out there but they don’t have anywhere near the same quality, reliability, and consistency as Alien Bees. Cheaper strobes tend to vary in power from the output you have selected each time you push the shutter, which is really maddening. The bottom line I have not found studio flash units at a better price than Alien Bees that I can recommend with confidence.
You can get higher quality stobes than Alien Bees with more bells and whistles, but at a higher price. Paul C. Buff who makes Alien Bees also makes the highly rated White Lightning strobes and the top of the line Einstein strobes. In addition to great products, their customer service is top notch. There are other manufacturers out there who make superb products but at several times the price.
Alien Bees studio strobes at the Paul C. Buff web site.
Beginner Bee Alien Bees B800 package (B800 studio strobe, light stand, umbrella, and case).
Rent studio flash units at LensRentals.com. You can rent an Alien Bees B800 flash for $32 for four days (plus shipping). I would suggest you rent two and use one as your main light source and the other for the fill light.
Article: Simplify your life with an incident light meter.
The Best Incident Light Meters at my Amazon.com photography store.