
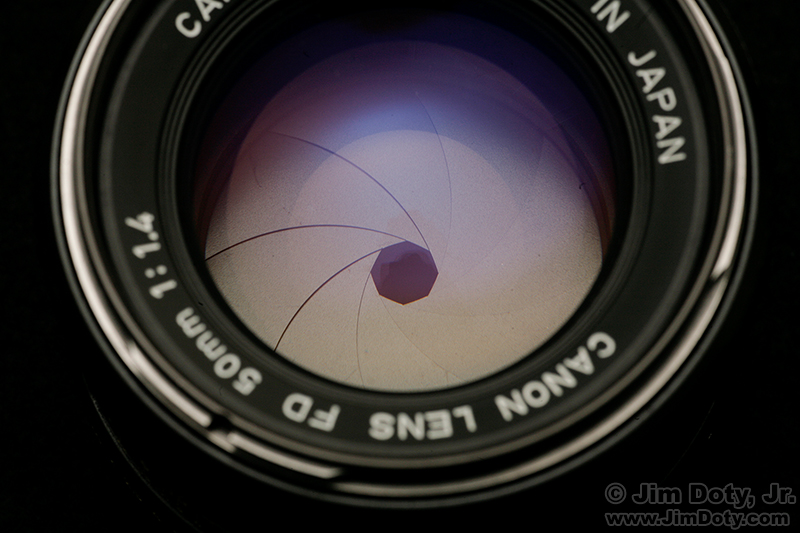
Almost every lens has a more or less round “aperture”, the opening that lets light through to the sensor or film. Most modern lenses have aperture blades that open and close to change the size of the opening. You can see the aperture blades in this photo. Larger apertures obviously let in more light in a given period of time and smaller apertures let in less light in the same period of time. The size of the aperture opening is one factor that determines the exposure. Just as important, the size of the aperture helps determine the depth of field in each image.
f-stops Explained
The size of the aperture opening is indicated by an “f-stop” like f/4 or f/8 (or f4 or f8). The slash which is sometimes included between the letter f and the number is a reminder that these numbers are a ratio and indicate a fraction. So f/4 means “focal ratio 1/4”, f/8 means “f ratio 1/8”, and f/16 means “f ratio 1/16”. f/16 (1/16) is a much smaller aperture than f/4 (1/4).
An f-stop is the focal ratio (hence the “f”) of the diameter of the aperture opening over the focal length of the lens. If the diameter of the aperture opening is 25mm and the focal length of the lens is 100mm, the focal ratio or f-stop is 25mm/100mm, or in other words 1/4 or f/4 or f4.
Â
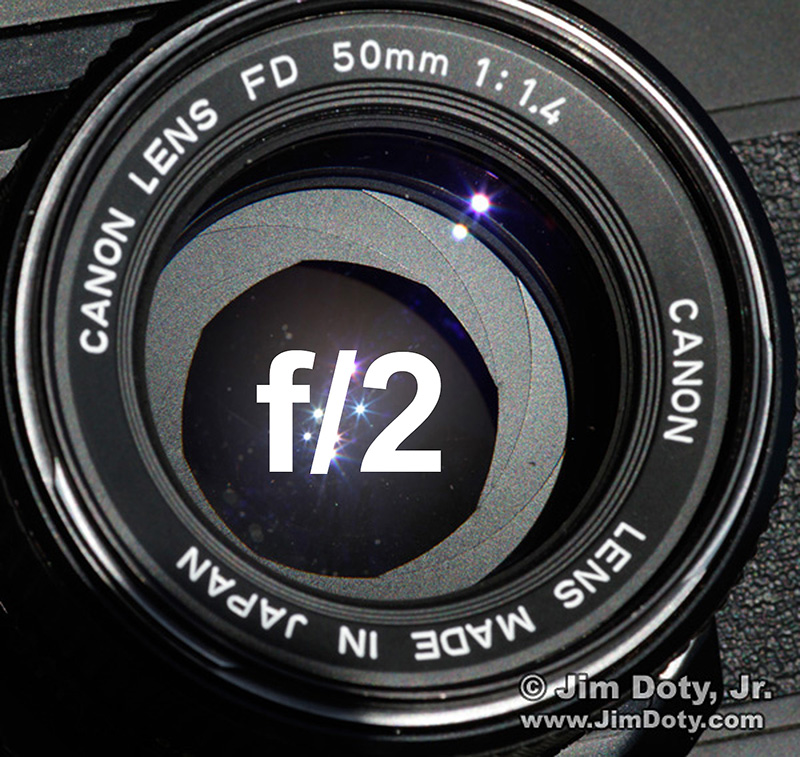
The aperture of this 50mm lens is set at f/2. The aperture diameter is 25mm and the lens focal length is 50mm. So the aperture/focal length ratio is 25mm/50mm or 1/2 or f/2 of f2.
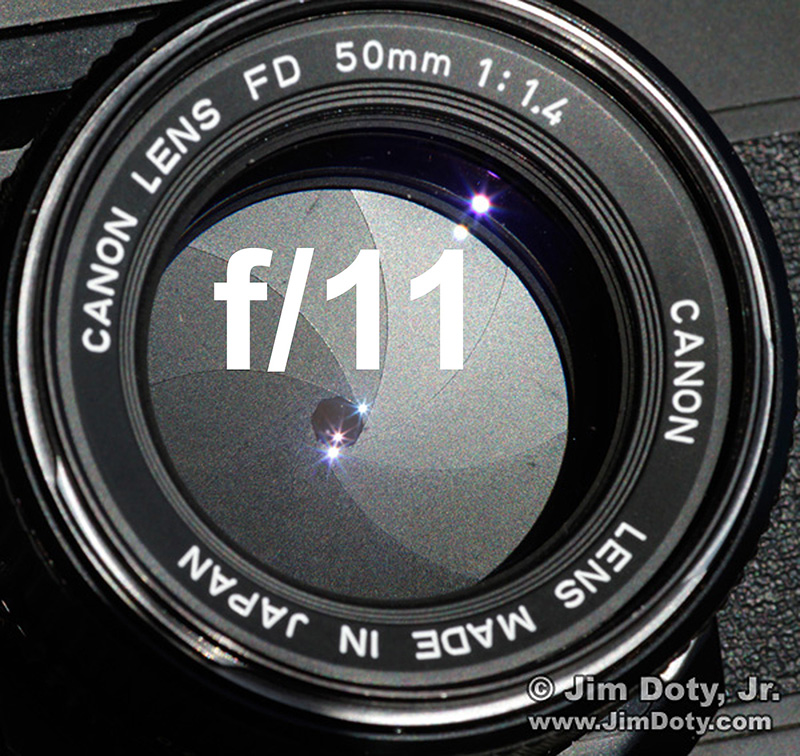
The aperture of this 50mm lens is set at f/11, which is, as you can see, a much smaller aperture than f/2. The aperture diameter is about 4.5mm and the lens focal length is 50mm. So the f-stop focal ratio is 4.5mm/50mm which is (with a smidge of rounding) 1/11 or f/11 or f11.
f-stop Increments
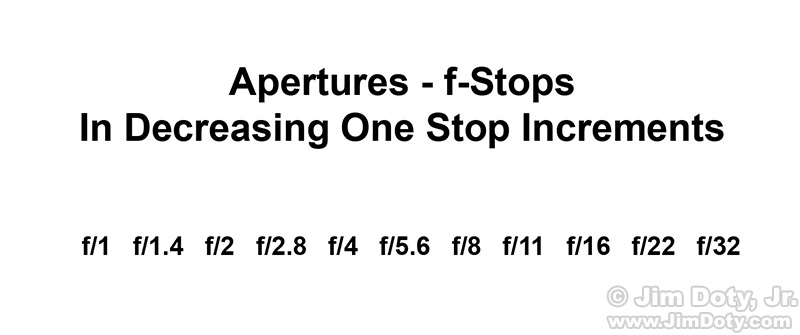
f-stops can be measured in full stop increments, or in fractions of a stop, usually in halves or thirds. Assuming the same exposure time, when you change the f-stop by one full stop, the light is either doubled or halved. In this chart as you go from left to right the apertures are getting smaller, one full stop at a time so the light is cut in half for each one stop change. f/11 is one stop smaller than f/8 so the light is cut in half. Going the other direction, the f-stops are getting larger so f/5.6 lets in twice as much light as f/8. All of this is important for exposure which is a topic for other articles. See the exposure links below.
Reciprocity
Thanks to reciprocity, you can use an f-stop that is one stop smaller and a shutter speed that is twice as long and get the same exact exposure, or vice versa. That means you have a number of aperture and shutter speed combinations that will all give you the same same amount of light on your sensor or film, but very different artistic looks. Reciprocity makes all kinds of artistic options possible. More about this in the next section and at the exposure links below.
f-stops and Depth of Field
f-stops are a powerful tool when it comes to artistic decisions. f-stops determine the depth of field, which is the apparent amount of near to far sharpness in an image. Large f-stops give you less depth of field (a smaller zone of sharpness), and small f-stops give you a bigger or deeper zone of sharpness.
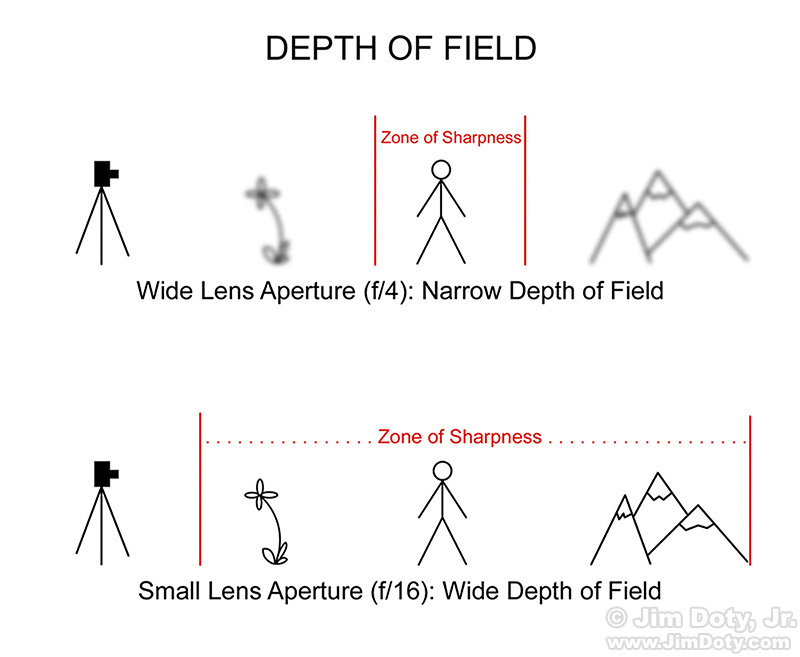
In this illustration you are taking a picture of a friend 10 feet away with flowers in the foreground 5 feet away and mountains in the background at infinity. With 28mm wide angle lens focused on your friend, by your choice of f-stop you can have your friend in focus and the flowers and mountains somewhat blurred (f/4). Or with a different choice of f-stop you can have your friend, the flowers, and the mountains all in focus (f/16).
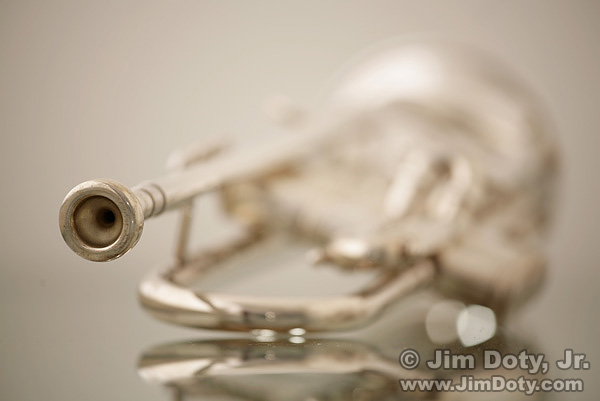
In this photo and the next, I focused the lens on the mouthpiece of this trumpet. With an aperture of f/4 the depth of field in this image is very shallow.
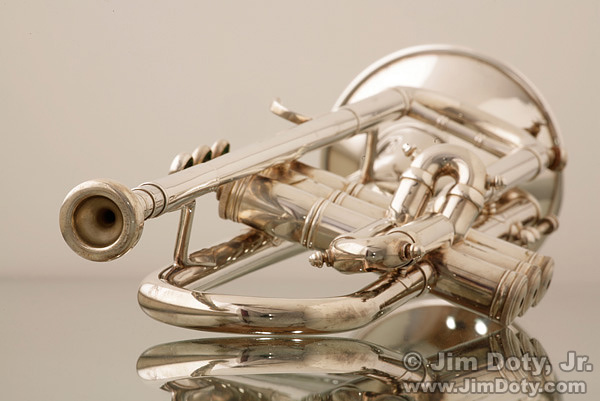
By changing the aperture to f/32, I have dramatically increased the depth of field in this image. A change of aperture necessitated a change in shutter speed to keep the exposure the same. Reciprocity again!
Setting the Depth of Field
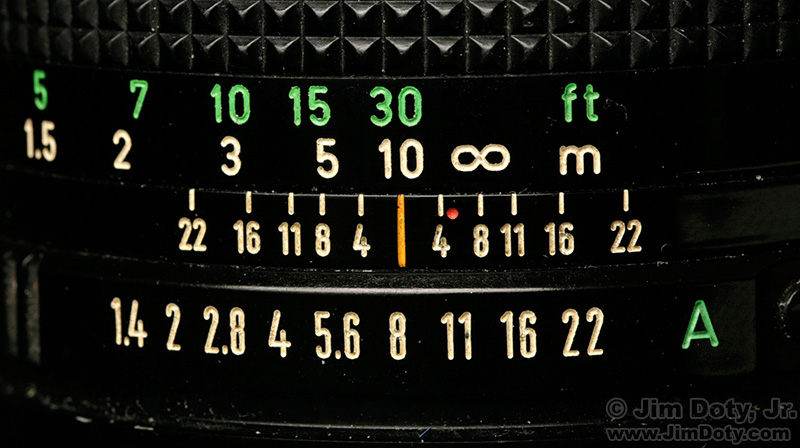
On older manual lenses, you set the aperture/f-stop using a ring on the lens. This lens has a choice of apertures between f/1.4 and f/22. The aperture is set to f/8 (opposite the orange mark). This lens also has a depth of field scale on either side of the orange mark. Read the pair of numbers on the scale for the f-stop you are using and look at the distance scale to see the depth of field. This lens is focused at 30 feet (green scale). If you read above the 8s on either side of the orange mark and look at the green distance scale, this depth of field scale tells you everything from about 15 feet to infinity will look sharp.

With most modern cameras the lens aperture is set on the camera with an indication on the LCD. Most modern lenses do not come with a depth of field scale. You will have to use other options to determine the depth of field.
How Much Depth of Field Will I Get in My Images?
In addition to the lens aperture you choose, depth of field is also determined by the focal length of the lens, the distance the lens is focused, the size of the sensor or film in your camera, and the size of the final print you want to create. These are all discussed at the depth of field links at the end of this article.
If your camera has a depth of field preview button, use it. It will give you a pretty good idea how your final image will look. When I buy a camera the depth of field preview button is on my list of essential features.
One way to figure out depth of field is to use an online Depth of Field Calculator like the one here. Of course it is not very practical to drag a computer around with you to check depth of field. But you can try out various combinations of focal length and f-stop to get an idea how they change the depth of field.
You can also use a hyperfocal distance chart which you can print out and carry with you. More information is at the links below.
There are also depth of field calculators for your smart phone. This is my preferred way to work when I am out in the field. My favorite is “Simple DoF Calculator” by Dennis van den Berg. See the next section and link below.
Simple DoF Calculator
The Simple Dof Calculator, second row, first app, is my preferred depth of field app for my iPhone. It is simple to use.
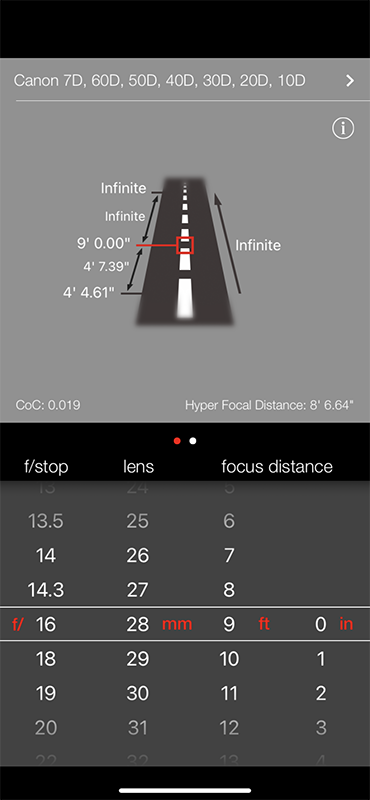
Open the app, enter the camera model you are using (top pf the app), the f-stop you are using, the focal length of your lens, and the distance your lens is focused at, and it will tell you the resulting depth of field. In this example I am using a Canon 7D, the aperture is set to f/16, with a 28mm lens focused at 9 feet. The depth of field is from about 4 feet 4 inches to infinity. If your choices don’t give you enough depth of field, use a wider angle lens, a smaller f-stop, or both.
If you want to set the focused distance of the lens to the hyperfocal distance, the app tells you that too. In this example it is 8 feet 6 inches. If you are not familiar with using hyperfocal distances, check out the detailed articles linked below.
Depth of Field Examples
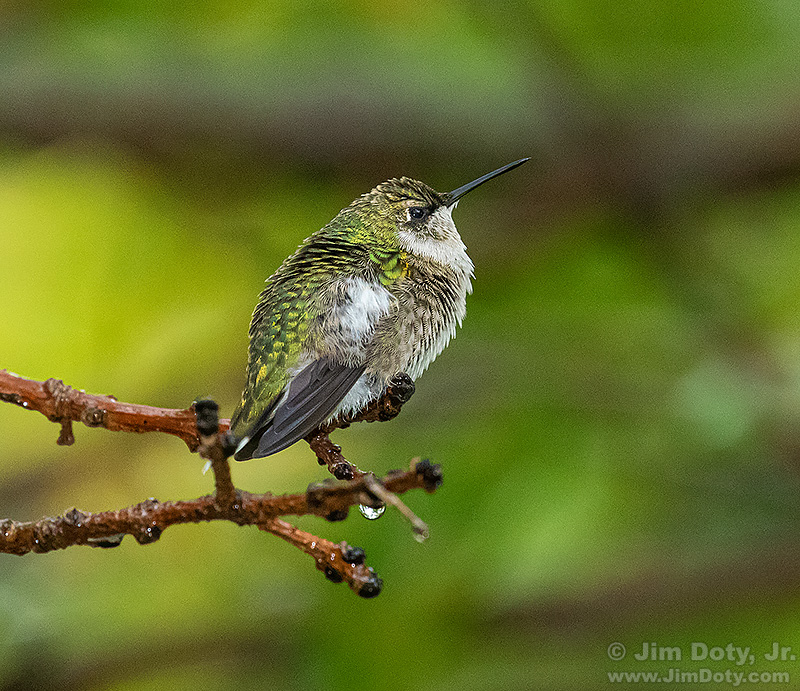
There were a lot of background branches in the tree where this hummingbird was sitting, so I used a long lens (400mm) and a medium aperture (f/8) to the minimize depth of field and blur the background.
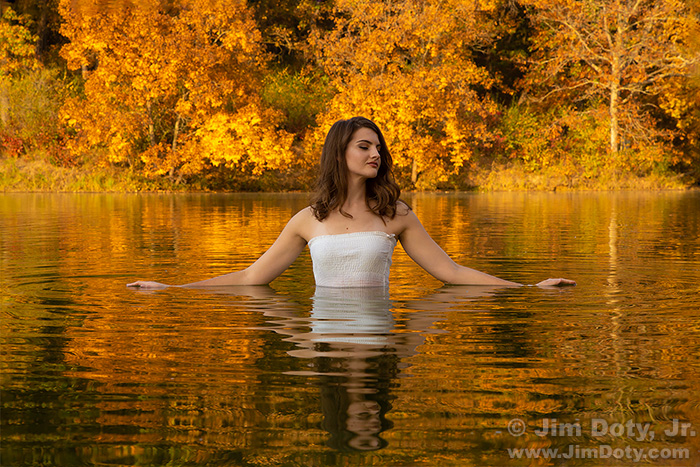
I didn’t want the background trees to blur out too much, so I used an 80mm focal length and an aperture of f/11 to keep Beth looking sharp and the background somewhat sharp. If I wanted to blur the background more I would have used a longer lens, backed up, and used a wider lens aperture like f/8 or f/5.6. To make the background leaves sharper I would have chosen f/16 or f/22 as the aperture.
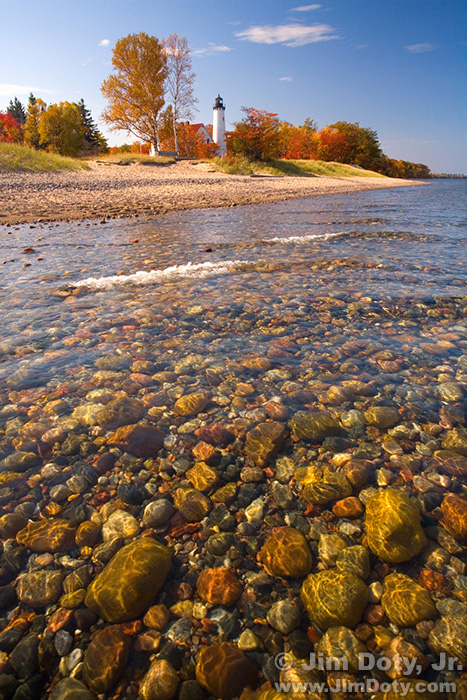
To get as much depth of field as possible from the lighthouse on the shore to the rocks at my very cold feet, I used a 22mm wide angle focal length and a small lens aperture of f/16 and focused at the hyperfocal distance. Incidentally, standing in frigid Lake Michigan water in your bare feet is not the place to check your depth of field chart or app.
This article was originally posted December 29, 2021. Most recent update, January 9, 2022.
Book Link
For 40 pages of detailed information on controlling depth of field, get my high rated photography book at Amazon. You can get used copies at a very reasonable price.
Depth of Field Article Links
Controlling Depth of Field with 35mm Film and Full Frame Digital Cameras
Hyperfocal Distance Chart for 35mm Film and Full Frame Digital Cameras
Controlling Depth of Field with Digital SLRs with a Field of View (FOV) Crop
Hyperfocal Distance Chart for Digital SLRs with a FOV Crop
Harold Merklinger on Depth of Field
Depth of Field for PDAs and Smart Phones
Exposure Article Links
Speaking Your Camera’s Exposure Language: Aperture, Shutter Speed, and ISO
Using Reflected Light Meters, Part One
Using Reflected Light Meters, Part Two
Simplify Your Life with an Incident Light Meter
Turn Your Camera Meter Into An Incident Light Meter: Using an ExpoDisc
Using a Gray Card, Incident Light Metering on the Cheap
The RAW versus Jpeg Exposure Advantage
DOF Calculators
Online Depth of Field Calculator
Simple DOF Calculator for your phone by Dennis van den Berg at the App store.