Using a color picker is a quick and simple way to learn how software (like Photoshop and Photoshop Elements) identifies digital colors with numerical systems. You can follow along in this tutorial. To make this tutorial quick and simple, we will use an online color picker.
In a new tab, open the online color picker at ColorPicker.com so you can go back and forth between that page and this tutorial simply by clicking the tabs in your browser.
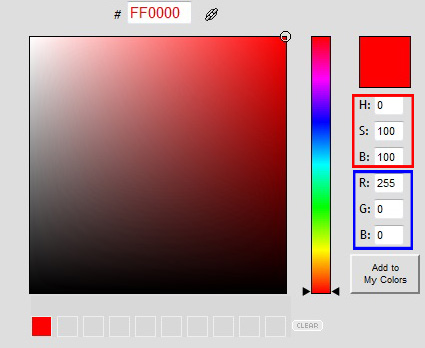
The Color Picker at ColorPicker.com uses two systems to identify color, HSB (Hue, Saturation, Brightness), and RGB (Red, Green, Blue). I marked the HSB system with a red box and the RGB system with a blue box. In some software the HSB system is called HSL with the L standing for Luminosity, another name for brightness. The two systems use two different sets of numbers for the same colors. If you change the values in one system, the numbers for the other system will change automatically.
If you learned about color wheels in a physics class where you talked about light in terms of wavelengths, the primary colors are red, yellow, and blue. But in the world of computers, software, monitors, cameras, television sets, and digital projectors, the primary colors are Red, Green, and Blue (RGB). So we will look at the RGB system first.
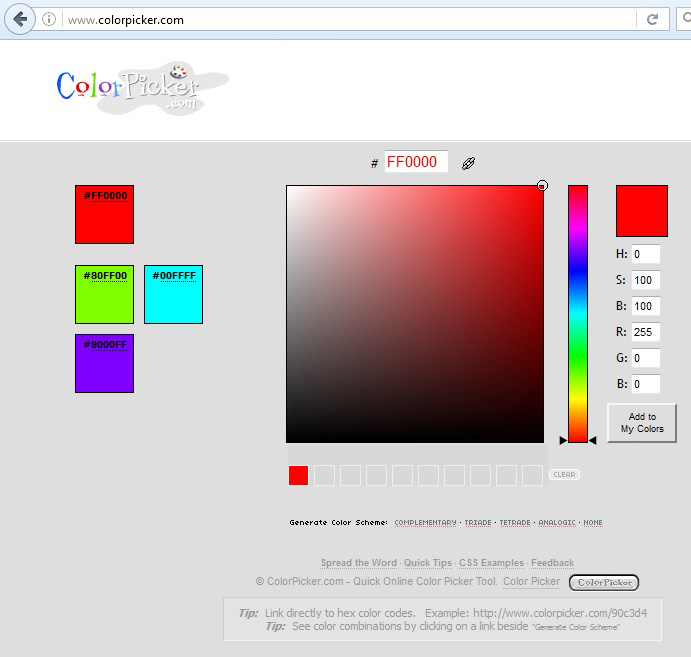
Let’s create Photoshop red. Go to the Color Picker (at ColorPicker.com) and enter these RGB values: 255, 0, 0. Then click Add to My Colors. You should see results like the screen capture immediately above. You should see a small red square above the HSB values. This is the color you just selected. The HSB values should change to 0, 100, 100 (more about HSB later). In digital and Photoshop terms, this is pure red. By pure red I mean Photoshop red at the maximum saturation and brightness settings.
The large square illustrates potential variations on red when you change the saturation or brightness. There is a circle at the top right corner of the large square which shows the color you chose, pure red, at maximum saturation and brightness. Above the large square you see the hexadecimal value for red which is used on the internet (#FF0000) when coding pages in html. Go ahead and click in various places in the large square and watch the red colors change in the small square just above HSB. The S and B values will change to indicate different saturation and brightness levels. The RGB values will change too.
FYI, 255 is the maximum number you can enter for an RGB value. 0 is the minimum.
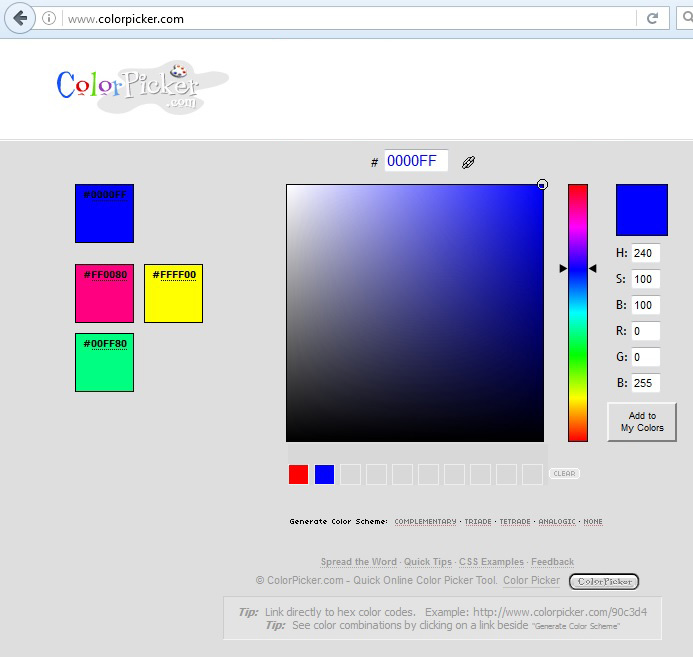
Now lets go for pure Photoshop blue. Enter these RGB values: 0, 0, 255. Then click Add to My Colors. The small upper right square should turn pure blue. The HSB values should be 240, 100, 100. The large square should have a small circle in the upper right corner to indicate pure blue. Go ahead and click in the large square to change the saturation and brightness levels for blue and watch the HSB and RGB values change.
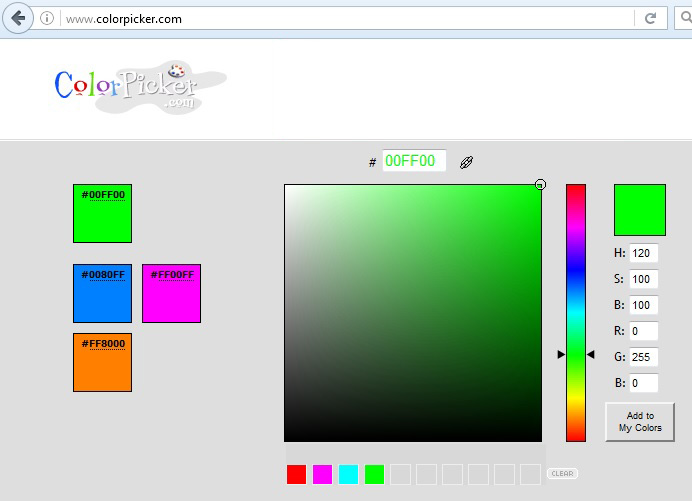
By now you have figured out by now how to get pure Photoshop green. Change the RGB values to 0, 255, 0 and click Add to My Colors.
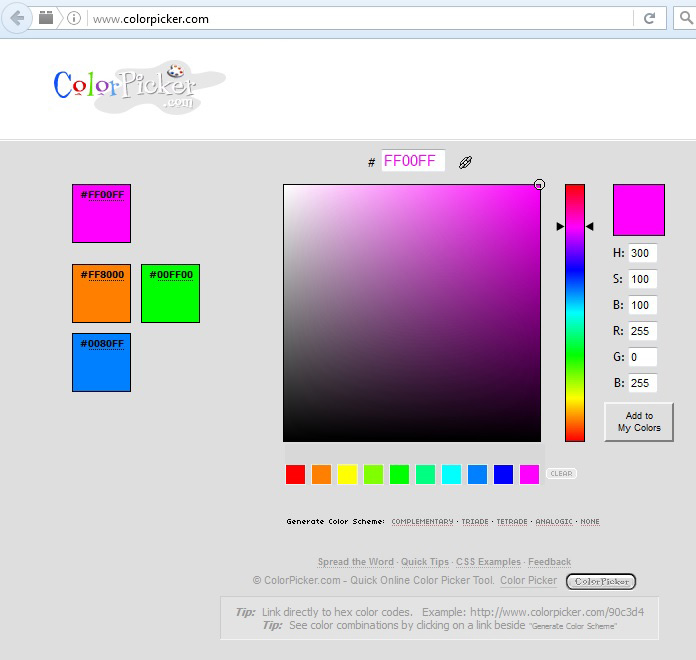
Now for the secondary Photoshop colors: magenta, cyan, and yellow. They are equal mixtures of two of the three RGB primary colors. For pure Photoshop magenta enter these RGB values: 255, 0, 255. Magenta is an equal mixture of red and blue. Just like with the other colors, you can click in the large square to try different variations on pure magenta.
To get pure Photoshop yellow, use these RGB values: 255, 255, 0.
To get pure Photoshop cyan, the RGB values would be 0, 255, 255.
For white, RGB =Â 255, 255, 255.
For black RGB =Â 0, 0, 0.
I have been referring to “pure” Photoshop colors, which, as I said before, means looking at each primary or secondary hue (color) at maximum saturation and brightness, which brings us to the HSB system (which you have already seen in action). HSB stands for Hue, Saturation, and Brightness. Hue refers to colors on a 360 degree color wheel. 0° and 360° in Photoshop terms both stand for Photoshop red. Green is 120° and Blue is 240°. For the secondary colors, yellow is 60°, cyan is 180° and magenta is 300°. On the color wheel, the secondary colors as indicated in degrees are exactly half way in between the primary colors. 100 (as in 100%) is the maximum value you can choose for Saturation and Brightness. The minimum value is 0.
So lets go for pure Photoshop green using the HSB system. Set the HSB values for 120, 100, 100 and click Add to My Colors. You should see pure Photoshop green. Note that, as expected, the RGB values changed to 0, 255, 0.
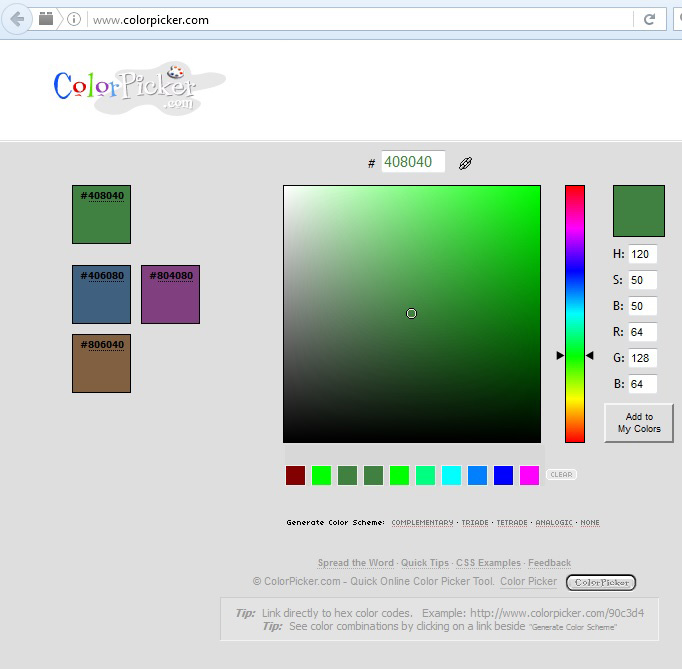
To get variations in saturation and brightness, change the values for S and B from 0 to 100. In the screen capture above I left the Hue value at 120 and reduced both S and B to 50. In the large square the color indicator circle jumped to the middle to show the new color.
Try these HSB values for green: 120, 0, 100. You get white because you still have maximum brightness but you reduced saturation to 0, removing all color. Try these HSB values: 120, 100, 0. You get black since you reduced brightness to zero.
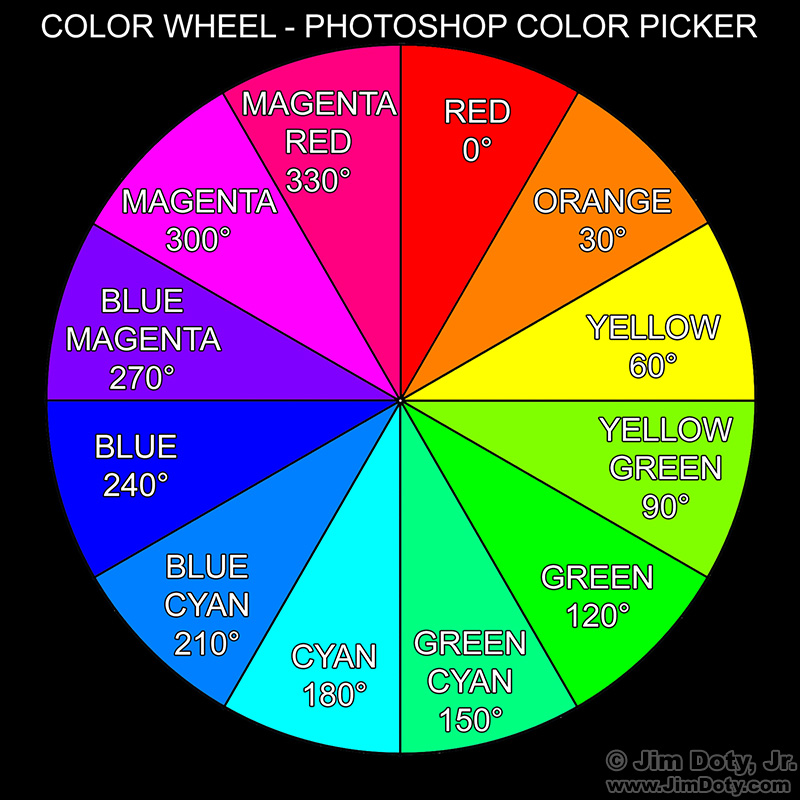
The primary, secondary, and tertiary colors with the H value in degrees from Photoshop’s HSB system (S and B values at 100).
By leaving S and B at 100, you can create any of Photoshop’s primary, secondary, and tertiary colors by entering the correct values for H from the color wheel above. You can also get all of the colors in between by changing the H value to anything from 0 to 360.
To pick colors visually, rather than numerically, drag the double black diamonds up and down the vertical color bar in the middle of the Color Picker until you see the general hue of colors you want in the large square. Then pick the exact color you want in that family by clicking in the large square. To remember that exact color to use later, just write down the HSB or RGB values.
Everything you did in this tutorial using the HSB and RGB color systems works the same way in the color picker in Photoshop or Photoshop Elements. When you open the color picker in Photoshop or Elements, you also get additional color systems that I will cover in another article.
Go ahead and experiment. The more you practice with these two systems, the more comfortable you will be with how Photoshop deals numerically with colors.
Series Links
“How To” Series: Photoshop’s Color Tools and Systems
Learning Photoshop Colors – A Color Picker Tutorial
Tutorial: Using Photoshop’s Color Selection Tools
How to Create Your Own Photoshop Color Wheel
There are all kinds of free photography lessons at JimDoty.com.
Article Links
The Best Digital Photography Books
The Best Introductions to Elements, Photoshop, and Lightroom
Lightroom & Photoshop: The Essential Books
The Best Books: The “Mastering Photoshop†Series
Book Purchase Links
If you want to master color in Photoshop, these are the books to get. Click on a title link to buy the book from Amazon.com via my photography store.
Professional Photoshop: The Classic Guide to Color Correction (5th Edition) by Dan Margulis.
Dan Margulis is the best of the best. He is one of the first three persons to be named as a member of the Photoshop Hall of Fame. What Margulis teaches you to do with color is amazing. The before and after images will make your jaw drop.
Scott Kelby, President of the National Association of Photoshop Professionals, says “Dan Margulis is the world’s leading expert on Photoshop Color. Professional Photoshop is considered to be the bible on color correction and prepress.â€
David Biedney, author of Photoshop Channel Chops, says “Dan Margulis is simply the best writer in the computer graphics field today, and his staggering knowledge of working with imagery in Photoshop and getting the results onto paper is unmatched by any self proclaimed ‘Photoshop Guru.’ He has an amazing sense of humor, arrives to the point in the most entertaining and comprehensive ways, yet never wavers from the task of teaching you how to think better.”
This wonderful book is out of print but you can still get it from Amazon. Just click on the link above to the book and use the Buy at Amazon button.
Photoshop LAB Color: The Canyon Conundrum and Other Adventures in the Most Powerful Colorspace (2nd Edition) by Dan Margulis
Why get this book?
David Biedny, author of Photoshop Channel Chops, called Photoshop LAB Color “probably the most important Photoshop book ever written.â€
Scott Kelby, President of the national Association of Photoshop Professionals, wrote “This book will radically change how we do color correction . . . it’s that revolutionary.â€
This is the second edition. You can also get the first edition on the used market from Amazon.
Adobe Photoshop Master Class (2nd Edition) by John Paul Caponigro. John Paul Caponigro is a master at photography and Photoshop and one of the best when it comes to color and Photoshop artistry. If you want to adjust colors to turn your photographs into works of art, this is the book to get. Click on the Buy at Amazon button to buy this out of print book from one of Amazon’s third party sellers.
This is another wonderful out of print book that you can get from Amazon’s third party sellers. just click on the book link and choose the Buy at Amazon button.
These books and a lot more are all available in the Mastering Photoshop and Lightroom section of my Amazon.com powered photography store. You get the same great Amazon prices, fast delivery, excellent service, and guarantee. And you help support my photography sites. Thanks.

