Testing your camera’s color exposure latitude is a key to getting good color in your digital photographs. This is a sequel to The Best Colors Come From the Best Exposures. I would suggest you read that article first.
The “color exposure latitude” of your camera tells you how far you can get from the ideal exposure and still get the very best colors. It tells you how precise your metering needs to be to get the best colors your camera is capable of producing. It is different for every camera and the only way to know what it is for your camera is to do a test.
The best way to do this test is to get a Gretag-Macbeth ColorChecker (a purchase link is below). They are carefully made to exacting standards of color and reflectance, matching the reflectance of the colors in the real world.
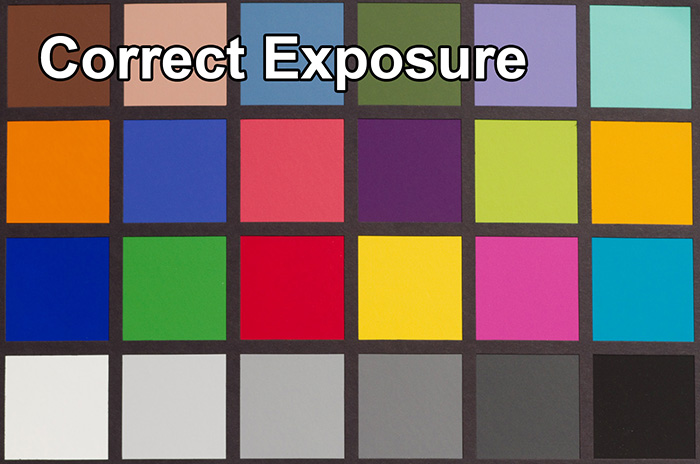
Or you can make your own. A home made version won’t be as versatile or precise, but at least it will give you a general idea what is going on with your camera. To make your own, go to the local paint store and pick up some paint samples (get matte, non-glossy samples if at all possible) that are as close to the ColorChecker colors as possible. A photo of a ColorChecker is immediately below. Get paint samples of the basic colors (third row from the top), get a range of pastel paint colors to match several of the colors in rows 1 and 2, and get black and white. Paste 2 inch color squares on a sturdy piece of poster board or foam core and add part of a gray card for something truly neutral gray in color.
On a bright sunny day in the middle of the day, set your camera in manual mode with an ISO of 100 and the lens aperture at f/11. Take a photo of the color chart at the ideal exposure by adjusting the shutter speed. The sun should be behind you and the chart in front of you (keep your shadow off the chart). You can determine the ideal exposure using a gray card or by using an incident light meter. On a bright sunny day with no clouds, at ISO 100 and a lens aperture of f/11, the shutter speed should be close to 1/200 second. After you have taken you “ideal” exposure, change the shutter speeds on the camera to take a series of photos in half or third stop increments from 3 or 4 stops over the ideal exposure to 6 or 7 stops under the ideal exposure.
Set your camera to capture both RAW plus JPEG files at the same time. If it won’t do that, do two sets of photos, one with RAW captures and one with JPEG captures. If your camera won’t provide you with RAW files, then just do a set of JPEG captures.
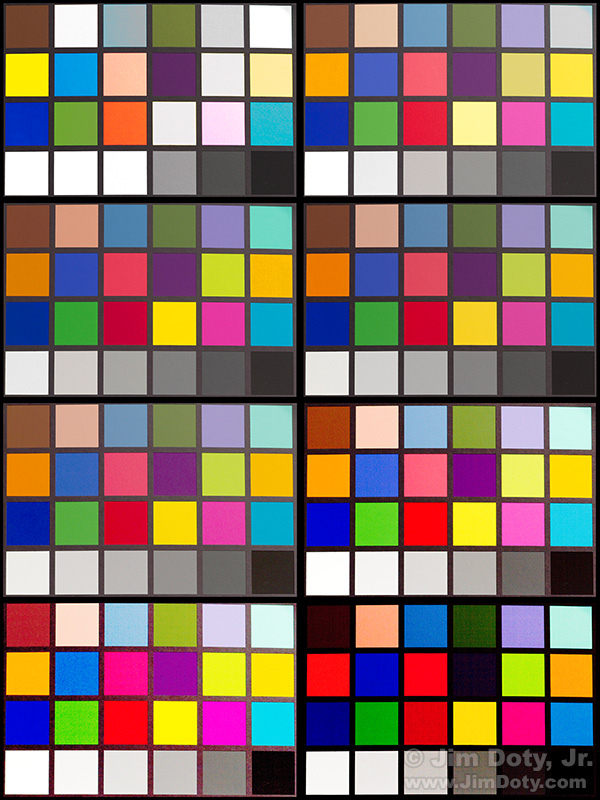
In your computer, correct the over and underexposed RAW camera files (I recommend using Adobe Camera Raw – ACR) to come as close to the right exposure as possible. Correct the exposure of your JPEG files with ACR or your favorite image editing software. The photo at the top of this article will give you an idea what you should end up with. It shows 8 different exposures with a Canon 7D camera body. The RAW files were exposure corrected with Adobe Camera Raw (ACR). I took a lot more photos than the eight shown above, but they will give you an idea what your exposure corrected files should look like.
Compare the colors of your files, color by color. As soon as you see a color shift in any of the color patches, you will know that is the limit to your camera’s color exposure latitude to get the best colors.
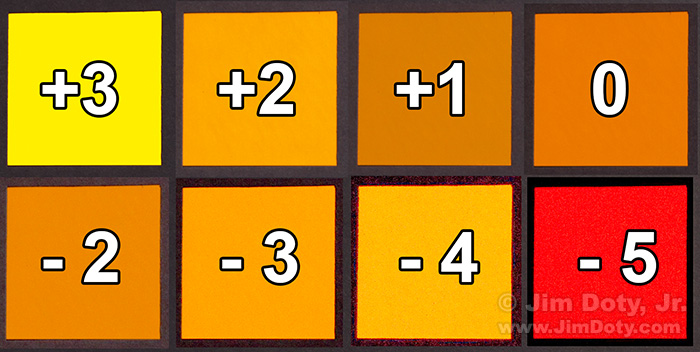
As an example, here is a side by side comparison of the “Orange” color patch (row 2, first color patch of the ColorChecker), showing the amount of variation in one stop increments from the ideal exposure. The “0” (zero) patch is the best exposure. All of these color patches have a shift in color which gets more dramatic is we get farther away from the ideal exposure.
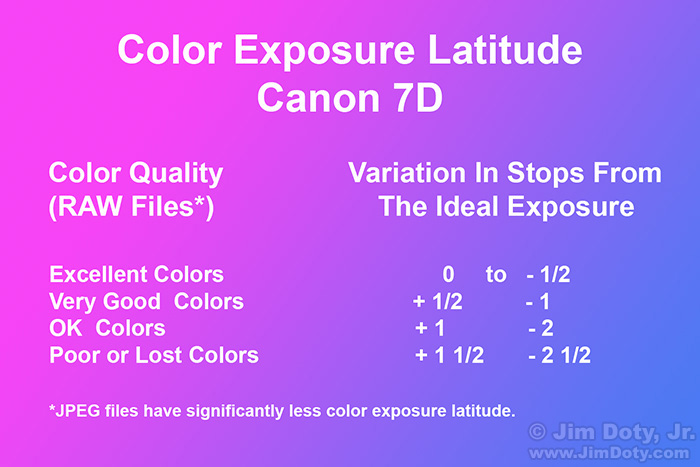
Without showing you dozens of color patches in different colors and with different exposures, this graphic will show what I’ve concluded. Your mileage may vary. Photographers can have very different standards when it comes to color from incredibly picky to unbelievably sloppy.
With JPEG files I get about half as much exposure latitude as with RAW files. Colors are starting to shift in unacceptable ways at 1/2 stop over and 1 stop under. Yet another reason to work with RAW files. If you are going to miss with a JPEG exposure, it is best you err on the underexposure side.
The bottom line is the better your exposures, the better your colors will be. Even though I shoot RAW files (the camera is set to capture both RAW and JPEG files), my goal is to be within 1/2 stop of the ideal exposure. It doesn’t always happen, but that’s my goal.
All of this applies to the Canon 7D. Every camera is a little different so the only way to know how your camera reacts to color and exposure is to do your own color latitude exposure test.
The need for color accuracy is relative of course. If you capture a rare photo of Elvis, who cares if the colors are off. And if your son or daughter hits the game winning home run, capturing the moment is more important than getting the best possible color. If you get the only photo of a major, unexpected news event, the news magazines won’t care if the colors are off.
Don’t be alarmed if the colors in your best photo don’t exactly match the colors on the color chart with your best exposure. There isn’t a digital camera on the planet that can accurately reproduce every color. (And when film was king, there wasn’t a film on the planet that could accurately reproduce every color either.)Â The good news is you can tweak good colors using ACR (see the link below) and Photoshop. The bad news is you can’t put colors back that have been lost due to a bad exposure.
Links
An introduction (with links at the bottom of the page) to the basics of exposure.
To learn how to get the ideal exposure in real world photography, read Digital Photography Exposure for Dummies. It has a 5 star rating at Amazon.com and it has one of the most comprehensive discussions of exposure of any book currently on the market. Learn more about the book here and order it at a discount at Amazon.com.
Order X-Rite’s Gretag-Macbeth ColorChecker in the Goodies Section (page 2) of my Photography Store which is powered by Amazon’s excellent prices, service, and guarantee.
The more adept you become at using ACR, the better your images will be. Read Mastering Photoshop & Lightroom: Adobe Camera Raw (ACR)


