

The lab you choose and the kind of file you send to your lab can make a big difference in the quality of print you get back. How do you pick a good online photo lab? How do you get the best results from your lab? What color space should you use for your digital files and how do you convert your files to the right color space? How big a print can you make from your digital files?
It’s the time of year that people think about making prints for family and friends, and more and more people send their files off to an online digital photo lab to have those prints made. So which are the best labs, and what can you do to get the best results? That’s what this article is all about. This article is revised and significantly enlarged from past versions of this article.
It’s now been several years since Pop Photo rated the above labs, and I revise this article every year as I test new labs. When I am testing, I will pick two labs, one I know and one that is new to me, and send identical files to both labs and have prints made. I order comparison prints as large as 20 x 30 inches to test the labs ability to make big prints from my files. Testing a new lab against one of my reference labs can be an expensive process, but I care about the quality of my prints and I choose my labs with care.
It is hard to beat Mpix as an all purpose lab that makes high quality prints of all sizes on a variety of photographic papers, plus a wide variety of specialty items with your photos on mouse pads, mugs, clothes, calendars and a host of other items.
I use EZPrints as my lab of choice for making panoramas.
For gorgeous prints on Fuji Crystal Archive and Fuji Pearl (metallic) paper, I use West Coast Imaging. This lab is pricey, but the image quality is superb. I also use Aspen Creek Photo which is part of West Coast Imaging, they use the same Fuji paper, the prices are less than at West Coast Imaging, and you download their ROES software to send in your orders.
For maximum color accuracy, convert the files to the sRGB color space before sending them to the lab, and turn auto enhance (or color correct) off at the online photo lab. Stick with the 300 pixels per inch guidelines. There is more about color space, auto enhance, and resizing files later on in this article. First, let’s look at some online labs.
PICKING THE BEST LABS
In May 2006, Popular Photography magazine ran a nice article comparing online photo labs. The results are summarized in the above graphic. The article didn’t cover all of the online photo labs, but it did cover several of the most popular labs.
It would be nice to see a more recent comparison from a source I trust. Web sites improve their interface to make it easier (or worse) for clients, prices change, and service can get better or worse. If Pop Photo ran their comparison today, the results might be different.
I have found several online reviews and comparisons which you can read at these sites:
Photo Print Reviews and also here
The problem with online reviews is that they are no better than the skills and experience of the reviewer(s), and that is sometimes in question. I trust Popular Photography. They know what they are doing.
MPIX
I recommend Mpix because I use them regularly, the quality is excellent, the prices are good, and the turn around time is remarkable.
I needed a print delivered quickly so I chose overnight FedEx shipping. I sent the order in the morning, it was shipped out that afternoon and delivered the next day.
I use a color calibrated monitor to work on my photos. When I print at home I use a professional grade Epson 2200 printer with archival inks and archival paper. Lots of professional photographers print at home with an Epson 2200 or similar Epson model. I get excellent, consistent results when I print at home. A print from Mpix (provided color enhancement is turned OFF), looks just like a print that I make at home.
With an excellent printer at home, why send photos to an online lab? Convenience and print size. If I want just a few prints, it is easier and faster to print them at home. But if I need a lot of prints, I would rather send an order to an online printer. Why spend hours printing at home when I can be out shooting or doing something else I like to do? My Epson printer has a maximum 12×18 inch size limit. If I need a bigger print, I need to go to an online lab.
A few years ago, I spent 10 hours printing one large order for one client. At the end of the day, I decided there had to be a better way. I tested Mpix and liked their work. From then on, I have been sending large orders to Mpix. It is much faster to do large orders online, the cost is just a little higher than doing it myself, and the turn around time is fast. The added cost of shipping is small when averaged out over a large number of prints.
How quick is the turn around time? If I send an order first thing in the morning, sometimes it is shipped back to me later the same afternoon. Other times, especially with a big order, it ships the next day. The majority of my orders are shipped within 24-36 hours. Once shipped, the delivery time depends on which of the delivery options you choose.
An 8×10 print is $2.09 or$2.59 depending on the paper you choose.
Print prices are here.
SHUTTERFLY
I recommend Shutterfly for two reasons. Tim Grey loves Shutterfly. With Tim’s permission, I have reproduced several of his Q&As about using Shutterfly in an article here. I have a very high degree of respect for Tim Grey’s advice. I also have family and friends who use Shutterfly and they are very pleased with the quality and service.
One plus to Shutterfly’s prints is the use of Fuji Crystal Archive Paper, one of the very best. Some photo papers excel at color quality and some excel at archival life-span. Fuji Crystal Archive excels at both. Prints costs more, but lots of photographers think it is well worth the extra cost.
An 8×10 print is $3.99.
Print prices are here.
EZPRINTS
I discovered EZPrints while trying to find an online printer that can handle my 8×43 inch panoramic prints. Most online photo labs don’t do panoramas, or you are forced to pay for the price of a 30×40 inch print with lots of wasted white spacing above and below the actual photo.
EZPrints will do panos in heights of 6 and 8 inches with a maximum width of 53 inches. They will do panos with heights of 10, 12, 20, and 30 inches with a maximum width of 156 inches. Pano prices are here.
EZPrints also does all of the standard print sizes.
An 8×10 print is $1.99 to $2.94, depending on the photo paper you choose.
You can check out prices here.
West Coast Imaging and Aspen Creek Photo
These two labs are part of the same company at the same location in California. They are one of the best discoveries I have made. They provide more paper options than most labs and they cater to a professional clientele. That should not discourage you if you aren’t a professional photographer. Amateur, advanced photographer, or professional, give them a try.
What I like most about these two labs is the superb print quality and the variety of paper choices, including Fuji Crystal Archive and Fuji Pearl. Fuji papers have a longer display life than Kodak papers. You pay more to get the longer archival print life, but if you want your prints to last as long as possible, Fuji prints live much longer than Kodak prints under identical display conditions.
You can get Fuji Crystal Archive paper in matte, glossy, and super gloss finishes. You can also get Fuji Lustre which has a semi-gloss look and a slightly pebbled surface (like Epson Premium Luster paper) and Fuji Pearl which has a pearlescent/semi-metallic finish. If you like the “metallic” look for some prints (and I do), then you will love Fuji Pearl.
And Fuji Super Gloss really does have to be seen to be believed!
They also print on actual metal (which is different than a “metallic” look on photo paper).
Needless to say, when I am turning one of my favorite photos into a big enlargement and want the ultimate in image quality, I go to Aspen Creek Photo or West Coast Imaging.
So which one should you choose?
If you are a professional photographer and you need exhibition prints, the place to go is West Coast Imaging. They will work with you on a personal basis to create superb prints. It will cost you, but if you are showing a professional exhibit, you know the money will be well worth it.
If you are using a lab like Mpix or Shutterfly and you are already turning out files that look good in print sizes up to 11×14 and 12 x 18 inches, it may be time to try Aspen Creek Photo and see what you think. Download the ROES software, send them one of your best image files, and order a BIG print (like 16 x 24 inches) in two or three different Fuji papers. I would suggest you try Fuji Crystal Archive Glossy, Fuji Pearl, and Fuji Super Gloss. You just might be blown away by the print you get back. Aspen Creek Photos has regular sales. Once you order, sign up to get sales notices by email. You can save up to 40% off.
If you want really big prints (16×24 and 20×30 inches), the files you send to either of these labs should be around 3600 x 5400 pixels in size in the sRGB color space (see below). If your files are too small, you will be disappointed in the results.
METALLIC PRINTS
If you have a print with bold colors, be sure and check out the metallic surface prints at any of the above labs. They can do wonders with some images. Do a simple test. Choose the same photo file and order a print with a standard surface (try glossy), then order the same photo with a metallic surface. My guess is you will love the metallic look for some of your boldest photos. Most labs call their metallic papers “metallic”. At Aspen Creek Photo and West Coast Imaging, the metallic paper is “Fuji Pearl”.
METAL PRINTS
These are expensive, and they look great, but to my eye they don’t look significantly better than metallic prints on paper. But that’s my personal opinion and they are unique. They are printed on sheets of aluminum. Instead of framing metal prints, you get them with float blocks on the back so they are ready to hang. They “float” out from the wall. Get small one first to see if you like them.
LUSTRE COATING
There is a difference between “lustre” paper and getting an extra “lustre” coating. I like lustre paper. I’m not so hot on lustre coatings.
When I print at home, one of my favorite photographic papers is Epson Premium Lustre. Most of the time, I prefer it to glossy paper. But lustre paper is different than ordering an online print and paying to have a lustre coating put on a glossy or matte print. Personally, I don’t choose the “lustre coating” option when I order online from labs like Mpix. I don’t see the benefit for a print that will be matted and framed under glass. Even when I’m not matting a print, I don’t order the lustre coating.
Your preferences may vary. It might make a difference to you, based on whether or not the print is framed under glass. The best test is to order the same print twice (8×10 size), one with luster coating and one without, and see what you think. Look at the prints, and then put them both under a piece of glass and compare them again to see what you thing. It will cost you about $5 to do the comparison, but then you will know.
PRINT SIZE FOR COMPARING PRINT SURFACES
I highly recommend choosing an 8×10 print size when you are doing comparison testing of different print surfaces (glossy, matte, metallic, lustre) at any of the above labs. An 8×10 will tell you everything you need to know about the surface of the print. It will only cost about $5.00 – $8.00 to compare a couple of 8x10s with different surfaces. 5x7s are a bit small for critical comparisons, and there is no point paying more money to do comparison test prints at sizes larger than an 8×10 when comparing print services at your typical photo lab. If you want to know how good your photos will look printed large on Fuji papers, follow the recommendations above under West Coast Imaging and Aspen Creek Photo.
AUTO ENHANCE
Mpix, Shutterfly, EZPrints, Ofoto and a number of other labs offer an “auto enhance” option (also called “enhance”, “color correction”, “VividPics”, or some other name). If you work on your own photos on your own computer and if you have a color managed workflow, I would recommend you turn auto enhance off. Why go to the trouble of working on the color in your digital images at home, and then let some automated computer program mess with the color at the lab?
I sent test photos to Mpix and had them print the same identical files with auto enhance off, and then print them again with auto enhance turned on. In every case, I preferred the photos with auto enhance turned off.
This was one of the test photos.
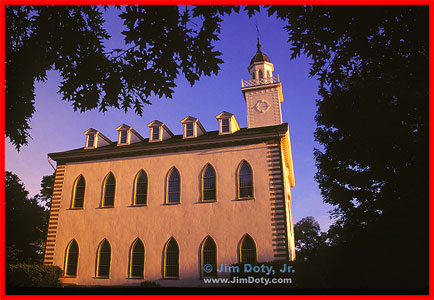
What attracted me to this scene was the rich, warm, early morning light that turned the white walls of the building yellow and gold. With auto enhance turned off, the print looked right, just like the building when I took the photo. With auto enhance turned on, the warm light on the building was toned toned down to look more “normal” or white (more “neutral”) but a lot less like the scene actually looked.
You will notice that the preferred choice in the Smugmug article linked above is to have auto enhance turned off. The same advice is given in Tim Grey’s Q&As in the article linked above.
So I do my own color correction on my own computer and turn color correction (auto enhance, enhance, Vivid Pics, etc.) off at the online lab. If you download your photos from your digital camera and don’t do your own color correction at home, you might prefer having auto enhance turned on. I would suggest you do a test. Pick one of your favorite photos (one that has a wide range of challenging colors), order a print with auto enhance turned off, and order another print with auto enhance turned on. See what you think.
sRGB COLOR SPACE
When I work and print at home, I use the “Adobe RGB (1998)” color space due to its wider color gamut (range of colors). But Adobe RGB isn’t the best color space for sending a photo to most online labs. If I am sending a photo to an online photo lab, I convert the file to the sRGB color space before I send it to the lab.
I always keep my master files in the Adobe RGB color space. My master files have all layers intact and are saved as PSD files.
Before I send a file to an online lab, I “flatten” the image so it has only one layer, I “convert” the color profile from Adobe RGB to sRGB, and then save the file as a JPEG file (“.jpg” extension). Then I save the file with a slightly altered name so it doesn’t overwrite my master file, and I send it off to the lab.
To do the color space conversion in Photoshop, choose Edit > Convert to Profile from the menu. Choose sRGB (it is called sRGB IEC61966-2.1). For Intent choose Relative Colorimetric. Click OK and save the image.
If you are using a recent version of Photoshop Elements, choose Image > Convert Color Profile > Convert to sRGB Profile. Other kinds of software have their own menu structure for converting the color profile. Be sure you CONVERT the color profile, don’t choose the ASSIGN color profile option, if your software gives you that option. Assign profile will shift the colors in your image.
MAXIMUM PRINT SIZE
Every digital file has a maximum usable print size. A digital file can look great printed at 8×10 inches, at little soft at 11×16 inches, and downright mushy at 16×20. Never assume your digital photos will look good at a large size until your have tested it with your favorite online lab.
I did a test with one of my favorite photos to see if the file would hold up to being printed at 16×24 inches. While I was at it, I wanted to see how it would look as a metallic print. The file held up well, the print looked great, and the metallic surface was wonderful. Now I know I can print that file at any size up to 16×24 and it will look great.
Before you order several copies of a particular photo in a size larger than 8×10, do a test and have just one print made first. If it looks good, then order the rest. It will cost you a little extra in shipping this way, but it is better than the unhappy surprise of ordering 10 copies at an 11×16 size, only to find out they don’t look good.
If a large print doesn’t look good, trying resizing your digital file with Photoshop, Photoshop Elements, Genuine Fractals or some other software, and then do another test print. Ideally, you want 300 pixels for every inch of print width. A print 8 x 10 inches in size needs to have a digital file 2400 x 3000 pixels in size. A 20×30 inch print would “theoretically” need a file 6000 x 9000 pixels in size but most labs won’t accept a file that big. In practice, a good lab can make a good print from a 3600 x 5400 pixel file in sizes up to 20×30 inches, provided it is a good quality file to begin with. You can usually increase your digital file by up to double the size of the original file (the original file being the size when it comes out of the camera). In a pinch, you can make a good print with 240 pixels per inch of print size.
YOUR LOCAL PHOTO LAB
What about your local photo lab? In my own experience, and I do a lot of comparisons, some local labs are wonderful, some labs are less than wonderful, and some labs are . . . . well . . . . . . not so good.
How do you know? You can always do some testing. Take the same photo to 3 or 4 different labs and have each of the make an 8×10 print. Better yet, pick 3 or 4 very different kinds of photos and take them to 3 or 4 labs to have prints made. Some labs do well with some types of photos and not with others. The best labs do a great job with all kinds of photos: portraits, landscapes, bold colors, pastel colors, high contrast, low contrast, you name it.
Too many labs in your area to test them all? Find our where the pros go. Call several local professional photographers and ask which lab they use. That will narrow down your search. By the way, some pros won’t tell you which lab they use. Does that seem suspicious to you? Why won’t they tell you? I wouldn’t choose a professional photographer that wouldn’t tell me who does their photo processing.
The quality of a local lab’s work my be related to price, then again, it might not. Sometimes a really excellent, experienced tech is working at the one-hour or three-hour mall lab and does wonderful work for a great price.
I believe in testing and comparisons. It’s your money. You might as well do some testing and get the best results!
This article is one in a series of articles on the best photo gear, books, software, and photo information.