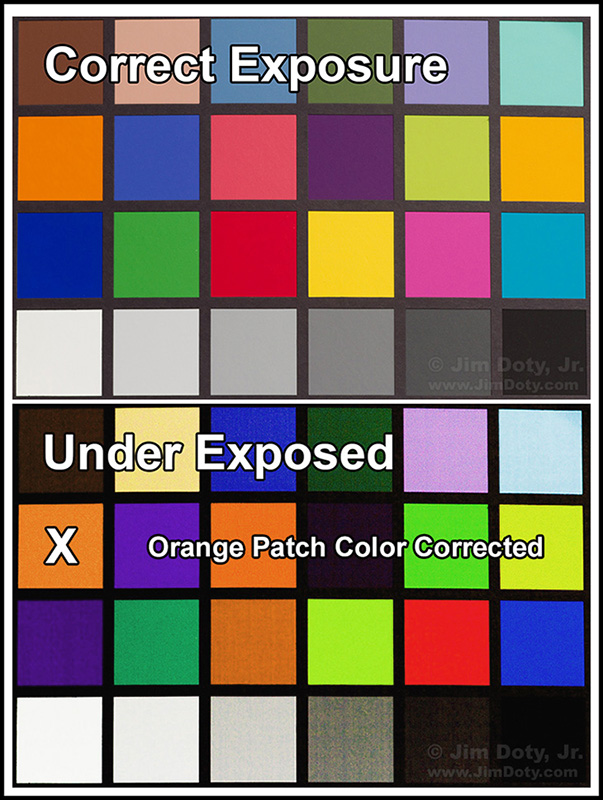
This has to be one of the best kept photographic secrets: The more accurate your exposures are, the better your colors will be. Why? If your exposures are off, the colors in your photograph will shift in different directions. You can correct the exposure in post processing, but you can’t correct the color shifts. Since the colors shift in different directions, if you try to correct one color (as you will see below), the other colors will get even worse.
The bottom line is this: the best, most accurate colors come from the best, most accurate exposures. This is why auto exposure is not the key to great colors, or great exposures. In auto exposure mode your camera is designed to give you average exposures, not the best exposures.
This means the better your metering skills, the better your colors will be. This is why professional photographers are so obsessive about accurate exposures, and why they get better colors. Contrary to popular opinion, “Hue/Saturation” in your favorite software is not the key to getting great colors. It will give you more intense colors, but not better and more accurate colors. What good are more intense colors if they are the wrong colors?
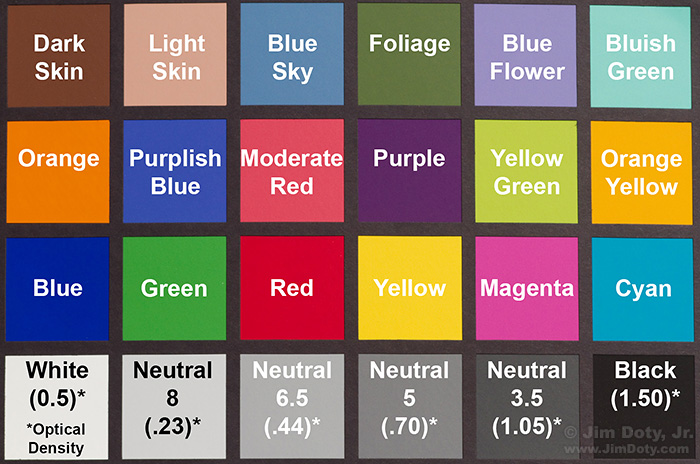
At the top of this article is a photo of a Gretag-Macbeth ColorChecker with all of the color patches labeled. I use a ColorChecker for several reasons. In this case I was checking the color response and color exposure latitude of a newly acquired digital camera body.
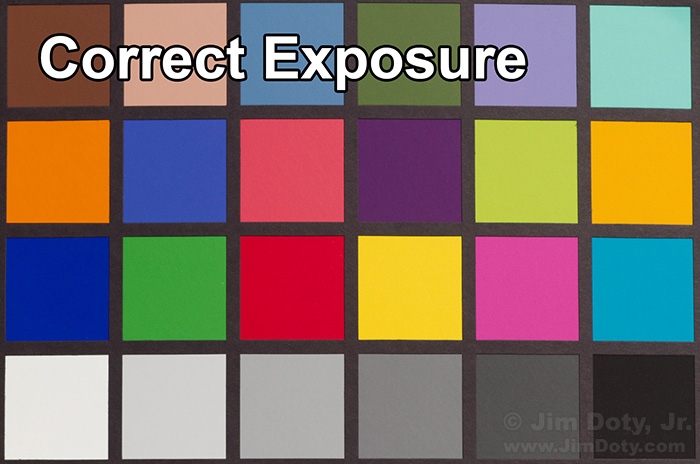 In mid-day sunlight, I took a series of exposures beginning with the ideal, optimum exposure (as determined by both an incident light meter and an 18% gray card), and then I did a series of over and underexposures.The photo immediately above is the optimum, correct exposure for the ColorChecker.
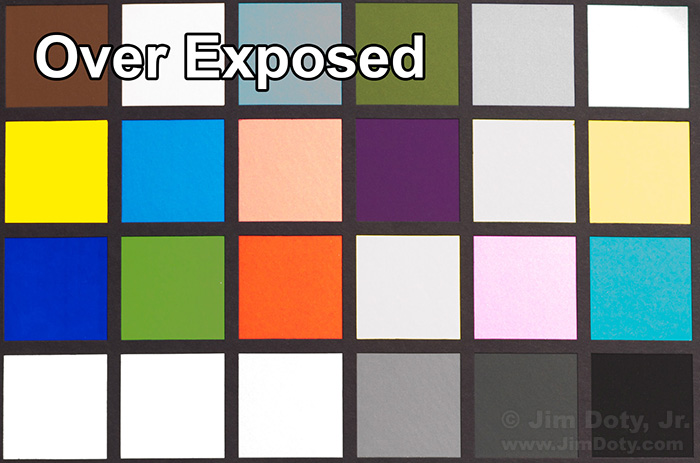
This photo was over exposed in the camera and then the exposure was corrected in the computer using Adobe Camera Raw (ACR) which comes with Adobe Photoshop, Adobe Lightroom, and Adobe Photoshop Elements. Some of the colors are totally washed out and can’t be recovered. Other colors have shifted significantly. No amount of Photoshop work will bring these colors back.
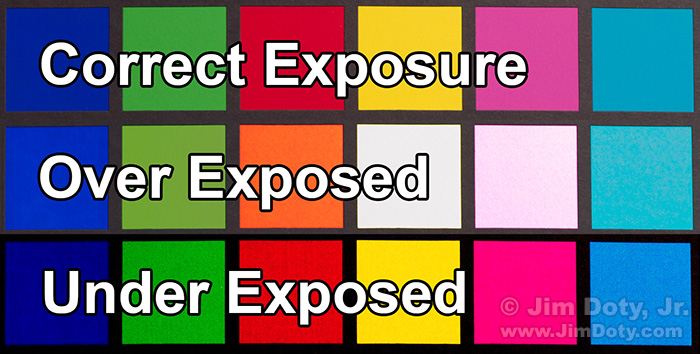
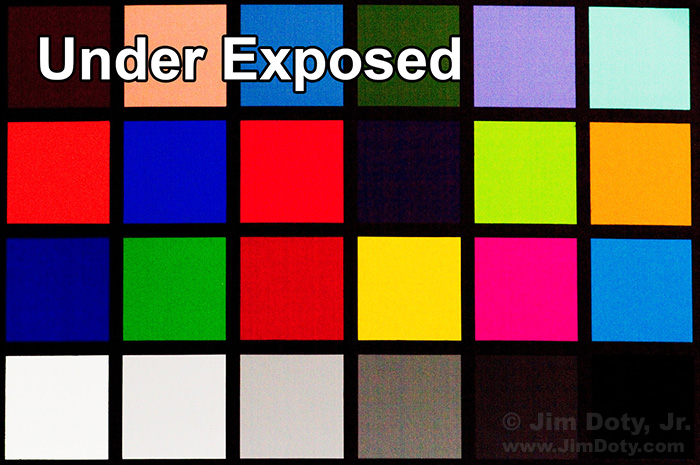 This photo was deliberately under exposed in the camera and then the exposure was corrected using ACR. Some of the colors have gone almost black and others have shifted dramatically. No amount of work in Photoshop is going to save all these colors.
It will be easier to see the shift in the individual colors if we compare the colors in the chart row by row, starting with the top row.
Top Row of Colors:
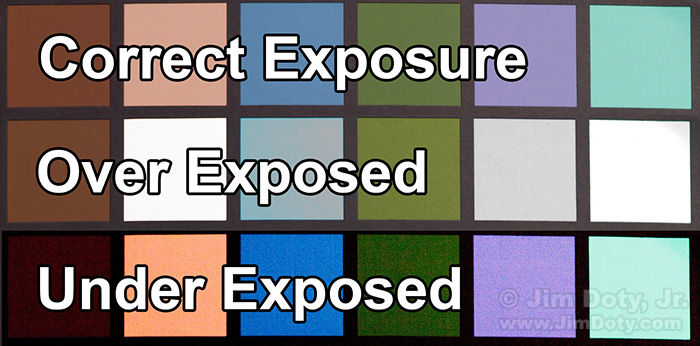 “Light Skin”, “Blue Flower”, and “Bluish Green” have lost their color in the overexposed photo. The delicacy of the colors is lost in the under exposed photo. If you were photographing a flower with petal gradations from bold to pastel, you would lose the wonderful and subtle range of colors in the flower petals. The “Dark Skin” is almost totally lost in the underexposed photo. The less accurate your exposure is (over or under), the more your skin tones will be off
Second Row of Colors:
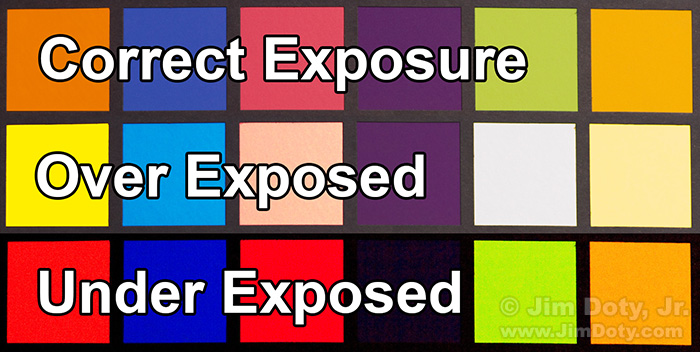 “Orange”, has shifted to yellow in the over exposed photo and to red in the underexposed photo. Other colors have shifted. “Yellow Green” has lost all color in the over exposed photo, and purple is pretty much lost in inky darkness in the under exposed photo.
Third Row of Colors:
These are the primary colors. In the overexposed photo “Red” has shifted toward orange, “Green” has lost its purity, “Yellow” has lost all color, “Magenta” has shifted to pink, and the “Cyan” color is off. In the underexposed photo the colors have fared better, but they have lost their purity.
What does this mean in real world photography? The better your exposures are, the better your colors will be. If the metering is off, the colors will be off, and the worse the exposure gets, the worse the colors will get.
I picked obvious over and under exposed examples for the above photos so the color shifts would be obvious. The farther you get from the ideal exposure, the greater the color shifts. If you over or under expose by too much, you are going to lose some colors and have other colors shift dramatically.
Let’s look at just one color from the Gretag-Macbeth ColorChecker.
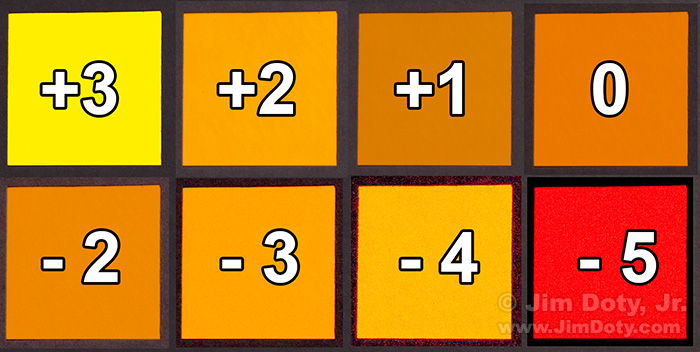
After photographing the Color Checker with 8 different exposures, and then exposure correcting the images with ACR, I pulled out the orange color patch (the first color patch in the second row) from all eight photos and put them together here. You can see how much the color of the orange patch has shifted. “0” is the ideal exposure and the best color. The farther away we get from the ideal exposure, the more the color shifts.
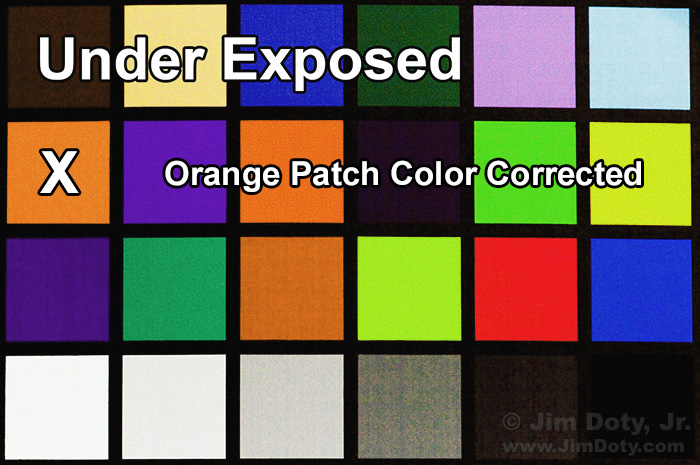
What if we try to color correct the orange patch which has shifted so far to the red? I did just that. I took the underexposed color checker and corrected the orange patch so it is a better match with the orange patch in the correctly exposed color checker. As you can see, the other colors get even worse. As mentioned before, when colors shift due to an incorrect exposure, they shift in different directions. If you try to correct one color, the other colors get worse.
Take a look row by row and see what happened to the other colors. In the third row, blue has become purple, red has become orange, and yellow has become lime green. The color shifts are just as dramatic in rows one and two. You could go through one patch at a time, select just that patch, and color correct each patch individually, but some color patches are too far gone to fix and it would take some time to fix the others. With a complex real life scene it would be a nightmare to go through and change every color in the scene, one at a time. The obvious quick and simple solution to getting all the colors as close to right as possible is to nail the exposure in the first place.
How much is too much under or over exposure?
That varies with every camera model. It also varies with whether you shoot RAW or JPEG files (RAW files give you more color exposure latitude). It also has a lot to do with your own individual preference for how accurate you want your colors to be. And you have more latitude on the under exposure side than the over exposure side.
The only way to know for sure is to test the “color exposure latitude” of your own camera. The color exposure latitude is how far over and under the ideal exposure you can be and still get great colors. This article will show you how: How To Test Your Camera’s Color Exposure Latitude.
As a general rule, if you are within 1/2 stop of the ideal exposure with a quality digital camera, you will get great colors. But you won’t know until you test your camera.
This is good news. You don’t have to get the perfect exposure with every image. If you are within a half stop pf ideal, either way, your will get really great colors.
FYI: There isn’t a digital camera on the planet that will give you the exposure accuracy you need in auto exposure mode. If you want the best colors your camera can give you, you are going to have to take over your camera’s exposure controls.
Originally posted February 21, 2013. Revised and re-posted January 18, 2022.
Links
How To Test Your Camera’s Color Exposure Latitude
An introduction (with links at the bottom of the page) to the basics of exposure.
To learn how to get the ideal exposures in real world photography, read Digital Photography Exposure for Dummies, one of the highest rated photography books at Amazon.com. It has one of the most comprehensive exposure books currently on the market and covers basic, intermediate and advanced exposure techniques. Unlike with most other exposure books, you won’t have to buy two or three sequels to learn what you need to know as your skills become more advanced. Learn more about the book here and order it at Amazon.com.
Order X-Rite’s Gretag-Macbeth ColorChecker in the Misc Goodies section of my Photography Store which is powered by Amazon’s excellent prices, service, and guarantee.
The more adept you become at using ACR, the better your images will be. Read Mastering Photoshop & Lightroom: Adobe Camera Raw (ACR)

